Recommended resources
The freely available resources this lesson will direct you to.
Welcome to the first lesson in our module on linked structures. So far in your journey, you've worked with powerful built-in data structures like arrays, maps, and sets. Now, we'll shift gears and start building data structures from the ground up. This is a crucial skill for tackling a wide range of algorithmic problems, as it gives you a deeper understanding of how data can be organized and manipulated.
Today, we'll focus on one of the most fundamental custom data structures: the singly linked list. Unlike an array, which stores its elements in a contiguous block of memory, a linked list is a collection of individual objects called "nodes" that can be scattered throughout memory. Each node contains a piece of data and a reference—or "pointer"—to the next node in the sequence.
By the end of this lesson, you will be able to implement the essential operations for a singly linked list in TypeScript: traversing its elements, inserting new nodes, and deleting existing ones. This will form the bedrock for more complex linked list problems you'll encounter later.
What is a Singly Linked List?
At its core, a linked list is a chain of nodes. To understand the whole structure, we first need to understand its basic component: the node.
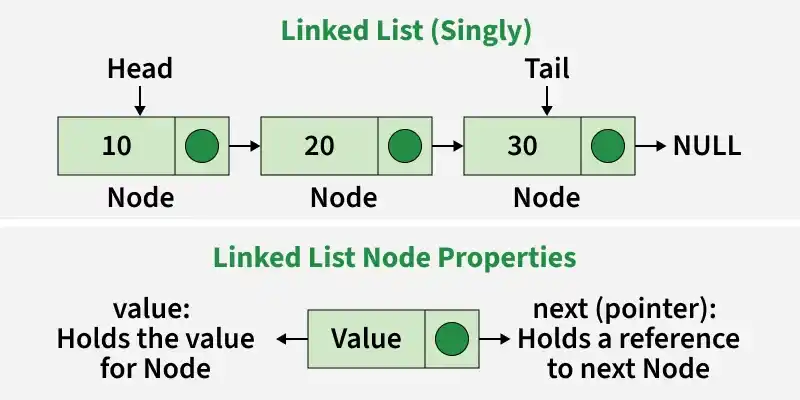
As you can see, each node has two parts:
- Data (or
value): The actual information we want to store (e.g., a number, a string, an object). - Next: A pointer or reference to the very next node in the list. For the last node in the chain, this pointer is
null.
The entry point to the entire list is a single reference called the head, which points to the first node. If the head is null, the list is empty.
To get a feel for this structure, watch the beginning of the following video, which provides a clear conceptual overview.
Linked List Data Structure | JavaScript
Watch this segment from "Linked List Data Structure | JavaScript" by Traversy Media for a concise explanation of the core idea.
Focus on the conceptual explanation from the introduction. The visual diagram clearly illustrates how nodes containing data and next pointers form a chain.
The Node and List Classes in TypeScript
With your background in TypeScript, defining the structure is straightforward. We'll create two classes: one for the Node and one for the SinglyLinkedList itself, which will manage the nodes.
A Node class holds the data and the next reference. Using generics (<T>) allows our linked list to store any type of data, which is a best practice.
class Node<T> {
  public data: T;
  public next: Node<T> | null = null;

  constructor(data: T) {
    this.data = data;
  }
}
The SinglyLinkedList class is a simple container that holds a reference to the head of the list. All operations on the list will be methods of this class.
class SinglyLinkedList<T> {
  public head: Node<T> | null = null;

  // We will implement methods here...
}
For a detailed walkthrough of creating these base classes, you can refer to the following guide.
How to Code Linked Lists with TypeScript: A Handbook for Developers
This article from freeCodeCamp provides a complete implementation guide. We'll start with the basic structure.
Read the sections on creating a generic Node and implementing the list class. This will solidify the TypeScript class structure we'll be building upon. (Note: The article uses N as the class name for Node; we'll stick to Node for clarity).
Traversing the List
Most operations on a linked list—like finding a value, adding to the end, or deleting from the middle—require you to walk through the list from the head. This process is called traversal.
The key pattern for traversal uses a temporary variable, often called a "runner" or current, which acts as a moving pointer.
- Initialize the runner to the
headof the list:let current = this.head; - Create a loop that continues as long as
currentis notnull. - Inside the loop, "visit" the node (e.g., read its data).
- Advance the runner to the next node:
current = current.next;
This pattern is fundamental. Let's see it in action in the context of converting a list to an array, which is a common utility function.
Singly Linked Lists (Data Structures & Algorithms in Javascript Typescript #1)
The video "Singly Linked Lists" by Justin Kim provides an excellent demonstration of both recursive and iterative traversal. We'll focus on the iterative "runner" approach, as it's often more intuitive and avoids potential stack overflow with very long lists.
Watch the segment explaining the iterative solution for the toArray function. Pay close attention to how the runner variable is initialized, used to access the node's value, and then advanced in the while loop.
Here is a simple traverse method that just prints each node's data to the console, directly implementing this pattern:
// Inside the SinglyLinkedList class
traverse(): void {
  let current = this.head;
  while (current) {
    console.log(current.data);
    current = current.next;
  }
}
This runs in time, as it must visit every node once.
Implementing Insertion
Now let's add nodes to our list. We'll cover three scenarios: inserting at the beginning, at the end, and at a specific position.
1. Insertion at the Head (prepend)
This is the most efficient insertion operation.
- Create a new node with the given data.
- Set the new node's
nextpointer to the currenthead. - Update the list's
headto point to the new node.
This operation takes constant time, , because it doesn't require any traversal.
2. Insertion at the Tail (append)
To add a node to the end, you must first find the last node.
- Handle the edge case: If the list is empty (
this.head === null), the new node becomes the head. - Otherwise, traverse the list using a
currentpointer until you reach the last node (current.next === null). - Set the last node's
nextpointer to the new node.
This operation's time complexity is because of the traversal.
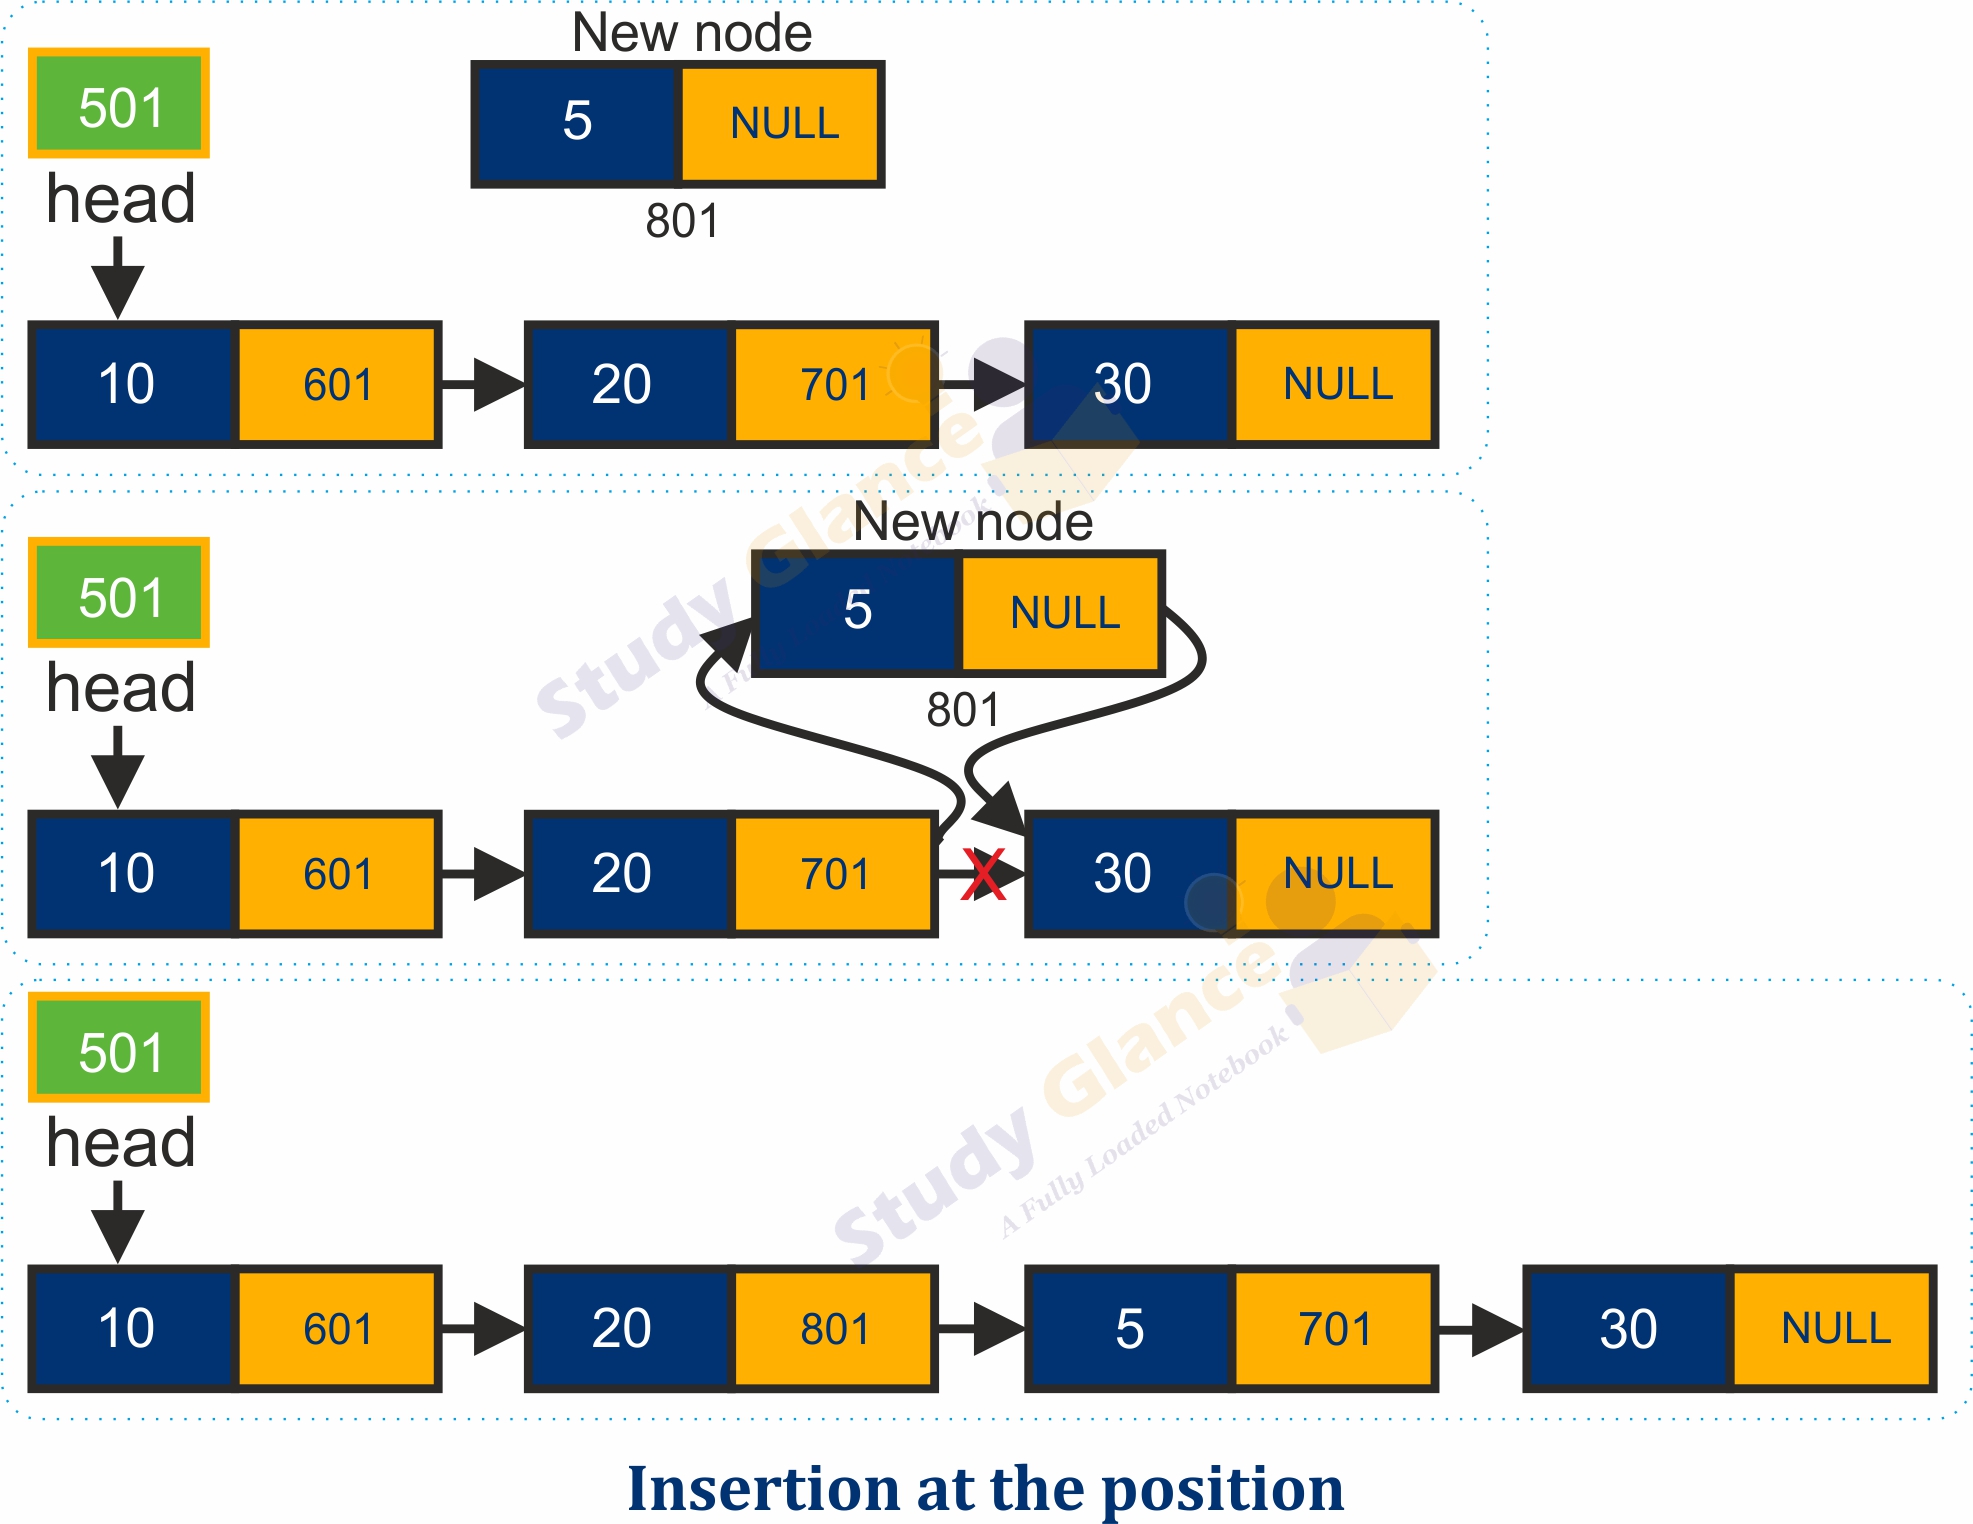
3. Insertion at a Specific Position (insertAt)
This is the most general case. To insert a node at index k:
- Handle edge cases: inserting at the head (
k=0) is the same asprepend. An invalid index should be handled (e.g., negative or too large). - Traverse the list to find the node at index
k-1(the predecessor). - Create the new node.
- Set the new node's
nextpointer to the predecessor'snextnode. - Update the predecessor's
nextpointer to point to the new node.
This "pointer-shuffling" is the essence of linked list manipulation. The following image clearly illustrates the steps for inserting the value 5 at the third position (index 2).
The LINK article provides excellent code examples for all three insertion methods.
How to Code Linked Lists with TypeScript: A Handbook for Developers
Now, let's look at the TypeScript implementations for these insertion operations.
Study the code and explanations for prepending a node, appending a node, and inserting at a position. Trace the logic for each, paying special attention to the pointer assignments.
Implementing Deletion
Deletion follows a similar logic, focusing on "unlinking" a node from the chain.
1. Deletion from the Head (deleteHead)
Simply update the head to point to the second node: this.head = this.head.next;. The garbage collector in JavaScript/TypeScript will then clean up the old, unreferenced head node. This is an operation.
2. Deletion from the Tail (deleteTail)
This is surprisingly tricky in a singly linked list. To delete the last node, you must set the second-to-last node's next pointer to null. This requires traversing almost the entire list to find that predecessor. This is an operation.
3. Deletion of a Specific Node (delete)
To delete a node by its value or at a specific index, you must again find its predecessor.
- Handle the edge case: If the node to be deleted is the head, use the
deleteHeadlogic. - Otherwise, traverse the list keeping track of both the
currentnode and itspreviousnode. - When you find the node to delete, you bypass it by setting
previous.next = current.next;.
Let's return to the freeCodeCamp article for the implementation details.
How to Code Linked Lists with TypeScript: A Handbook for Developers
This guide provides clear implementations for the core deletion methods.
Read the sections on how to delete the head, delete the tail, and delete by value. For deleteTail and delete by value, notice the common pattern of needing to find the node before the one you want to modify.
Conclusion
In this lesson, you've taken a significant step from being a user of data structures to being a builder. We've deconstructed the singly linked list and implemented its core functionalities from scratch in TypeScript.
Here are the key takeaways:
- A singly linked list is a sequence of nodes, each containing
dataand anextpointer. - Traversal is the fundamental operation, typically done with a "runner" pointer that moves from the
headto the end of the list. - Insertion and deletion are exercises in careful pointer manipulation. The key is often to locate the node before the point of modification.
- Operations at the head are very fast (), while operations requiring traversal to the middle or end are linear in time ().
Mastering these basic operations is essential, as they are the building blocks for solving many classic interview problems. In our next lesson, we will explore a powerful pattern called the dummy head node, which simplifies the edge cases you saw today when dealing with the head of the list. We will also tackle one of the most common linked list interview questions: reversing a list.