Recommended resources
The freely available resources this lesson will direct you to.
Hello! Last lesson, you refactored a log scanner into functions and used ShellCheck and tracing to diagnose a quoting defect. The script now has a useful history worth preserving: its original behavior, the refactor, and future improvements should be distinguishable rather than overwritten in place.
This lesson closes the Bash foundations module by putting an infrastructure script under local Git version control. You’ll create a repository, decide what must stay out of it, record a commit, and make a small change on a separate branch. Everything stays in Ubuntu; no hosting account or AWS resources are needed. Allow about 45 minutes, including the short video segments and hands-on work.
A commit records a selected version, not everything on disk
Git distinguishes three places: your working directory, where you edit files; the staging area, where you select the versions for the next commit; and the repository, where commits are stored. git status tells you what is untracked, what has changed, and what is staged.
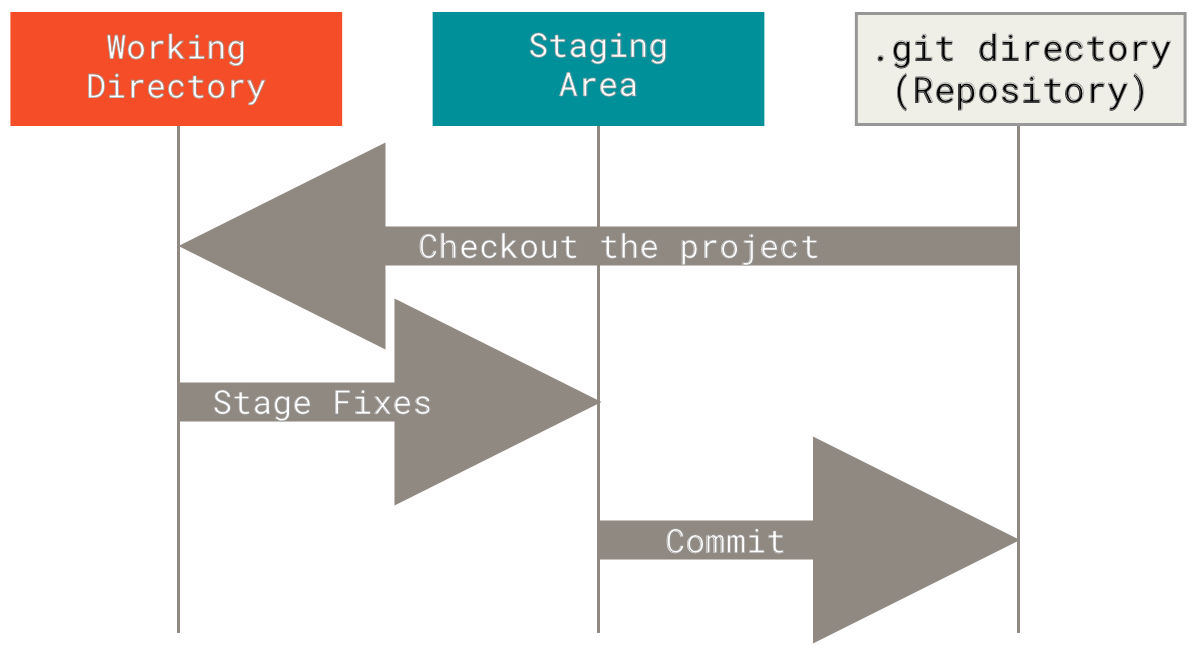
This distinction matters for scripts. If you stage a tested script and then edit it again, the new edit is not automatically part of the staged version. Inspect what you intend to commit rather than assuming Git will save whatever happens to be on screen.
Watch the selected portions of Corey Schafer’s Git Tutorial for Beginners: Command-Line Fundamentals. The demonstration uses master as its branch name; this lab will use main. Those are names, not different kinds of branch.
Git Tutorial for Beginners: Command-Line Fundamentals
Corey Schafer’s Git tutorial demonstrates repository setup and the status, staging, and commit workflow you will use below.
Watch initial setup for Git verification and commit identity. Then watch repository creation and ignoring files. Finish with staging and commits; focus on how git status changes after git add and git commit. You can skip the later remote-repository demonstration: this lab is local.
First check Git inside Ubuntu:
git --version
If Ubuntu reports that git is unavailable, install it there with sudo apt update and sudo apt install git. You will also need a commit identity. Git writes this metadata into commits; it is not a login or an authentication method. For this local-only lab, the commands below set deliberately fictional values only in this repository. Set an appropriate identity before publishing work elsewhere.
Create a fresh directory beside your earlier Bash practice directory, and copy in only the finished script. Adjust the source path if you saved it somewhere else.
mkdir -p ~/cloud-labs/git-scripts
cd ~/cloud-labs/git-scripts
cp ../bash-flow-practice/scan-logs-functions.sh .
git init -b main
git config --local user.name 'Lab Committer'
git config --local user.email 'lab@example.invalid'
git status
If your installed Git does not recognize git init -b main, use git init followed by git branch -M main instead. The repository’s .git directory holds its local history; the script remains an ordinary file you can edit and run. At this point, git status should show the script as untracked. Initializing a repository does not commit its contents.
Decide what belongs in the repository
For infrastructure work, the useful distinction is between reproducible source and local or sensitive by-products. The Bash script belongs in Git. Run logs, temporary files, local environment settings, and credential files generally do not. A .gitignore file records matching rules so Git does not offer untracked files of those kinds for normal staging.
Read the indicated passages from Pro Git, “Recording Changes to the Repository.” The first clarifies what happens if you edit after staging; the second explains ignore patterns.
Git - Recording Changes to the Repository
Read the relevant parts of the Git book to connect staging with a practical .gitignore file.
Under “Staging Modified Files,” start where the book says “Both files are staged and will go into your next commit.” Read the staging example through its explanation of why a file can have both staged and unstaged changes. Then, under “Ignoring Files,” start in the opening paragraph at the sentence about automatically generated files. Read the ignore rules through the pattern list. Focus on what *, a leading /, a trailing /, and ! mean; you need not memorize every example.
Create rules suited to this script repository:
cat > .gitignore <<'EOF'
# Generated output and editor leftovers
*.log
*.tmp
*.swp

# Local settings and credentials
.env
.env.*
!.env.example
credentials/
EOF
*.log matches log files even when they are in subdirectories; credentials/ matches directories with that name. .env and .env.* exclude common local settings files, while !.env.example permits a deliberately safe template if you create one later. An exception is not permission to put real credentials in a template. Avoid sweeping rules such as *.json if your project might need to track nonsecret JSON examples.
Use harmless dummy files to see the rules work:
printf 'sample output\n' > example.log
printf 'LOCAL_ONLY_PLACEHOLDER\n' > .env
git status --short
git check-ignore -v -- example.log .env
The short status should list .gitignore and the scanner as untracked, but not example.log or .env. git check-ignore -v identifies the rule matching each dummy file. These are test files, not credentials.
There is an important limit: .gitignore does not untrack a file already committed. If an unwanted file was previously tracked, git rm --cached -- path/to/file can stop tracking it while leaving the working copy on disk. That does not erase earlier commits. If actual credentials ever enter Git history, treat them as exposed and rotate them; adding an ignore rule is not a security repair. For now, checking before the first commit avoids that problem.
Make a deliberate first commit
Stage the two source files by name, rather than using git add . while learning what the repository contains:
git add -- .gitignore scan-logs-functions.sh
git status
git diff --cached --stat
git diff --cached --check
git commit -m "Track Bash log scanner and ignore local files"
git log --oneline -1
git status
Before committing, git status should put the two selected files under “Changes to be committed.” git diff --cached --stat summarizes what is staged, while git diff --cached --check flags common whitespace errors. If you want to inspect every staged line, use git diff --cached. After the commit, the log shows a short commit identifier and your message; status should report a clean working tree despite the ignored dummy files.
A commit is a local snapshot of staged content, with a message that explains its purpose. It is not a backup of every file in the directory, and it has not been uploaded anywhere. Specific messages make later reviews more useful: “Show an example when no logs are provided” says more than “update script.”
Isolate the next change on a branch
A branch is a movable name for a commit. HEAD indicates the branch you currently have checked out. In the figure below, HEAD points to master, while testing points to a different commit. Your repository uses main in place of the figure’s master.
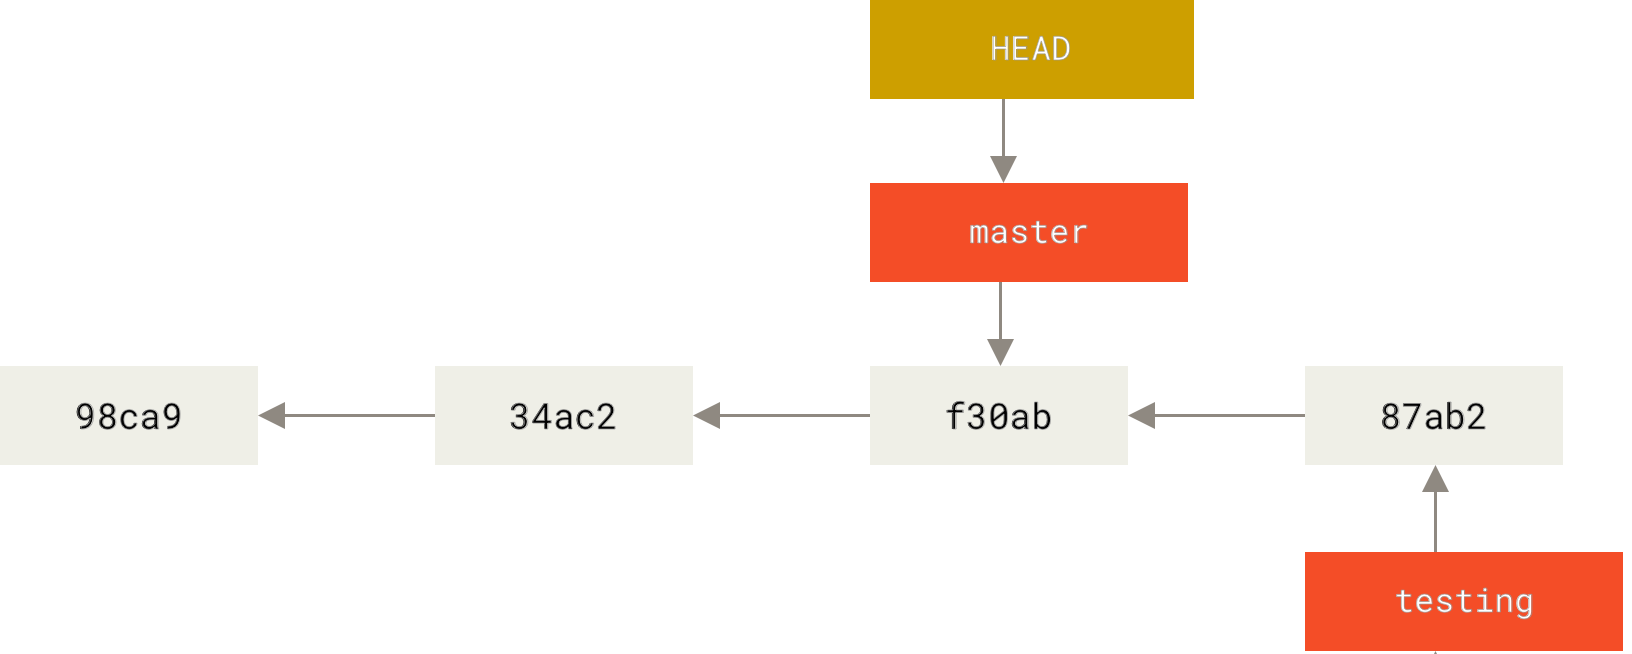
Watch the branching portions of the same Git tutorial. Concentrate on what happens to the original branch when a commit is made on the new one, and which branch is checked out before a merge.
Git Tutorial for Beginners: Command-Line Fundamentals
The branching demonstration in Corey Schafer’s Git tutorial shows how to keep an unfinished change separate and then integrate it.
Watch branch and commit for branch creation, switching, and committing without changing the original branch. Then skip to merge and cleanup for merging into the checked-out mainline branch and deleting the finished local branch. The video also uses a remote; you do not need to push anything for this lab.
Create a branch for one small improvement to the scanner’s no-argument message:
git switch -c improve-usage
git branch
nano scan-logs-functions.sh
Inside main, find the existing usage message in the block that checks whether there are zero arguments. Immediately after its printf line, add:
printf 'Example: %s app.log\n' "$0" >&2
Save the file. Check the change and its behavior:
git diff -- scan-logs-functions.sh
bash -n scan-logs-functions.sh
shellcheck scan-logs-functions.sh
bash scan-logs-functions.sh
printf 'Status: %s\n' "$?"
If ShellCheck is not installed, omit that command or install it as in the previous lesson. With no arguments, the script should now print both a usage line and an example to standard error, then return status 2. The status contract is unchanged.
Record only this improvement on the branch:
git add -- scan-logs-functions.sh
git diff --cached -- scan-logs-functions.sh
git commit -m "Show an example when no logs are provided"
git log --oneline --decorate --all -3
The log should now show improve-usage at the new commit and main at the earlier one. Your change exists in the repository, but not yet on main. This separation lets you test or review a proposed script change before treating it as part of the mainline version.
Switch back and integrate it:
git switch main
git status
git merge improve-usage
git log --oneline --decorate -3
git branch -d improve-usage
git status
Switching back to main checks out its earlier version of the script. Because nothing else was committed on main while you worked, the merge should be a fast-forward: Git moves main to the existing improvement commit without creating another commit. git branch -d then removes the no-longer-needed branch name, not the merged commit. If a real project has changes on both branches, a merge can require more work; do not overwrite conflicting changes just to make a merge succeed.
What to carry forward
You have a local history with two purposeful commits: one introducing a scanner and its ignore rules, and one improving its usage message. git status shows what Git sees, git add selects content for the next commit, and a branch gives a change its own line of work until it is ready to merge. A suitable .gitignore keeps routine output and local settings out of new commits, but it cannot protect secrets that were already committed.
This completes the Bash foundations module. Next, you’ll begin AWS foundations by examining how Regions, Availability Zones, and edge locations affect where infrastructure runs and how reliably users can reach it.