Recommended resources
The freely available resources this lesson will direct you to.
Hello! Last time, you created files in your Ubuntu workspace and used ls to find them. You also saw that a dot-prefixed file is hidden from an ordinary listing—but hidden is not protected. This lesson adds the controls that matter: who owns a file, who can read or change it, and whether it can be executed. You’ll apply those controls to script, configuration, and credential placeholders in a safe practice directory. Allow about 40–45 minutes.
Read a permission listing
Linux evaluates access using three categories: the owner, the file’s group, and others (users who are neither the owner nor in that group). Each category can have read (r), write (w), and execute (x) permission. Start with this short demonstration from Travis Media; its examples introduce the notation you will inspect in Ubuntu.
Linux File Permissions in 5 Minutes | MUST Know!
Watch “Linux File Permissions in 5 Minutes | MUST Know!” by Travis Media to see how owner, group, and other permissions appear in a long listing.
Watch access categories for the three groups of users, then permission strings for the file-type character, the three permission groups, and the owner and group names shown by ls -l.
The first character of a listing identifies the object type: - for a regular file or d for a directory. The next nine characters form three sets, always in owner, group, others order. A dash within a set means that permission is absent.
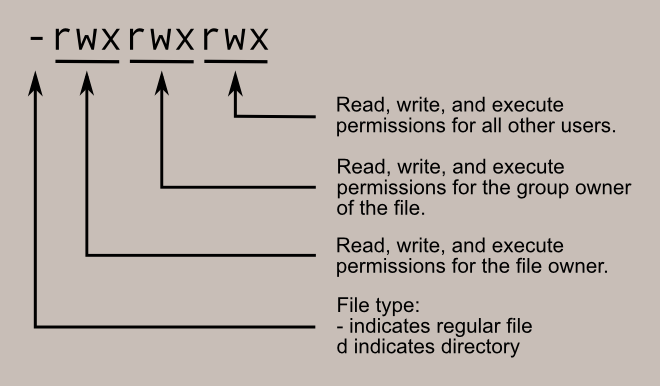
For example, -rw-r----- describes a regular file whose owner may read and write, whose group may read, and to which others have no access. The two names later in an ls -l line tell you which user and group occupy those first two categories. They are not part of the nine-character permission string.
Open Ubuntu and make a fresh sandbox. If permissions-practice already exists, choose a new name and use it consistently below; do not work inside an older directory by accident.
cd ~/cloud-labs
mkdir permissions-practice
cd permissions-practice
pwd
id
touch deploy.sh app.conf sample-key.pem
mkdir private
touch private/credentials private/config
ls -l
ls -ld private
Check that pwd ends in /cloud-labs/permissions-practice, not a path under /mnt/c. All the files you just created are empty placeholders: sample-key.pem is not a working private key, and private/credentials contains no AWS credentials. Do not put real secrets in this lab.
id shows your current user and groups. In the ls -l output, find the owner and group names beside each file. Your exact initial permissions may differ from another machine’s, so inspect rather than assume. ls -ld private displays the permissions of the directory itself; without -d, ls -l private would list its contents.
Choose permissions for the job
For a regular file, r allows reading its contents, w allows changing them, and x allows executing it. A script intended to run directly needs execute permission; a configuration file or private key generally does not. Merely adding x does not turn an empty placeholder into a useful script.
Directories make x mean something different: it permits traversing the directory, including entering it or accessing a known name inside it. Directory r permits listing names, while directory w, together with x, permits creating, deleting, or renaming entries. Read LinuxCommand.org’s explanation before changing the lab directory.
Learning the shell - Lesson 9: Permissions
Read the “Directory Permissions” subsection of LinuxCommand.org’s lesson to distinguish access to a directory from access to files inside it.
Under “Directory Permissions,” begin with the paragraph explaining that directory permission letters have different meanings. Read directory access through the 755 and 700 examples. Focus on why a private directory needs x for its owner but no permissions for others.
An important consequence is that file and directory permissions work together. Making a credential file private is necessary, but protecting its containing directory also prevents other users from listing or traversing that directory. Conversely, making a file unwritable does not necessarily prevent someone with write and traverse permission on its parent directory from deleting or replacing its directory entry.
The next part of the video shows the numeric notation commonly used in setup instructions and infrastructure runbooks.
Linux File Permissions in 5 Minutes | MUST Know!
Continue “Linux File Permissions in 5 Minutes | MUST Know!” for the numeric form of chmod and examples involving ordinary files, directories, and private keys.
Watch numeric permissions for the values assigned to read, write, and execute. Continue through common settings, paying particular attention to why a key file should not be readable by other users. Treat the video's suggested settings as examples to choose from, not defaults for every file.
For each user category, add 4 for read, 2 for write, and 1 for execute. The resulting three digits specify owner, group, and others respectively:
| Mode | Meaning | Suitable example |
|---|---|---|
600 |
Owner reads and writes; nobody else has access | A credentials or secret configuration file |
700 |
Owner reads, writes, and executes; nobody else has access | A private directory or owner-only script |
644 |
Owner reads and writes; others may read | A configuration file containing no secrets, if shared reading is intended |
755 |
Owner has full access; others read and execute | A script or directory deliberately available to other users |
These are choices, not a security ranking. A 644 file is inappropriate for a secret, while a script that must be run by a service account may need an intentionally different owner, group, and mode. Avoid 777 as a way to “fix” an access error: it gives every local user write access.
Apply explicit modes to your placeholders:
chmod 700 private
chmod 600 private/credentials private/config sample-key.pem
chmod 600 app.conf
chmod 700 deploy.sh
ls -ld private
ls -l deploy.sh app.conf sample-key.pem private/credentials private/config
You should now see drwx------ for private, -rwx------ for deploy.sh, and -rw------- for each of the other files. chmod normally produces no output on success; the listings are your verification. The private-key placeholder is set to 600 here. A key that its owner should only read could instead be 400.
chmod also accepts symbolic changes. Read the targeted example in Red Hat’s documentation; its ls output may contain an extra trailing dot, but the owner/group/other positions follow the same pattern.
Chapter 9. Managing file system permissions
Read subsection “9.1.4. Changing file permissions using symbolic values” in Red Hat’s documentation for a way to adjust particular user categories without rewriting all three numeric digits.
In subsection 9.1.4, start at the “Procedure” line that introduces the chmod command’s level, operation, and permission. Read the procedure through Example 9.6’s explanation of removing group and other permissions. Focus on the meanings of u, g, and o, and on how = differs from adding or removing one permission.
Try a targeted change on your script placeholder:
chmod u-x deploy.sh
ls -l deploy.sh
chmod u+x deploy.sh
ls -l deploy.sh
u-x removes execute permission from the owner only; u+x restores it. You could instead use chmod go= app.conf to clear all group and other permissions without specifying the owner’s bits. In contrast, chmod 600 app.conf sets all three categories explicitly. Be cautious with broad or recursive permission changes: applying a file mode such as 600 to directories would remove the traverse permission needed to use them.
A newly created file may initially be readable by others because the shell’s umask influences its starting permissions. You can inspect the current mask with umask. Its value may differ between systems; for sensitive material, set and verify the intended file and directory modes explicitly rather than relying on a default. Changing a umask affects subsequent creations in that shell, not existing files.
Understand ownership before using sudo
chmod changes access rights; it does not change who the owner or owning group is. Ownership matters when a file must belong to an account other than yours—for example, when diagnosing why an application account cannot use a configuration file. chown changes the owner, and chgrp changes the owning group. Changing a file’s owner requires administrative privilege; changing its group as the owner is limited to groups you belong to.
LinuxCommand.org introduces these commands alongside sudo, which grants privilege for an individual administrative command. Read that part for the distinction, but do not modify system files as you follow it.
Learning the shell - Lesson 9: Permissions
Continue LinuxCommand.org’s permissions lesson to see when sudo, chown, and chgrp are used.
Read from “Becoming the Superuser for a Short While” through “Changing Group Ownership.” Start the ownership discussion there, stopping before “Further Reading.” Focus on why transferring ownership needs sudo and how changing an owner differs from changing a group.
If your Ubuntu account can use sudo, you can observe ownership changing on one disposable file. Stay in permissions-practice; do not add -R or use these commands on your home directory or real credentials.
touch ownership-demo.txt
ls -l ownership-demo.txt
sudo chown root:root ownership-demo.txt
ls -l ownership-demo.txt
sudo chown "$(id -un):root" ownership-demo.txt
chgrp "$(id -gn)" ownership-demo.txt
ls -l ownership-demo.txt
The first chown assigns the file to the administrative root user and group. The second returns ownership to your user; chgrp returns the group to your primary group. The id commands supply those names so you do not have to guess them. If you stop after making the file root-owned, you can run the remaining commands later to restore it. If sudo is unavailable, skip this optional demonstration—you can still inspect ownership and change permissions on files you own.
Use privilege narrowly. A permission-denied error is a reason to inspect the path, owner, group, and required access, not an automatic reason to prepend sudo. In particular, making a credential world-readable is not an appropriate workaround.
Carry the habit into cloud work
On an Ubuntu filesystem, a practical starting policy is an owner-only directory (700) containing credential files (600), with an owner-only executable script (700) if no other account needs it. A non-secret configuration file may be more widely readable, but check its contents before choosing that access. Confirm both ownership and mode with ls -ld for the directory and ls -l for its files.
Keep these labs under your Linux home directory rather than /mnt/c: files on a mounted Windows drive can behave differently with respect to Linux ownership and modes. Permissions are also only one layer of protection. They do not make a secret safe to paste into a terminal session, commit to Git, or expose to an administrator with sufficient privilege.
You can now interpret an ls -l listing, set permissions with numeric or symbolic chmod, distinguish file access from directory access, and recognize when chown or chgrp is the appropriate ownership tool. Next, you’ll use shell redirection and text-processing commands to work with file contents—while keeping these access decisions in mind.