Recommended resources
The freely available resources this lesson will direct you to.
With your Android development environment now fully configured, we can move on to the rewarding step of seeing your application come to life. In the last lesson, we installed Android Studio and configured the necessary environment variables. Today, we'll leverage that setup to build and launch your Capacitor-wrapped React SPA on an Android emulator.
Our objective is to master the two primary workflows for running your app during development. First, we'll use the Capacitor CLI, which provides a fast, terminal-based method ideal for web-centric changes. Second, we'll open the project in Android Studio and launch it from the IDE, a process essential for native-level configuration and debugging. By the end of this lesson, you'll be able to seamlessly switch between these two powerful workflows.
Part 1: Creating an Android Virtual Device (AVD)
Before you can run the app, you need a target device. Android Studio includes a powerful emulator that can run Android Virtual Devices (AVDs), which are configurable emulations of specific Android phones or tablets. Let's create one.
-
Open the Device Manager: Launch Android Studio. From the welcome screen, click on the "More Actions" dropdown and select "Virtual Device Manager". (If you have a project open, you can access it via Tools > Device Manager).
-
Create a New Device: In the Device Manager window, click the "Create device" button.
- Select Hardware: You'll be presented with a list of device definitions (e.g., Pixel 7 Pro, Pixel Tablet). The choice here primarily affects screen size and resolution. A recent Pixel model is always a safe bet. Select a device and click Next.
- Select a System Image: Now, you must choose the version of the Android OS to run on the virtual device. Capacitor supports API level 24 (Android 7.0) or higher. It's best practice to use a recent, stable API level. If you don't have any system images downloaded, find a recent version (e.g., API 33 "Tiramisu" or API 34 "Upside Down Cake") and click the Download link next to its name. Accept the license agreement and wait for the download to complete. Once downloaded, select that system image and click Next.
- Verify Configuration: On the final screen, you can give your AVD a custom name and adjust other settings. The default configuration is usually sufficient. Click Finish.
Your newly created AVD will now appear in the Device Manager list. You can close this window and return to your terminal.
Part 2: Building and Running via the Capacitor CLI
For day-to-day development where you're primarily working on the web-based parts of your app, the Capacitor CLI offers the most direct path to running your code on a device.
The run command is a convenient wrapper that automates several steps:
- It prompts you to synchronize your web assets if changes are detected (
bunx cap sync). - It invokes Gradle (the Android build tool) to compile the native Android project.
- It searches for connected devices and running emulators.
- It installs and launches the app on your chosen target.
The official Capacitor documentation explains this process. We will adapt their commands to use bun.
Capacitor Android Documentation | Capacitor Documentation
This document provides the canonical explanation for running a Capacitor app on Android. We'll focus on the command-line execution.
Read the sections Running on the Command-Line and Running with Android Studio. Note the npx cap run android command; we will use bunx instead.
Now, let's run the command from the root of your Turborepo workspace. Make sure the emulator you just created is running by pressing the green play icon next to it in Android Studio's Device Manager.
# This command will sync, build, and run the app
bunx cap run android
After the command runs, it will detect your running emulator and may present a prompt to select it as the target. Once you select it, the CLI will install the .apk file and launch the app. You should see your React SPA running inside the native Android shell on your emulator.
Part 3: Opening and Running via Android Studio
While the CLI is fast, the IDE workflow is indispensable for tasks that touch the native layer, such as configuring permissions, debugging native plugins, or diagnosing complex build issues.
First, open the native Android project in Android Studio. Capacitor has a helper command for this.
# This opens the `android` folder as a project in Android Studio
bunx cap open android
When the project opens, a few things will happen:
- Gradle Sync: Android Studio will automatically kick off a "Gradle Sync." This is the process where the IDE reads your
build.gradlefiles, resolves dependencies, and indexes the project structure. The first sync can take a few minutes as it may download the required Gradle version and other dependencies. You can monitor its progress in the bottom status bar. - Project View: Once synced, you'll see the project structure in the "Project" pane on the left.
Now you are ready to launch the app directly from the IDE. The process involves two simple steps, which are clearly shown in the following images.
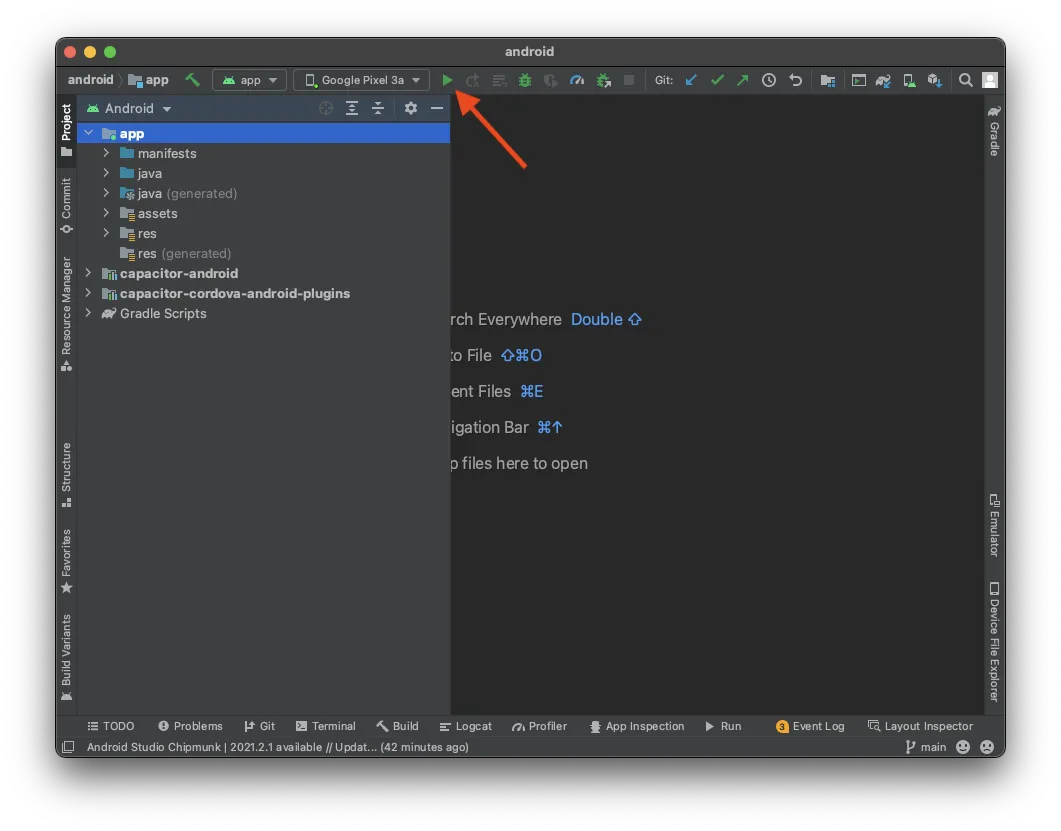
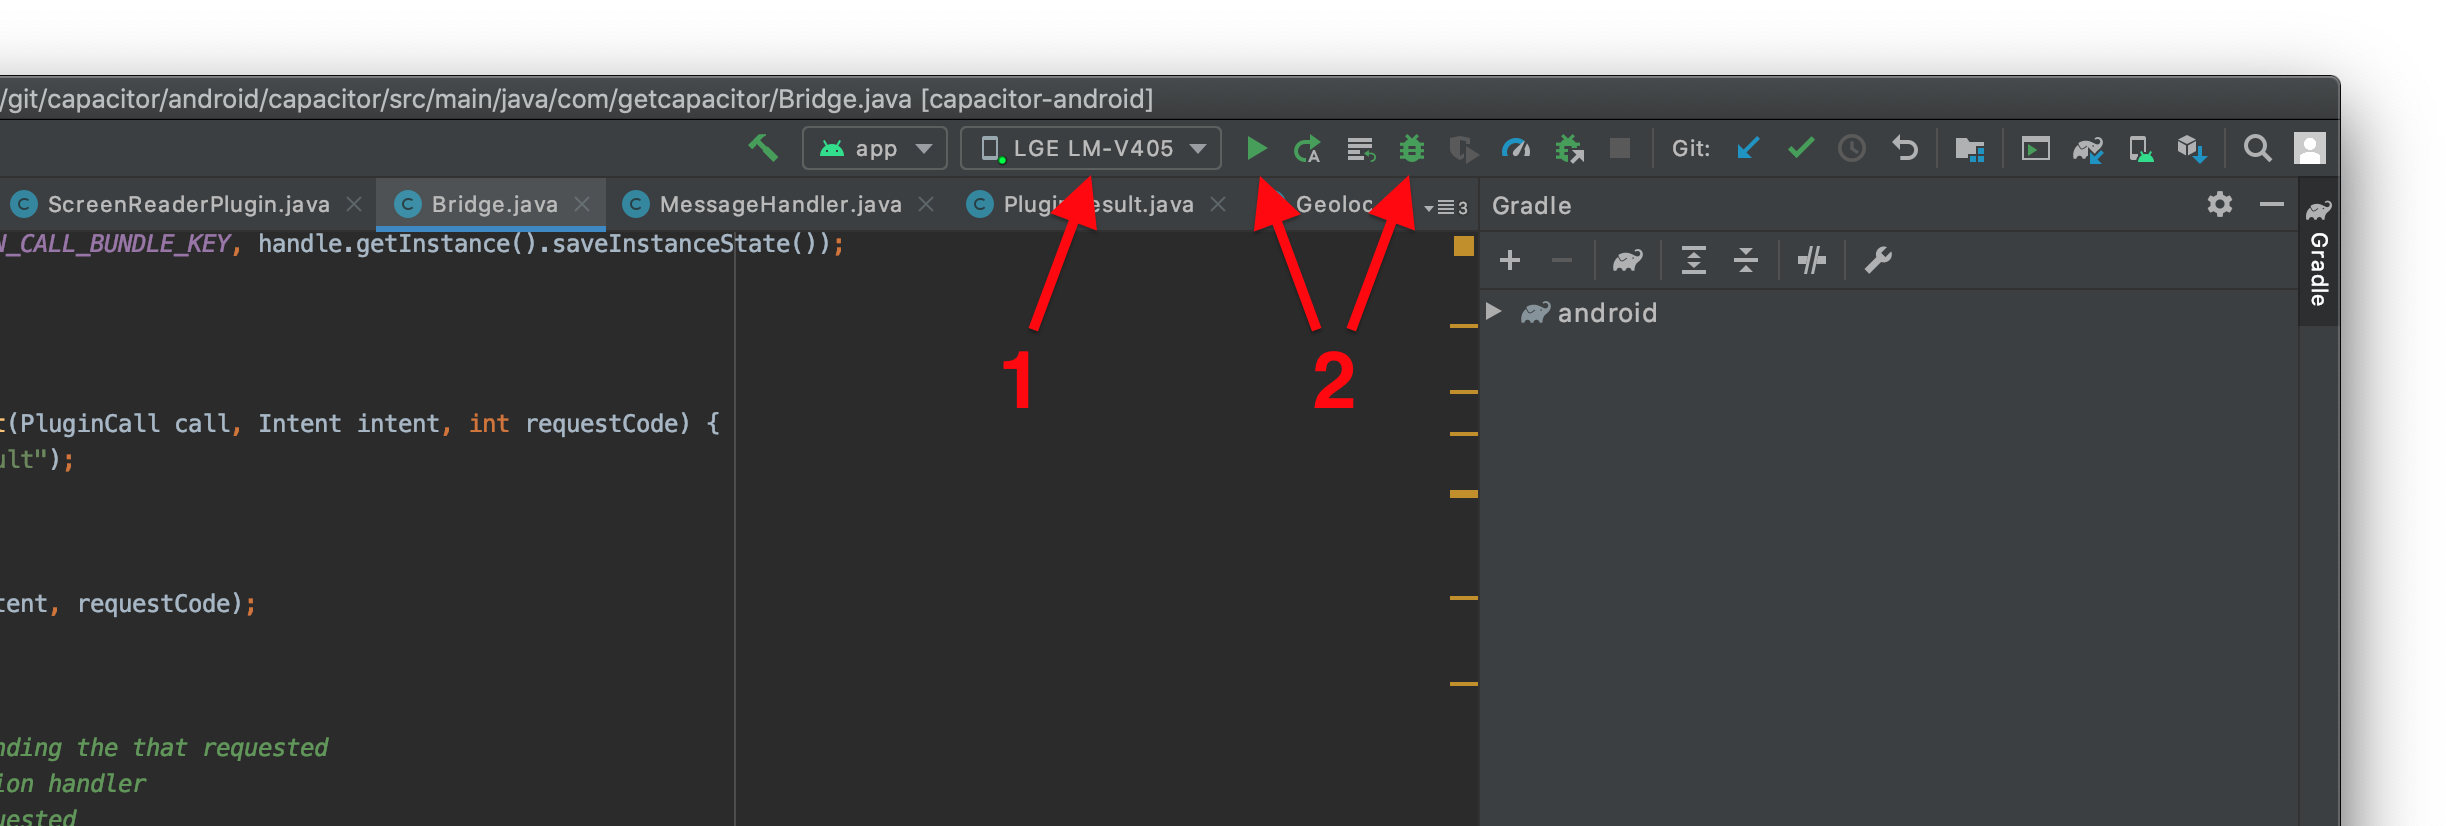
-
Select Target Device: In the toolbar at the top of the Android Studio window, locate the device dropdown menu (marked as
1in the "Running an app" image). Select the AVD you created earlier. It should appear in this list automatically. -
Run the App: Click the green 'Run' button (a right-facing triangle, marked as
2). This action compiles the project, installs it on the selected emulator, and launches it. The app should appear on your emulator screen, just as it did with the CLI command.
This IDE-based workflow gives you access to powerful native tools like the Logcat for viewing device logs, the layout inspector, and the native debugger, which will become invaluable as your app's complexity grows.
Conclusion
In this lesson, you've successfully built and launched your Capacitor application on an Android emulator using the two essential development workflows.
Here are the key takeaways:
- Android Virtual Devices (AVDs) are created and managed via the Device Manager in Android Studio and serve as your primary testing ground.
- The
bunx cap run androidcommand provides a quick, terminal-centric way to sync, build, and deploy your app, ideal for rapid iteration on the web layer. - Launching from within Android Studio (
bunx cap open androidthen clicking 'Run') is the standard workflow for native development, debugging, and resolving build-system issues.
You are now fully equipped to develop and test on an emulated Android environment. In our next lesson, we will move from the virtual to the physical world by learning how to deploy and run your app on a physical Android device.