Recommended resources
The freely available resources this lesson will direct you to.
Hello! In the last lesson, we configured your project's build.gradle file to use your new signing key. Modifying core build scripts like this is a powerful but delicate operation. As you know from your extensive experience with complex front-end build systems, when you change the machinery, you also need to know how to fix it when it sputters.
This lesson is dedicated to exactly that: building your diagnostic toolkit for the Android native layer. We will explore the most common categories of build failures you're likely to encounter, from environmental hiccups to intricate dependency conflicts. Our goal is to equip you to diagnose and resolve Gradle sync errors, SDK license issues, and AndroidManifest merge conflicts, turning cryptic error messages into actionable solutions.
Think of this as learning the debugging process for Gradle, the build automation tool for Android, much like you would for a Turborepo or Webpack setup.
The Android Troubleshooting Mindset: A First-Aid Kit
Before diving into specific errors, it's crucial to establish a systematic troubleshooting process. The Android build ecosystem is complex, but many problems can be solved with a few standard procedures. Your experience debugging build pipelines will serve you well here; the principles are the same, only the tools are different.
The official Capacitor documentation provides an excellent "Android Toolbox" of first-response actions. These should become your go-to steps whenever a build fails unexpectedly.
Troubleshooting Android Issues | Capacitor Documentation
This document from the Capacitor team outlines the most fundamental debugging techniques for Android. These are the equivalent of clearing node_modules and your bundler cache in the web world.
Please read the introductory section, "Android Toolbox." Pay close attention to the four primary techniques it introduces: Using Google for error messages Performing a Gradle Sync Using Clean/Rebuild And finally, the Invalidate Caches/Restart option.
These four steps form a powerful first-aid kit. Often, Android Studio's caches or intermediate build files can get into a corrupted state, and these actions reset the environment, resolving many transient issues. When in doubt, start here.
Category 1: Gradle, JDK, and SDK Environment Errors
This class of errors typically occurs when you first set up a project or when the underlying configuration of your development machine changes. They relate to Gradle's ability to find its required tools and dependencies.
Gradle Sync Errors
A "Gradle Sync" is the process where Android Studio reads all your build.gradle files, resolves all Java and Android dependencies, and correctly configures the project structure. A failure here often presents as a "Gradle project sync failed" message or, more cryptically, as an error like "Please select Android SDK".
As you just read, the most common fix is to manually trigger a sync. This can be done via the elephant icon in the top-right of Android Studio or through the menu: File > Sync Project with Gradle Files. You should perform a Gradle sync anytime you:
- Modify a
.gradlefile. - Run
bunx cap sync, which may introduce new native plugins. - Open the project in Android Studio after pulling changes from version control.
JDK Location Errors
Another common issue is Gradle being unable to find a valid Java Development Kit (JDK). This often manifests as an error like "Unable to locate a Java Runtime" when you run bunx cap run android. This means the JAVA_HOME environment variable is not set or points to an incorrect location.
You can find the correct JDK path that Android Studio uses and recommend setting it in your shell configuration (.zshrc, .bashrc, etc.).
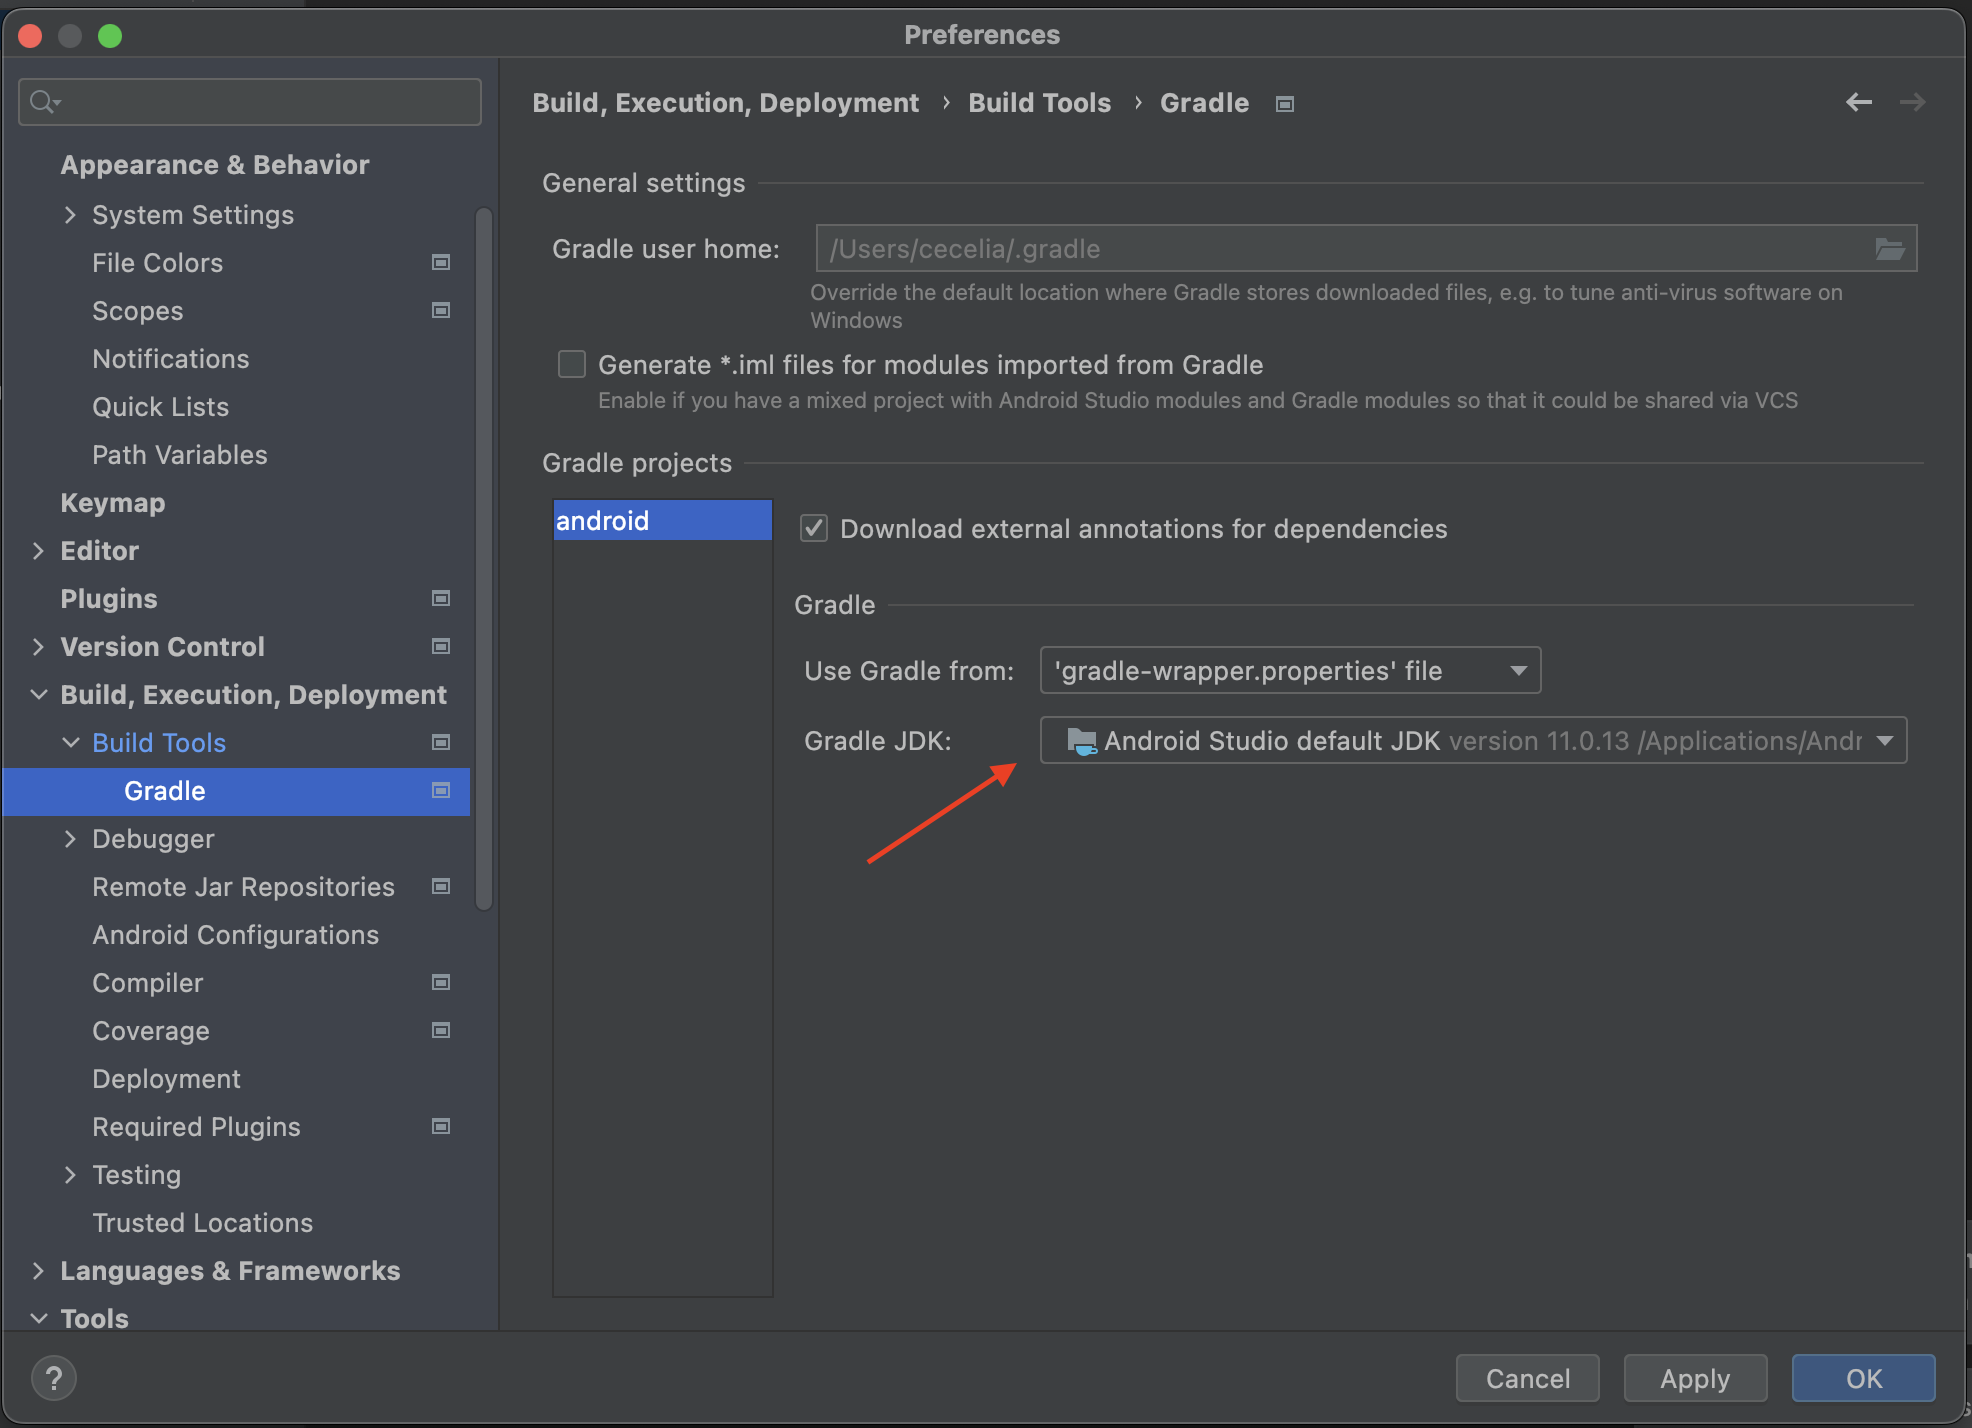
The Capacitor documentation provides concise instructions for setting this variable.
Troubleshooting Android Issues | Capacitor Documentation
This section directly addresses the JAVA_HOME issue.
Read the section titled <tf start="Error: "Unable to locate" end="as a System Variable">"Unable to locate a Java Runtime". This will guide you on how to find the path and set the environment variable on your operating system.
SDK License Issues
The first time you build a project, Gradle may attempt to download new Android SDK components. Before it can, you must agree to Google's licenses. If you haven't, the build will fail with a clear message, typically including: Failed to install the following Android SDK packages as some licences have not been accepted.
The error output itself usually tells you the exact command to run to fix this. It will look something like this (the path may vary):path/to/your/sdk/tools/bin/sdkmanager --licenses
Running this command will present you with the licenses you need to accept. Once you accept them, the build should proceed. This highlights a key skill: carefully reading the Gradle output, as it often contains the solution.
Category 2: Dependency and Plugin Conflicts
This category will feel familiar from your work with npm dependency trees. Capacitor plugins are native libraries, each with its own set of native dependencies. When two plugins require different versions of the same library, conflicts arise.
A classic example is the migration from the old Android Support Library to the modern AndroidX libraries. If you use a plugin that hasn't been updated, you'll see errors like *"package android.support. does not exist"**.
The Android ecosystem provides a tool called Jetifier that automatically migrates old Support Library references to their AndroidX equivalents during the build. Capacitor projects are configured to use this by default. You can ensure it's enabled by checking your android/gradle.properties file for these two lines:
android.useAndroidX=true
android.enableJetifier=true
For more general dependency version issues, the Capacitor CLI includes a helpful diagnostic tool.
How to Resolve Android Build Errors in Capacitor - Capgo
This article from Capgo provides a great overview of different error categories and solutions. We will focus on its advice for handling version and package conflicts.
First, read the subsection "Version Updates". The cap doctor command is your first line of defense for finding inconsistencies within the Capacitor ecosystem itself. Next, review the subsection "Fixing Package Conflicts". It reiterates the importance of Jetifier and also introduces a more advanced technique: forcing a specific dependency version using a resolutionStrategy in your build.gradle file. This is analogous to using a resolutions field in package.json to resolve stubborn version conflicts.
Category 3: AndroidManifest Merge Conflicts
The AndroidManifest.xml file is the primary configuration file for an Android app. It declares the app's components, permissions, and device feature requirements. Your project has a main manifest at android/app/src/main/AndroidManifest.xml, but every plugin you add can also include its own manifest snippets.
During the build, Gradle's manifest merger tool combines all these files into a single, final manifest. A conflict occurs when your manifest and a plugin's manifest define the same attribute with different values. For example, if your app's manifest sets android:exported="false" for an activity, but a plugin manifest declares the same activity with android:exported="true", the build will fail with a "Manifest merger failed" error.
Android Studio provides a powerful visual tool for diagnosing these exact issues.
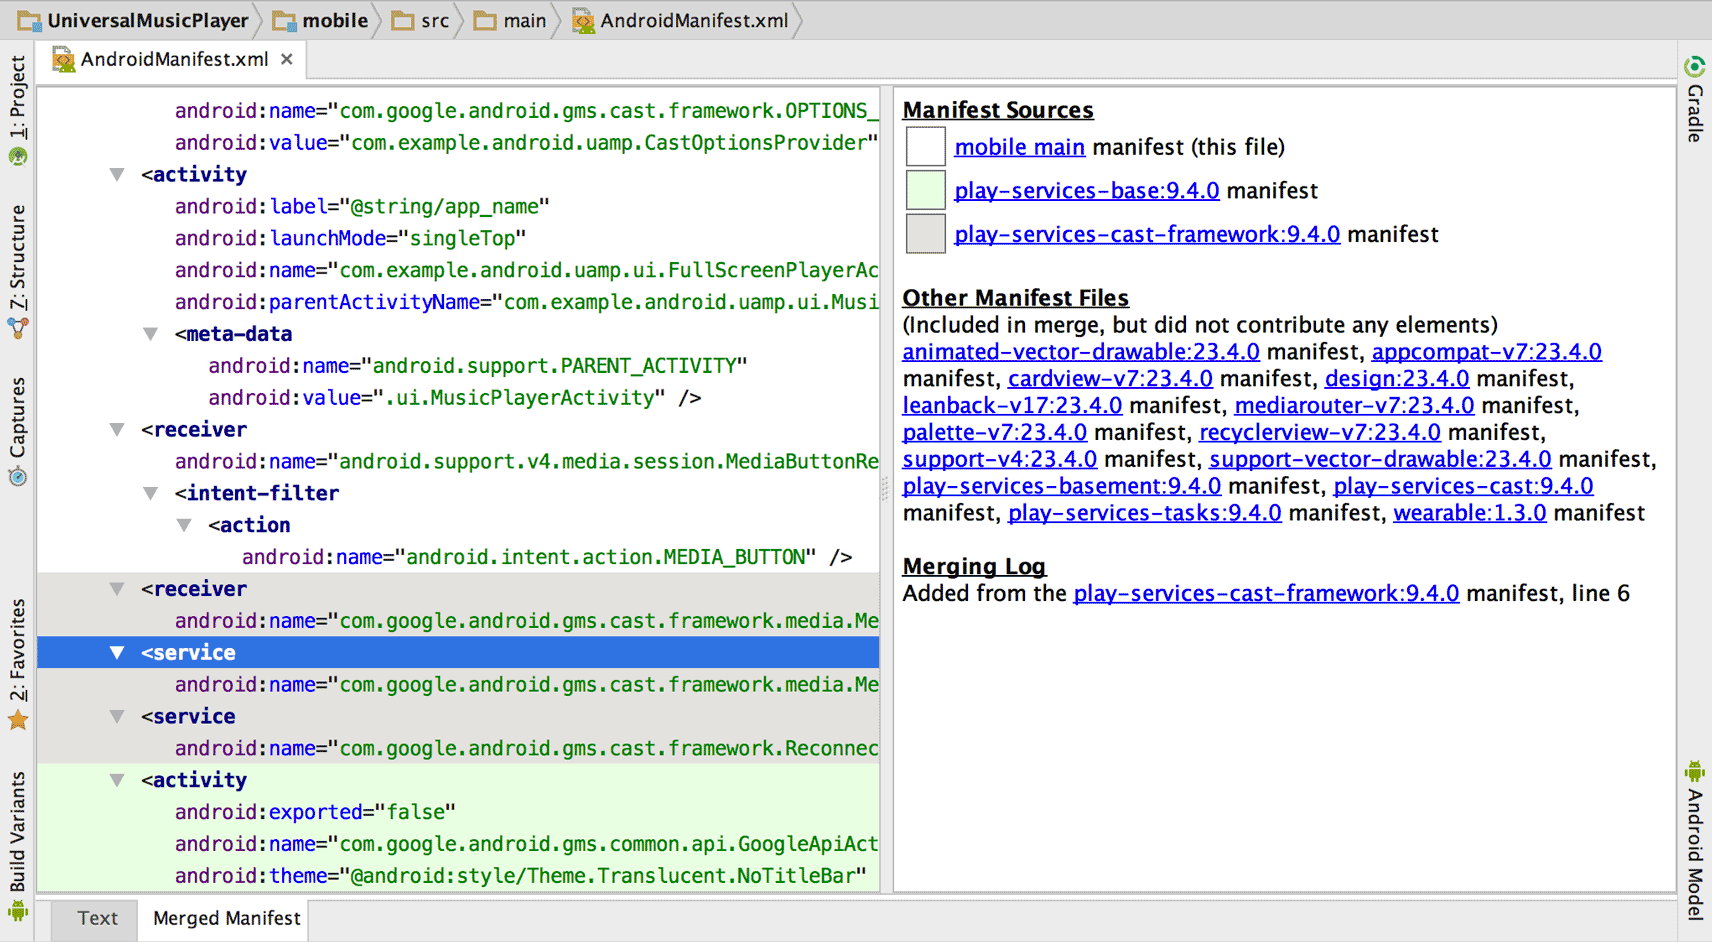
To use it, open your android/app/src/main/AndroidManifest.xml file and click the "Merged Manifest" tab at the bottom of the editor. As seen in the image above, this view shows you the final result and, crucially, which files contributed to each part. Conflicts are highlighted, allowing you to see exactly which two (or more) files are disagreeing.
To resolve a conflict, you can provide an explicit instruction to the merger in your main manifest. For example, if you want your app's android:label to always override any label provided by a library, you would add a tools:replace attribute:
<application
    android:label="@string/app_name"
    ...
    xmlns:tools="http://schemas.android.com/tools"
    tools:replace="android:label">
    ...
</application>
This tells the merger, "For the label attribute, ignore what other libraries suggest and use my value." This gives you precise control to resolve ambiguities.
Conclusion
You now have a structured approach to diagnosing the most common Android build failures. You've moved from simply running build commands to understanding why they fail and how to fix them.
Here are the key takeaways:
- Start with the "first-aid kit": When a build fails, always try
bunx cap sync, followed by "Sync Project with Gradle Files" and "Clean/Rebuild Project" in Android Studio. - Check the environment: Errors like "Unable to locate Java Runtime" point to
JAVA_HOME, while license errors are solved by running thesdkmanagercommand from the error log. - Diagnose dependency issues: Use
bunx cap doctorto find Capacitor version mismatches. Ensurejetifieris enabled ingradle.propertiesto handle legacy plugins. - Resolve manifest conflicts: Use the "Merged Manifest" view in Android Studio to visually identify sources of conflict and use
tools:replaceor other merge rule markers in your mainAndroidManifest.xmlto assert control.
With these skills, you are well-prepared to handle the inevitable bumps in the road during native development. In our next lesson, we'll shift our focus from the build process to the runtime environment. We will explore the Capacitor plugin model, demystifying how your React code communicates with the native Swift and Kotlin code to access device features.