Recommended resources
The freely available resources this lesson will direct you to.
Hello! Last lesson traced a February sales batch from its CSV source to a report and distinguished transforming before a load from transforming after it. This lesson sets up the place where you’ll begin writing that processing code: a Linux-based Python project on your Windows laptop, edited in Visual Studio Code (VS Code). Everything here runs locally, with no cloud account or paid service.
By the end, you should be able to open a project stored in WSL2, run its Python file, and verify that both VS Code’s terminal and Python interpreter are using Linux rather than Windows.
One laptop, two development environments
Windows Subsystem for Linux (WSL) lets you use a Linux distribution, such as Ubuntu, alongside Windows. WSL2 runs that distribution using lightweight virtualization. This matters because a command entered in a Windows PowerShell window and the same command entered in an Ubuntu shell may find different tools and files. Installing Python on Windows does not establish the Linux Python installation you need for this project.
VS Code bridges the two environments. Its interface runs on Windows, while a VS Code Server in WSL works with your Linux files, terminal, and development tools.
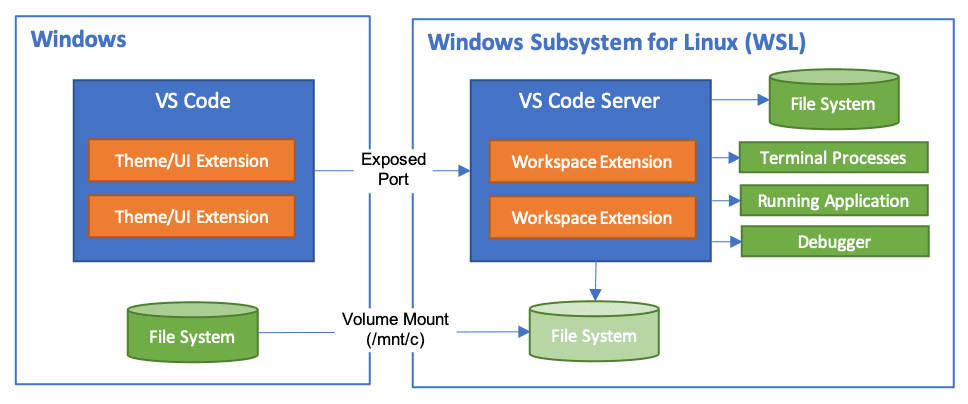
For this course, keep Python project files under your Linux home directory, such as ~/projects/batch-sales, rather than on the Windows drive at /mnt/c/.... You can still view Linux files from Windows, but keeping the active project and its tools on the Linux side makes it easier to know which environment is doing the work.
Install Ubuntu and verify WSL2
First, read Microsoft’s installation instructions. They give both the current installation command and the check that distinguishes WSL2 from WSL1.
How to install Linux on Windows with WSL
Microsoft’s WSL installation guide provides the commands to install Ubuntu and check the version your distribution uses.
In “Prerequisites” and “Install WSL command,” read the requirements and installation steps. In the note immediately after that subsection’s first-launch explanation, read the existing-WSL case. Then go to “Upgrade version from WSL 1 to WSL 2” and read the version check. Focus on checking the installed distribution’s version, not merely confirming that a wsl command exists.
On a supported Windows version, open PowerShell as administrator and run this if WSL is not already installed:
wsl --install
Restart Windows if prompted. Launch Ubuntu from the Start menu and complete its first-run setup by creating a Linux username and password. This account is separate from your Windows sign-in; the password may appear to accept no input while you type it.
If WSL is already installed but has no Ubuntu distribution, use the guide’s wsl --list --online command to check available names, then install Ubuntu with wsl --install -d Ubuntu. You do not need to reinstall an existing distribution.
Back in PowerShell, check the result:
wsl --list --verbose
Look for your Ubuntu distribution with VERSION equal to 2. If an existing Ubuntu installation shows 1, use wsl --set-version Ubuntu 2, replacing Ubuntu with the exact distribution name shown by the list command. The conversion may take some time.
From here on, watch the terminal prompt: run wsl commands in PowerShell, but run Linux commands such as sudo, mkdir, and python3 in Ubuntu.
Put Python and the project on the Linux side
Open an Ubuntu terminal. Check whether Linux Python is already present:
python3 --version
which python3
If python3 is missing, install it using Ubuntu’s package manager:
sudo apt update
sudo apt install python3
A successful which python3 should point to a Linux path, commonly under /usr/bin, not to a Windows .exe file. You only need Python itself to run today’s example; the next lesson will set up a separate environment for project packages.
Create a workspace in your Linux home directory:
mkdir -p ~/projects/batch-sales
cd ~/projects/batch-sales
pwd
The printed directory should begin with /home/, not /mnt/c/. The ~ in the command stands for your Linux home directory. This small distinction will become useful when later projects contain more files and dependencies.
Connect VS Code and run a Python file
Install Visual Studio Code on Windows if you do not already have it. In its Extensions view, install Microsoft’s WSL extension. The following video shows the visible signs of a WSL-connected editor and how to install the Python extension in that environment.
Setup python on Linux in Windows using WSL and VS Code
Watch “Setup python on Linux in Windows using WSL and VS Code” by Learning Software for the VS Code connection and Python-interpreter selection. Some interface labels may differ in your current VS Code version.
Watch connect and configure for the WSL extension, WSL connection indicator, and Python extension installed on the WSL side. Continue through run in WSL for interpreter selection and running Python. The demonstration reopens a folder from Windows; for this course, use the project folder you created under your Linux home directory instead.
Return to the Ubuntu terminal, ensure you are in your project folder, and launch VS Code from there:
cd ~/projects/batch-sales
code .
The dot means “open the current folder.” On first connection, VS Code may take a moment to set up its server in WSL. If code is not recognized, check that VS Code is installed on Windows, then close and reopen the Ubuntu terminal before retrying.
Check the connection indicator in VS Code’s lower-left corner: it should say WSL: Ubuntu or show your installed distribution’s name. Open Terminal → New Terminal in VS Code and run:
pwd
which python3
The terminal should show your /home/.../projects/batch-sales folder and a Linux Python path. If instead it opens PowerShell or shows a Windows project directory, do not continue as though it were a Linux workspace: reconnect to WSL and open the Linux folder.
In VS Code’s Explorer, create a file named run.py in batch-sales:
from pathlib import Path
import sys

print("Python interpreter:", sys.executable)
print("Project directory:", Path(__file__).resolve().parent)
print("Batch workspace ready")
Save it, then run it in the VS Code integrated terminal:
python3 run.py
You should see a Linux interpreter path, your project directory under /home/, and Batch workspace ready. The output is deliberately simple: it establishes where the code ran before you add CSV reading, transformations, and loading.
For editing and run controls, install Microsoft’s Python extension when VS Code suggests it for run.py. Check its Extensions view to confirm it is installed in WSL, not only locally on Windows. If VS Code asks you to select an interpreter, choose the Linux python3 interpreter—the path should match the Linux side you verified with which python3. Running python3 run.py in the integrated terminal remains a reliable check even if an editor run button is not yet configured.
What a working setup proves
You now have three independent checks: PowerShell reports WSL version 2 for Ubuntu; VS Code shows a WSL connection; and the integrated terminal runs run.py with a Linux Python interpreter from a project under /home/. Together, they show that this is more than a Windows editor displaying a Python file: the project actually runs in Linux.
Keep the batch-sales folder. In the next lesson, you’ll give that project an isolated Python environment and record its dependencies reproducibly before building the file-processing steps of the batch pipeline.