Recommended resources
The freely available resources this lesson will direct you to.
- Why you should always overfit a single batch to debug your deep learning modelwww.youtube.com
- PyTorch Tutorial 09 - Dataset and DataLoader - Batch Trainingwww.youtube.com
- Lecture 7: Troubleshooting Deep Neural Networks - The Full Stackfullstackdeeplearning.com
- How to Trust Your Deep Learning Code | Don't Repeat Yourselfkrokotsch.eu
Welcome back. Last lesson, you completed one optimizer step and confirmed that it changes the denoiser’s parameters. A changed parameter is a useful first check, but it does not tell you whether the whole pipeline can learn the task you gave it.
Today you’ll deliberately train on one fixed, tiny corrupted example until the denoiser nearly memorizes its missing characters. This is a debugging test, not a way to build a good language model. It closes the training module: once the test passes, you’ll be ready to use the trained denoiser for generation.
Why memorize one example?
In normal training, you want a model to perform well on text it has not seen. Here, you want the opposite. If a small denoiser cannot learn a handful of known masked characters that you show it repeatedly, adding more data will make the underlying problem harder to find.
Watch these short portions of Why you should always overfit a single batch to debug your deep learning model from The Full Stack:
Why you should always overfit a single batch to debug your deep learning model
The video explains why single-batch memorization is a useful debugging test and what different loss patterns can tell you.
Watch the motivation, then the success criterion: the goal is a loss near zero, not merely a loss that moves. Finish with failure patterns for clues you can use if your notebook stalls.
For our denoiser, the test has a precise question: given this same corrupted input and noise level, can it predict the original characters at the masked, non-padding positions? It says nothing yet about unseen sentences or text generation.
Freeze the example, including its corruption
Reuse the x0, x_t, noise_level, and corruption_mask tensors from your previous lesson. Choose a batch whose first row has at least one masked, non-padding token. The code below keeps just that row. If your first row has no selected tokens, choose another row or regenerate the corruption once before running this cell.
# Use one row from an already-corrupted batch.
x0_fixed = x0[:1].detach().clone().to(device)
x_t_fixed = x_t[:1].detach().clone().to(device)
corruption_mask_fixed = (
    corruption_mask[:1].detach().clone().bool().to(device)
)

# Allow for either one noise level per row or a scalar noise level.
noise_level_fixed = (
    noise_level[:1] if noise_level.ndim else noise_level
).detach().clone().to(device)

valid_fixed = x0_fixed.ne(pad_id)
selected_fixed = corruption_mask_fixed & valid_fixed

assert selected_fixed.any().item(), "Choose a row with a masked valid token."
assert not (corruption_mask_fixed & ~valid_fixed).any().item()
assert torch.equal(
    x_t_fixed[~selected_fixed], x0_fixed[~selected_fixed]
), "Unselected tokens, including padding, should be unchanged."

print("Clean IDs:    ", x0_fixed[0].tolist())
print("Corrupted IDs:", x_t_fixed[0].tolist())
print("Positions graded:", selected_fixed[0].tolist())
Inspect the three printed lines. The corrupted input should contain mask IDs at the positions being graded; the clean IDs are their targets. Your earlier corruption function may sample a new pattern every time it is called, but do not call it inside this test’s training loop. Otherwise you would be testing many different inputs rather than memorization of one fixed example.
Train and measure the same example
We will measure both masked-position loss and masked-position accuracy. Accuracy tells you whether each selected character is the top prediction; loss also tells you how confidently the model makes those predictions. A model can reach perfect accuracy while its loss still has room to fall.
The evaluation function uses model.eval() to turn off training-time effects such as dropout. Your denoising_train_step switches back to model.train() for each update.
def evaluate_fixed_example():
    model.eval()
    with torch.no_grad():
        logits = model(x_t_fixed, noise_level_fixed, valid_fixed)
        loss = denoising_loss(
            logits, x0_fixed, corruption_mask_fixed, pad_id
        )
        predictions = logits.argmax(dim=-1)
        correct = (
            predictions[selected_fixed] == x0_fixed[selected_fixed]
        ).sum().item()

    accuracy = correct / selected_fixed.sum().item()
    return loss.item(), accuracy
For this debugging run, use an optimizer without weight decay: regularization is not the point when you are trying to memorize one example. This creates a fresh optimizer for the model you already have.
import math

optimizer = torch.optim.AdamW(
    model.parameters(), lr=1e-3, weight_decay=0.0
)

initial_loss, initial_accuracy = evaluate_fixed_example()
print(f"step   0 | loss {initial_loss:.4f} | masked accuracy {initial_accuracy:.1%}")

for step in range(1, 201):
    train_loss = denoising_train_step(
        model=model,
        optimizer=optimizer,
        x0=x0_fixed,
        x_t=x_t_fixed,
        noise_level=noise_level_fixed,
        corruption_mask=corruption_mask_fixed,
        pad_id=pad_id,
        device=device,
    )
    assert train_loss is not None and math.isfinite(train_loss)

    if step % 25 == 0:
        fixed_loss, fixed_accuracy = evaluate_fixed_example()
        print(
            f"step {step:3d} | loss {fixed_loss:.4f} "
            f"| masked accuracy {fixed_accuracy:.1%}"
        )
For a small model and one short example, look for 100% masked accuracy and a loss approaching zero; a loss below about 0.1 is a useful practical target, not a guarantee at exactly 200 steps. Individual training updates need not improve the measurement every time. If your Colab run is slow, inspect the first 50–100 steps before deciding whether to continue.
Notice what stays fixed: clean targets, corrupted input, noise level, and graded positions. Only the model parameters change. That makes the result much easier to interpret than a loss curve produced with fresh random masks each step.
If it does not work, follow the symptom
The image below is a compact guide to common single-batch failure patterns. Use it as a starting point, then check the parts specific to your denoising pipeline.
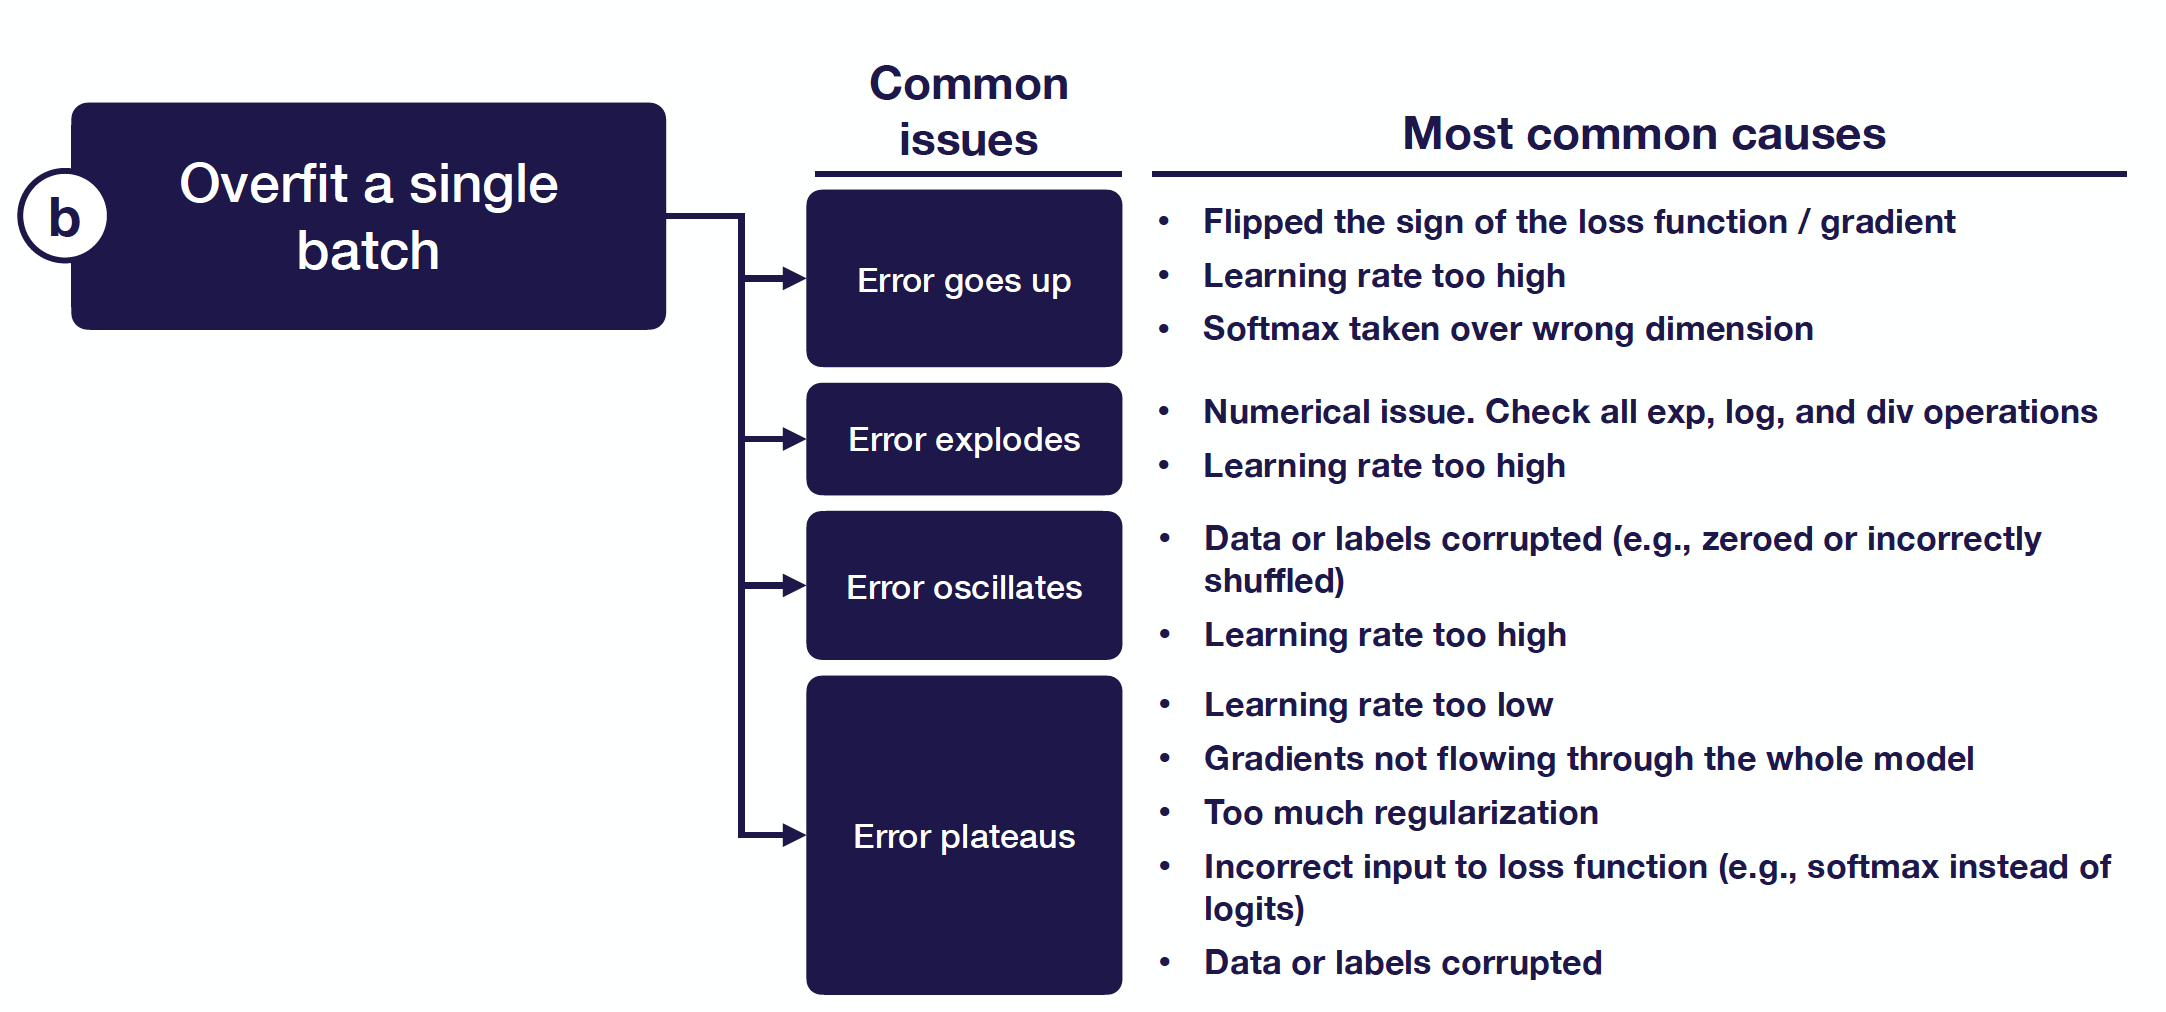
If loss rises or becomes non-finite, first check the learning rate and the loss call. Your denoising loss should receive raw vocabulary logits, not probabilities already passed through softmax. Also verify that its targets are clean IDs and that its selected positions are the intersection of corrupted and non-padding positions.
If loss oscillates, try a smaller learning rate. If it barely moves or plateaus, inspect the printed IDs and masks before changing the architecture: are you grading actual masked characters, passing the matching noise_level, and reusing the same corruption each step? Check that the optimizer holds the current model’s parameters. Excessive dropout or other regularization can also obstruct memorization; if your model configuration allows it, reducing dropout for this diagnostic run is reasonable.
A passed test supports a narrow but valuable conclusion: your batch preparation, forward pass, loss, gradients, and optimizer can work together to learn a fixed mapping. It does not establish that the model has learned to denoise new text.
What to carry forward
You now have an end-to-end training check: freeze one tiny corrupted example, repeatedly train on it, and measure predictions only where valid characters were masked. Near-zero loss and correct masked predictions are stronger evidence than a single parameter update or a briefly decreasing loss.
Next, you’ll turn from training to generation: starting with an entirely masked sequence and asking the denoiser for candidate characters.