Recommended resources
The freely available resources this lesson will direct you to.
Welcome to the next lesson in our journey from React to HTMX. In our previous session, you became proficient at implementing common UI patterns like modals and dropdowns, leveraging the clear separation of concerns between HTMX for server interaction and Alpine.js for local, component-scoped state (x-data).
This naturally leads to a question that your React experience has made you very familiar with: what happens when different, non-nested components need to share the same piece of client-side state? In React, you would reach for the Context API or a state management library. In the world of HTMX and Alpine.js, we have a similarly elegant, but much lighter, solution.
Today's lesson is designed to help you manage shared client-side state across different components using Alpine.js global stores as a lightweight replacement for React Context. We will explore how to define this global state, how different parts of your UI can react to it, and the best practices for keeping it organized and maintainable.
The Need for Shared State: From x-data to $store
So far, we've used x-data to encapsulate state within a specific component tree. This is the direct parallel to using useState in a React component. It's perfect for things like a dropdown's open/closed status or the active tab in a tab group.
However, consider these common scenarios in a CRUD application:
- An "Add to Cart" button on a product page needs to update a cart item counter in the site's main header.
- A user logs in, and their name and profile picture should appear in the header, while other components on the page might also need to know the user is authenticated.
- A "dark mode" toggle in the settings menu needs to change the theme for the entire application.
These components are often in completely different parts of the DOM and cannot be easily wrapped in a single, shared x-data parent. This is precisely the problem that Alpine.js stores are designed to solve.
The article "Alpine.js Stores: usage guide and best practices" provides an excellent overview of this concept. It frames the distinction in terms you'll find very familiar.
Alpine.js Stores: usage guide and best practices
This guide clearly defines what stores are and, most importantly, when you should (and shouldn't) use them.
Please read the introduction and the first few sections of the article. Focus on the following parts: The definition of stores and their key benefits. The scenarios under "When Should You Use Stores?". Crucially, read the section "When not to use Alpine.js stores". The blockquote here makes a direct and accurate comparison to React's Context API vs. useState, which is the core mental model for this lesson.
As the article makes clear, the rule of thumb is simple: if state is isolated to a single component or a small, self-contained part of the UI, use x-data. If state needs to be accessed and modified by multiple, disparate components across the application, use a store.
Defining and Interacting with a Global Store
Now let's move to implementation. A store is a global JavaScript object that you define once, typically when your page loads. Alpine listens for a special alpine:init event on the document, which is the correct time to register your stores.
The following video from AM Design provides a clear, step-by-step demonstration of defining a store for a dark mode toggle and interacting with it from the HTML.
Alpine Js: Defining Store and Watch
This video walks through the entire lifecycle: defining a store, reading its value, and calling its methods to update the state.
First, observe how to define a store using document.addEventListener('alpine:init', ...) and Alpine.store(). The example creates a darkmode store with an on property and a toggle method. Watch from the beginning. Next, see how the store's state is accessed in HTML using the $store magic property ($store.darkmode.on) and how a button's @click event calls the store's method ($store.darkmode.toggle()). This is shown from here.
The syntax is straightforward:
- Define the store:
document.addEventListener('alpine:init', () => { Alpine.store('darkmode', { on: false, toggle() { this.on = !this.on } }); }); - Access the store from any Alpine component:
<!-- Any element can read from the store -->
<p>Dark mode is: <span x-text="$store.darkmode.on"></span></p>

<!-- Another element, anywhere on the page, can modify the store -->
<button @click="$store.darkmode.toggle()">Toggle Dark Mode</button>
Notice that the elements interacting with the store don't need to share a parent x-data. They only need to be processed by Alpine.
A Practical Example: The Shopping Cart
Let's look at a slightly more complex and highly practical example: a shopping cart. This scenario perfectly illustrates combining local state (for the "add new item" input field) with global state (the list of items in the cart). The article "Mastering State Management in Alpine.js" has an excellent walkthrough.
Mastering State Management in Alpine.js with $store and $data
This resource provides a clear shopping cart example that demonstrates combining global and local state.
Please read the article, focusing on two parts: The initial setup under "Setting Up a Store", which reinforces the basic syntax. The full shopping cart example. Pay close attention to how x-data="{ newItem: '' }" provides local state for the input, while $store.cart manages the global list of items.
This pattern is powerful. The component for adding items has its own local state (newItem), which doesn't pollute the global scope. When the user acts, the component's event handler (@click) calls a method on the global store ($store.cart.addItem(...)), which then updates the shared state. Any other component on the page that references $store.cart.items will reactively update.
Best Practices and Advanced Patterns
As with any state management tool, there are best practices that lead to more scalable and maintainable code. Given your background, these will feel like familiar principles applied to a new tool.
Organize Stores by Domain
Just as you wouldn't put authentication logic and shopping cart logic in the same React Context Provider, you should separate your Alpine stores by their functional domain.
Alpine.store('auth', { user: null, login() {...} })Alpine.store('cart', { items: [], total: 0, addItem() {...} })Alpine.store('notifications', { messages: [], addMessage() {...} })
This makes your state predictable and easier to debug.
Use Getters for Derived Data
Often, you'll have state that is computed from other state (e.g., the total price of a shopping cart). Instead of manually calculating this every time, you can define a JavaScript getter in your store.
The "Alpine.js Stores" guide has a concise example of this.
Alpine.js Stores: usage guide and best practices
This snippet shows how to compute derived state within a store.
In the "Best Practices" section of the guide, please review the example under "Use Getters for Derived Data".
This is analogous to using selectors in libraries like Redux or useMemo in React to compute derived values efficiently.
Watching for State Changes
While most interactions with a store will be declarative through directives like x-text, x-show, or x-bind, you may occasionally need to run imperative code when a piece of state changes (e.g., logging, interacting with a third-party library). For this, Alpine provides the $watch magic property.
The video you watched earlier also covers this feature.
Alpine Js: Defining Store and Watch
This segment explains how to use $watch to execute code in response to a state change in the store.
Please watch the section where the presenter adds a $watch to the darkmode store to console.log the new value whenever it changes. You can find this from here.
Debugging and Inspection
When working with state, being able to inspect it is critical. While you can always console.log($store) inside an event handler, you can also access component data directly from the browser's developer console. This can be a quick way to check the current state without adding extra code.
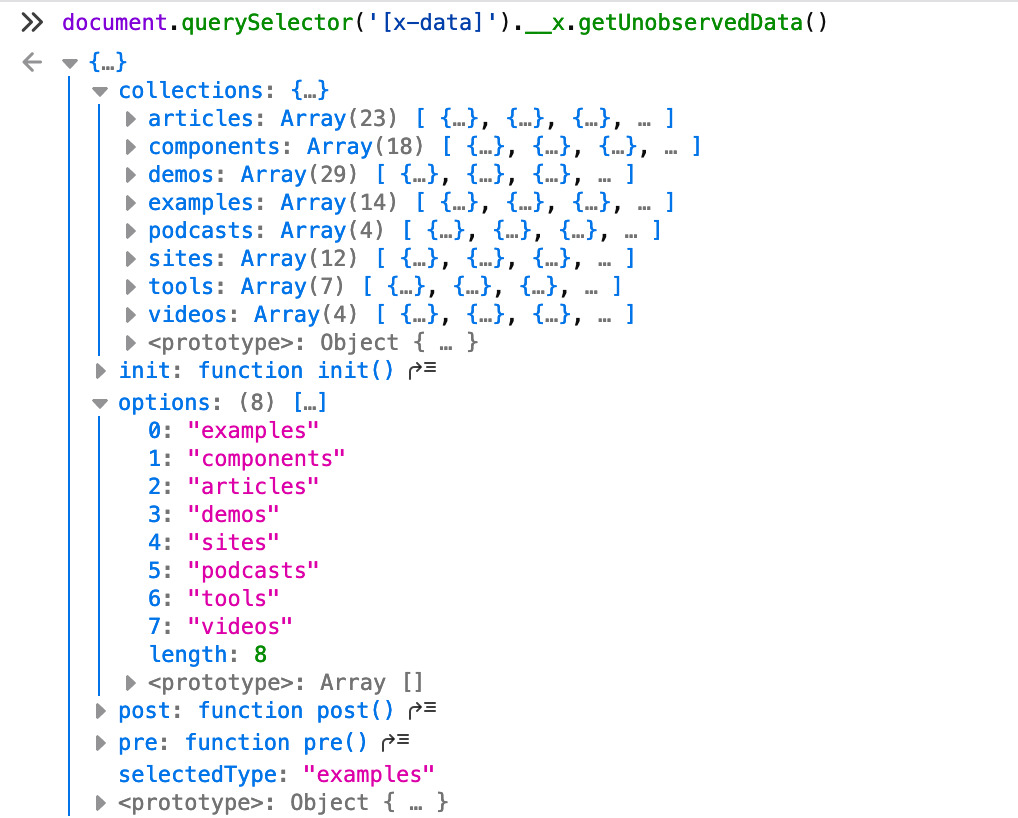
The article "Alpine.js Stores: usage guide and best practices" also mentions that the official Alpine.js Devtools browser extension provides a dedicated panel for inspecting and even editing your store values in real-time, which is the most robust solution for debugging.
Conclusion
In this lesson, you've bridged a major conceptual gap between the React and HTMX/Alpine ecosystems by mastering Alpine.js global stores. You now have a lightweight yet powerful tool for managing shared client-side state, liberating you from the complexity of prop-drilling or large state management libraries for many common use cases.
Key Takeaways:
Alpine.store()is used to define global, reactive state accessible anywhere on the page.- The
$storemagic property is the key to reading and modifying store data from your HTML. - The mental model is a direct parallel to React: use
x-datafor local component state (useState) and$storefor shared, cross-component state (React.Context). - Best practices like organizing stores by domain and using getters for derived data lead to cleaner, more maintainable code.
- Tools like
$watchand the Alpine.js Devtools provide powerful mechanisms for reacting to and debugging state changes.
In our final lesson of this module, we'll discuss the role of plain, vanilla JavaScript. While HTMX and Alpine.js cover the vast majority of use cases, there are still times when a small, targeted JavaScript snippet is the right tool for a transient, non-reactive task. We'll explore how to identify these scenarios and integrate vanilla JS gracefully into your stack.