Recommended resources
The freely available resources this lesson will direct you to.
Hello! Welcome to the final module of our course. You've come a long way, from writing your first line of Solidity to deploying and upgrading complex contracts on a testnet. This is where all your hard work culminates.
In our last lesson, you built a Node.js script to listen for and react to smart contract events. This was a critical skill, bridging the gap between your on-chain contracts and the off-chain services that make a dApp truly functional. Your backend development experience was a great asset there.
Now, we begin the most exciting and critical phase: preparing for launch. Today's lesson marks the first step towards taking your project live on the Ethereum mainnet. The learning outcome is to configure Hardhat for mainnet deployment with secure private key management. This is arguably one of the most important security lessons in the entire course, as we are now preparing to handle real funds.
From Testnet to Mainnet: What Changes?
So far, all our deployments have been on testnets like Sepolia. Testnets are forgiving environments where the Ether is free and mistakes have no financial consequences. The mainnet is the opposite.
- Real Value: The Ether (ETH) used for gas fees is real money.
- Real Impact: The contracts you deploy are live, permanent, and will interact with users' real assets.
- Real Risk: The private key you use to deploy holds real ETH and has control over your contracts. If compromised, the financial loss can be total and irreversible.
Therefore, our primary focus is not just on how to configure for mainnet, but how to do so securely.
Part 1: Mainnet Configuration Essentials
To deploy to any network, Hardhat needs two key pieces of information in your hardhat.config.js file:
- A Network RPC URL: This is the address of an Ethereum node that Hardhat will send your transaction to. For mainnet, you'll get this from a node provider like Alchemy or Infura, just as you did for the Sepolia testnet.
- An Account Private Key: This is the secret key for the wallet you will deploy from. This wallet must be funded with real ETH to pay for the mainnet gas fees.
Here is a conceptual look at how we'll add a mainnet configuration to your Hardhat project.

A naive and highly insecure configuration might look like this. DO NOT DO THIS!
// AVOID THIS INSECURE EXAMPLE
module.exports = {
  solidity: "0.8.20",
  networks: {
    mainnet: {
      url: "https://eth-mainnet.g.alchemy.com/v2/YOUR_API_KEY", // Your real API key
      accounts: ['0x123...your...private...key...abc'] // Your real private key
    }
  }
};
Hardcoding your private key like this is extremely dangerous. If you accidentally commit this file to a public repository like GitHub, automated bots will find your key and drain your wallet within minutes. We must manage these secrets professionally.
Part 2: Secure Key Management Strategies
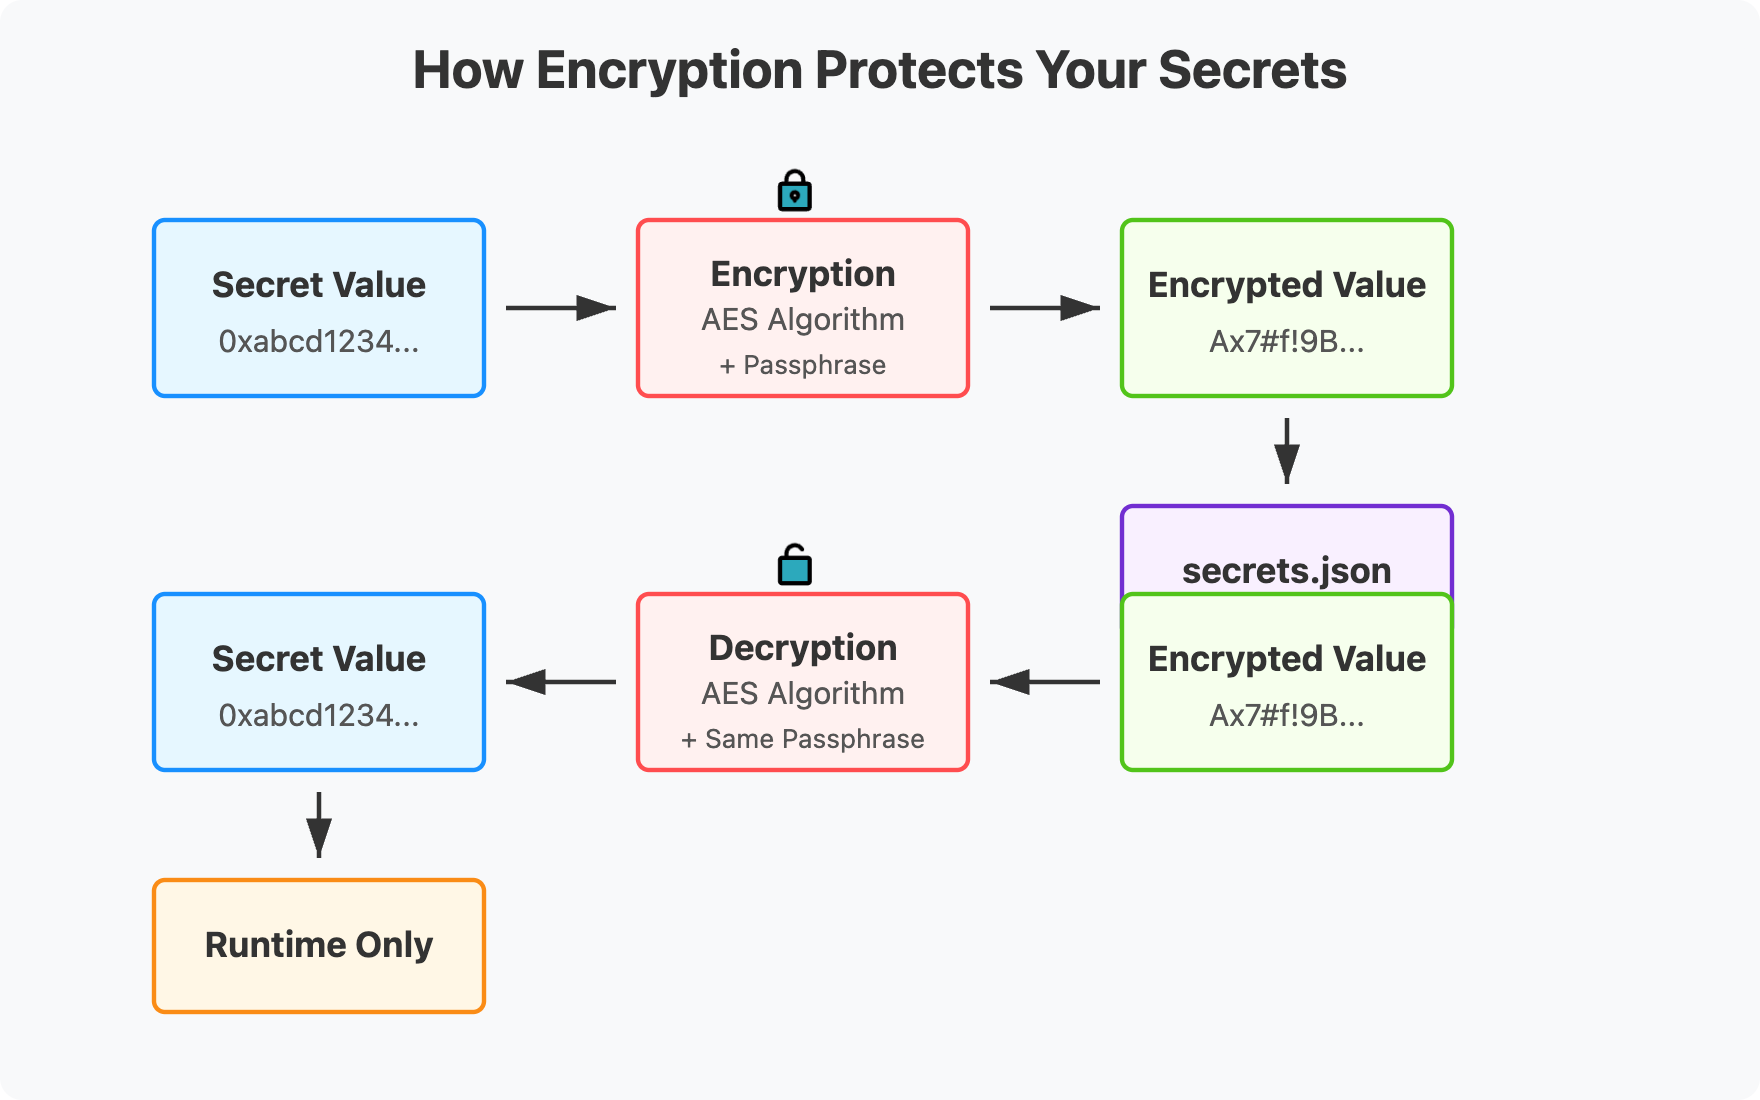
Let's explore two professional methods for managing your private key and other secrets, moving from a common practice to a more robust, encrypted solution. The goal is to protect your "Secret Value" (your private key) so it is only ever used at runtime and never stored in plain text in your codebase.
Method 1: Environment Variables with .env
A very common and effective practice in backend development is to store secrets in environment variables. We can achieve this in our Hardhat project using the dotenv package. This method keeps your secrets in a local file that is never committed to version control.
To learn about this method, let's turn to a practical guide.
Deploying ERC20 Token With Hardhat: A Step-by-Step Guide
The article "Deploying ERC20 Token With Hardhat" from Semaphore provides a clear, step-by-step guide on using a .env file to manage secrets for deployment. We'll follow this pattern.
Read the sections "Configuring our Project for Deployment", "Getting your MetaMask Private Key", and "Getting Sepolia Endpoint in Infura". Although the article targets the Sepolia testnet, the process for mainnet is identical—you would simply select the mainnet endpoint from Infura/Alchemy instead. Focus on how it uses the dotenv package, creates a .env file, and accesses the variables in hardhat.config.js.
Let's summarize the steps from the article for a mainnet deployment:
-
Install
dotenv:npm install dotenv -
Create a
.gitignoreentry: Ensure your.envfile is never committed. Add this line to your.gitignorefile:.env -
Create the
.envfile: In the root of your project, create a file named.envand add your secrets.# .env MAINNET_RPC_URL="https://mainnet.infura.io/v3/YOUR_INFURA_PROJECT_ID" MAINNET_PRIVATE_KEY="YOUR_METAMASK_PRIVATE_KEY" -
Update
hardhat.config.js: Modify your configuration to load and use these variables.require("@nomicfoundation/hardhat-toolbox"); require("dotenv").config(); // This line loads the .env file /** @type import('hardhat/config').HardhatUserConfig */ module.exports = { solidity: "0.8.20", networks: { mainnet: { url: process.env.MAINNET_RPC_URL, accounts: [process.env.MAINNET_PRIVATE_KEY], }, // ... your other networks like sepolia }, };
This is a solid approach that correctly separates configuration and secrets from your code. However, the private key is still stored in plain text on your local machine. For an even higher level of security, we can encrypt it.
Method 2: Encrypted Secrets with Hardhat Keystore
Hardhat provides a built-in, more secure way to handle secrets using the hardhat-keystore plugin (which is included with hardhat-toolbox) and configuration variables. This method encrypts your secrets with a password and stores them in a secure location outside your project directory.
The official Hardhat documentation explains this best.
Managing config values and secrets safely
The Hardhat documentation page "Managing config values and secrets safely" introduces the modern, recommended way to handle secrets using encrypted storage.
Read the sections "Using Configuration Variables" and "Managing secrets with the hardhat-keystore plugin". Pay close attention to the configVariable function and the npx hardhat keystore commands. This is the most secure method we will cover.
Here’s how to apply this superior method:
-
Store your secrets in the keystore: Run the following commands in your terminal. Hardhat will prompt you to enter the secret value. The first time you do this, it will also ask you to create a password for your keystore. Choose a strong, unique password and save it in a password manager.
# Store your RPC URL npx hardhat keystore set MAINNET_RPC_URL # Store your private key npx hardhat keystore set MAINNET_PRIVATE_KEY -
Update
hardhat.config.js: Now, modify your configuration to use Hardhat'sconfigVariablefunction. This is cleaner as it doesn't require thedotenvpackage.require("@nomicfoundation/hardhat-toolbox"); const { configVariable } = require("hardhat/config"); // Import the function /** @type import('hardhat/config').HardhatUserConfig */ module.exports = { solidity: "0.8.20", networks: { mainnet: { url: configVariable("MAINNET_RPC_URL"), accounts: [configVariable("MAINNET_PRIVATE_KEY")], }, // ... your other networks }, };
Now, whenever you run a Hardhat task that needs to connect to the mainnet (like deploying), Hardhat will automatically prompt you to enter your keystore password. This unlocks the secrets in memory just long enough to use them, providing excellent security.
Test your understanding!
A colleague suggests using a .env file for secrets, which is then added to .gitignore. Another colleague argues for using hardhat-keystore instead. What is the primary security advantage of the keystore approach over the .env approach, even when the .env file is properly ignored by Git?
Show answer
The primary advantage is encryption at rest. The hardhat-keystore method encrypts the private key on your computer's hard drive. Even if an attacker gains access to your file system, they cannot read the private key without also knowing your keystore password. The .env file, while kept out of Git, stores the private key in plain text on your hard drive, making it vulnerable if your machine is compromised.
Preparing for Deployment
With your hardhat.config.js now securely configured, you are technically ready to deploy. The command would be:
# IMPORTANT: This is an example. Do NOT run it yet!
npx hardhat run scripts/deploy.js --network mainnet
Warning: Executing this command will initiate a real transaction on the Ethereum mainnet and will cost you real ETH. This lesson is about configuration only. We will not perform the actual deployment until we have covered cost estimation and final security checks in the upcoming lessons.
Conclusion
You have now reached a major milestone in your journey as a blockchain developer. Configuring your project for a mainnet launch with a focus on security is a sign of professionalism and a crucial step toward creating a real, valuable application.
Key Takeaways:
- Mainnet deployment carries real financial risks, making security paramount.
- Never hardcode private keys or other secrets in your source code.
- Using a
.envfile is a good security practice that separates secrets from code. - Using
hardhat-keystoreprovides a higher level of security by encrypting your secrets at rest, protecting them even if your local machine is compromised. - The final mainnet deployment command is
npx hardhat run <script> --network mainnet, but should only be run after careful preparation.
Preview of the Next Lesson:
Now that we know how to configure for mainnet, the next vital question is: how much will it cost? In the next lesson, we will dive into estimating mainnet deployment and transaction costs using gas estimation tools. This will ensure you can fund your deployer wallet appropriately and avoid any expensive surprises when you go live.