Recommended resources
The freely available resources this lesson will direct you to.
Hello again. In the previous lesson, you selected controls for investigating an unreliable separator level indication. A control proposal, however, is not permission to begin work. The plant team must agree on the task, prepare the equipment, verify required precautions, and communicate who may do what.
This lesson follows that agreement through the permit-to-work (PTW) sequence, from planning to handback. You will also distinguish the responsibilities of the people who authorize and lead the work from your responsibilities as a trainee. Allow about 40 minutes for the video, readings, and lesson. The sequence is a model for understanding site procedures—not a substitute for them.
A permit defines the boundary of the work
A permit to work is a controlled authorization for a specified task, on specified equipment, at a specified location, for a specified period. It records hazards and required precautions, but its deeper purpose is communication: the people preparing the plant and the people doing the job must share the same understanding of what is safe to undertake.
Watch the opening and middle of IMCA’s Permit to work. Notice its emphasis on nearby activities, access to the permit at the worksite, and checking whether conditions have changed.
IMCA’s short Permit to work video introduces the permit as a worksite communication and control tool, rather than just a form to complete.
Watch worksite risks for why other activities near a job matter. Then watch ongoing review for what workers and supervisors need to understand before starting and reconsider during the job.
For the separator transmitter, “investigate poor level indication” is not yet a precise work boundary. Reviewing control-room trends, inspecting a transmitter without disturbing it, opening its electrical enclosure, and disconnecting its process connection are different scopes. Each can expose people or the plant to different hazards. Permission for a visual inspection does not silently expand into permission to open equipment.
The illustration below gives a useful overview. Read it as a cycle of decisions, not as a universal permit form: sites may use different role names, approval steps, or authorizations.
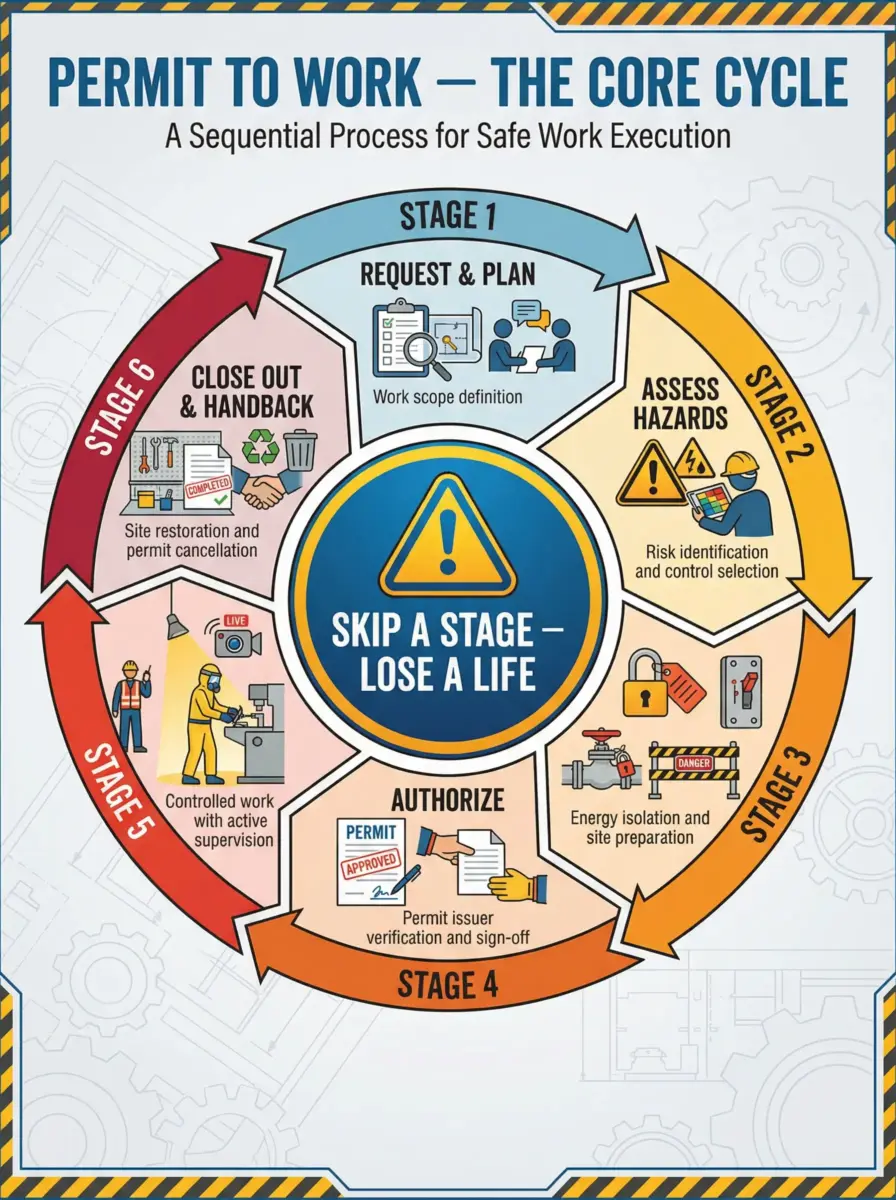
The important distinction is between recording a precaution and confirming it exists where the work will occur. Writing “isolate process connection” on a permit does not isolate the connection. Likewise, a permit does not prevent a release, de-energize a circuit, or establish that an atmosphere is safe. The people assigned those preparations must perform and verify them under the applicable procedures.
From request to authorization
An industry guidance document, Job Safety Analysis / Permit to Work from IOGP, pairs the PTW system with a job safety analysis (JSA). The JSA breaks a task into steps, identifies hazards, and proposes precautions; the permit controls authorization and communication for work that the site determines needs it. Terminology varies: you may encounter “task risk assessment” or another site-specific name instead of JSA.
7. Job Safety Analysis / Permit to Work
Read IOGP’s Job Safety Analysis / Permit to Work to see how task assessment, crew communication, authorization, changes, and closeout fit together.
On the opening page, read the definitions and pre-job requirements. Under “Job Safety Analysis,” continue through the numbered points in changes and task assessment; pay particular attention to hazards from other work in the area. Under “Permit to Work,” read roles and validity. Finish with closeout checks on the final page.
Here is the sequence those ideas create for a transmitter investigation:
- Request and define the job. The request identifies the equipment, location, work steps, tools, crew, and intended time. The responsible planner determines which site authorization applies. The name or type of permit depends on the actual work—not simply on the fact that an instrument is involved.
- Assess hazards and coordinate work. The team considers the transmitter’s process, electrical, and atmospheric hazards, as well as other work nearby. For example, a separate crew’s ignition-producing activity could affect an otherwise straightforward inspection. The assessment specifies controls and any supporting documents or checks required.
- Prepare and verify the worksite. Assigned personnel carry out prerequisites such as site-required isolation, equipment identification, or atmospheric testing. Where required, the responsible parties inspect the location together. A planned control that has not been established or cannot be verified remains an unresolved issue.
- Authorize and brief. The designated permit roles review the actual scope and completed prerequisites, then authorize the work according to site rules. Before starting, workers review the permit and task assessment, understand their own part in the job, and know what conditions would require them to stop.
- Execute within the approved boundary. The permit and controls must remain applicable throughout the task. A changed condition, new tool, different equipment, expanded task, or shift handover requires review under the site process; authorization is not automatically carried forward.
- Suspend or close and hand back. The team communicates what was completed, what remains open, and the condition in which the equipment and work area have been left. The appropriate personnel manage any later return to service.
This is a sequence of checks and agreements, not a promise that every job uses six separate forms or six different people. Site rules determine which tasks need a permit, what supporting records are required, and how suspension, renewal, and handover work.
Who is responsible for what?
The following manual provides a concrete example of role separation. Its procedures belong to a particular operating system, so study the responsibilities and decision points, not its local form names or validity periods.
Manage Control of Work Manual - RGM00001
Read the Manage Control of Work Manual as an example of how an operating site assigns permit duties. Focus on who plans, checks, authorizes, leads, and communicates work; your own site’s current procedures govern your actions.
In Section 3, “Permit to Work,” read the permit purpose. In Section 3.6, “Field tours,” read from required tours through their checks; focus on identifying the correct equipment and confirming prerequisites, rather than memorizing the site-specific list. In Section 3.9, “Roles and Responsibilities in Permit to Work,” skim the request-planning duties from request through timing. Then read issuer checks, receiver duties, and approver checks. You can skip the detailed rules for transferring those named roles between individuals.
The labels requester, issuer, approver, and receiver describe functions; they do not confer authority on anyone merely because they are present at the job. In the manual’s example, the requester describes and plans the work. The issuer reviews the request and its prerequisites. The approver confirms with the receiver that the site and equipment are ready for the agreed scope. The receiver accepts and leads that scope on behalf of the work team, makes sure workers understand it, and manages communication if work changes or ends. Other sites may combine, separate, or rename some functions while retaining the need for accountable authorization and work-team understanding.
As a trainee working under supervision, your role is different from accepting a permit on behalf of a crew. You should:
- Attend the pre-job briefing and review the work scope, equipment identity, hazards, controls, permit status, and instructions relevant to your assigned work. Ask for clarification before acknowledging a document you do not understand.
- Perform only the tasks assigned to you, within the approved scope and your competence, with the supervision required by site procedure. Do not treat another person’s permit signature as permission to improvise a diagnostic step.
- Check that the conditions you can observe match the briefing. If the equipment tag, location, work conditions, or required precautions do not match, pause and tell the person supervising the work.
- Follow the stated stop-work and emergency arrangements. Report a changed condition or an unexpected indication promptly; do not wait for a scheduled permit review.
- Help record factual observations and the work’s status as directed. Do not sign for an isolation, test, approval, or handback that you did not perform and are not authorized to certify.
The trainee is therefore an active participant in worksite verification, not a substitute for the qualified people assigned to establish controls or approve work. Raising an uncertainty is part of complying with the permit, even when the form appears complete.
When the planned job changes
Return to the unreliable level indication. Suppose the team has authorization to review diagnostics and visually inspect the transmitter without opening it. At the worksite, the indication is still suspect, and someone suggests loosening the process connection to check for blockage.
That suggestion changes the task from a non-intrusive investigation to opening a process boundary. The existing authorization cannot be assumed to cover it. The trainee should not loosen the connection. The team needs to stop that proposed step, inform the responsible permit holder or supervisor, and have the scope, hazards, required preparations, and authorization reviewed under site procedure. The next lesson will examine the isolation principles that might be required for such work; this lesson’s decision is about who may authorize the changed job and when it may begin.
A subtler change occurs if the scope stays the same but the conditions change. Imagine an alarm, a suspected leak, unexpected gas-detector indication, or another crew beginning work nearby. The original assessment may no longer describe the worksite. IOGP’s guidance calls for stopping work when scope or conditions change and reviewing the JSA and permit before resuming. Even at a shift change or after a delay, the incoming team needs a reliable account of what was done, what remains isolated or unfinished, and whether authorization remains valid. A permit that was valid earlier is not evidence that conditions are still suitable now.
Finally, “finished with the instrument” is not the same as “plant ready for normal operation.” At handback, the responsible people account for job status, housekeeping, outstanding defects, equipment condition, and any isolations or temporary changes. Restoration and return to service follow their own checks and authorization. If a fault remains, it must be communicated as an outstanding condition, not hidden by closing paperwork.
Key takeaways
A permit to work ties a defined job and time window to assessed hazards, established precautions, authorization, crew communication, and a controlled handback. Its value depends on checks at the real worksite and continued attention to changes—not on a signature alone. As a trainee, understand and stay within the approved task, work under the required supervision, speak up when details do not match, and stop the affected work when conditions or scope change.
Next, you will apply isolation and lockout/tagout principles to a simulated instrument task. That will make the “prepare and verify” stage more concrete without treating a permit itself as proof of zero energy.