Recommended resources
The freely available resources this lesson will direct you to.
Hello! Welcome back to your second lesson.
In our first session, we established a structured, metronome-based practice framework, treating your guitar development like a well-architected software project. You've been working on building your alternate picking speed—essentially, optimizing the performance of a core function. As you've likely discovered, when you increase speed and gain (distortion), you also introduce a new class of problems: unwanted noise.
Today's lesson is the "bug-fixing" and "refactoring" phase. A fast algorithm is useless if it's plagued by memory leaks and race conditions; similarly, fast playing is unlistenable if it's buried under a layer of string hiss, hum, and ringing open strings.
Our learning outcome is to apply fretting-hand and picking-hand muting techniques to eliminate unwanted noise during fast passages on a 7-string guitar. We will systematically identify the sources of noise and deploy specific, two-handed solutions to ensure every note you play is intentional and clean.
1. Identifying the Problem: Making Noise Audible
To fix a bug, you first need to reproduce it reliably. In guitar, unwanted noise often hides at lower volumes or with clean tones, only to become a major issue when you add distortion. Therefore, the first step is to practice with a high-gain tone. This doesn't mask mistakes; it amplifies them, making them easier to diagnose and fix.
This video provides an excellent overview of the different types of string noise we need to eliminate.
Do THIS to Play Guitar Fast *Without* Sounding Sloppy
Let's start by watching this video from the HowToPracticeGuitar channel. It clearly demonstrates why practicing with distortion is crucial and categorizes the main types of noise we'll be tackling.
Please watch the section on string noise types. Pay close attention to the three categories of noise he identifies: noise from lower strings, noise from higher strings, and 'bleeding' notes.
As you saw, we are fighting a battle on three fronts:
- Low-String Noise: The thicker strings (especially your low F#) vibrating sympathetically.
- High-String Noise: The thinner strings ringing out when they're not supposed to.
- Note Bleeding: A previously played note continuing to ring after you've moved to the next note.
To solve this, we need a system where both hands work together, each with a clear responsibility.
2. The Two-Handed Muting System
Think of this as a distributed system where each hand manages a specific part of the fretboard. The core principle is simple:
- The picking hand is responsible for muting all strings lower in pitch than the one you are currently playing.
- The fretting hand is responsible for muting all strings higher in pitch than the one you are currently playing.
This image provides a great visual summary of the overall strategy.
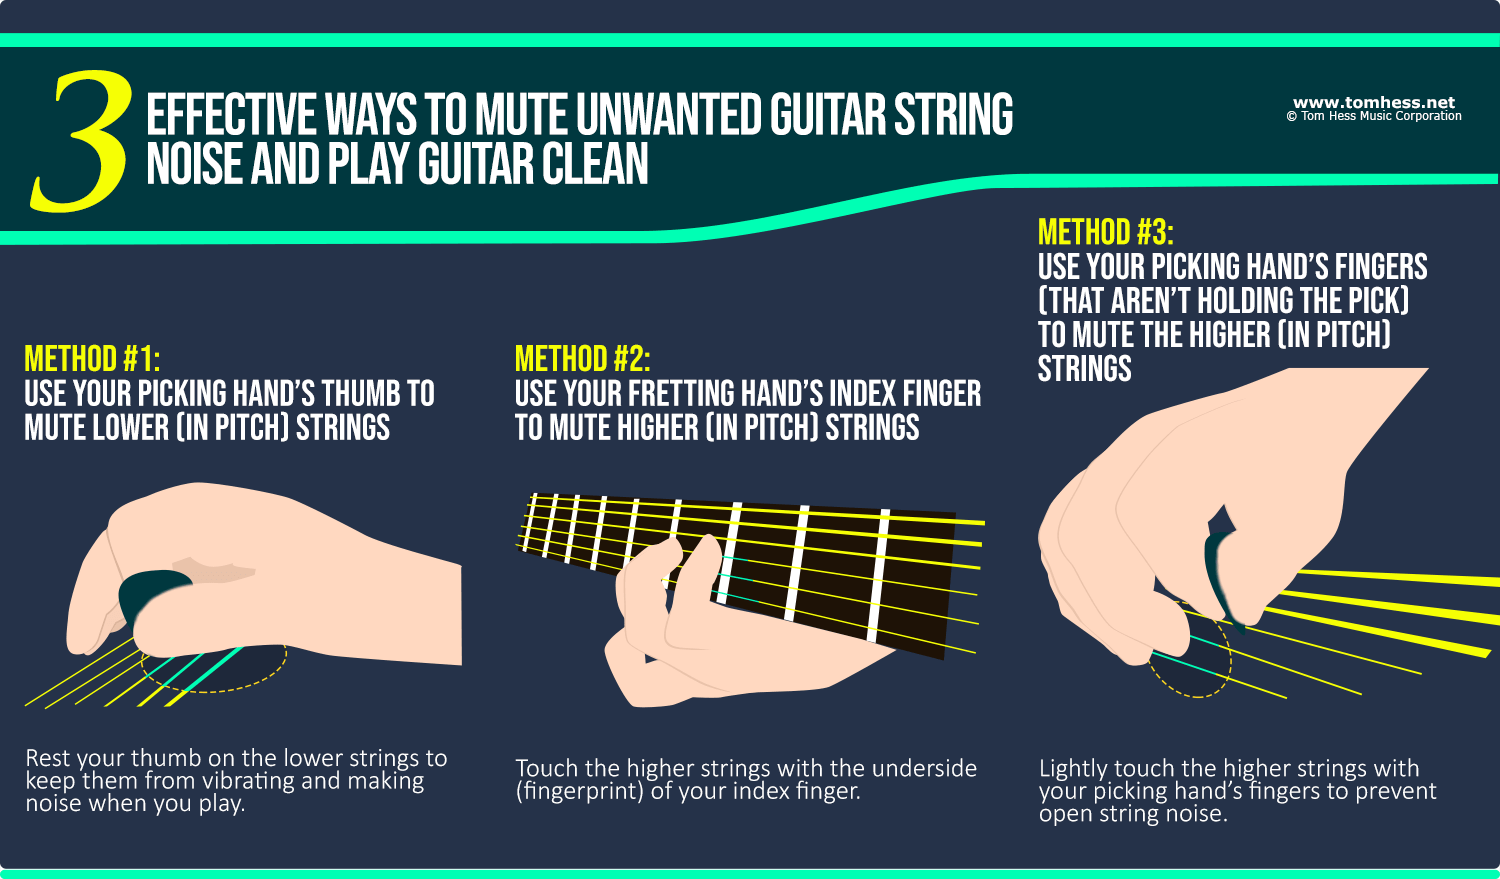
Let's break down the specific techniques for each hand.
3. Picking-Hand Muting Techniques
Your picking hand performs two distinct types of muting: a "noise gate" mute for lead playing and a "palm mute" for rhythmic effect.
A. Muting for Lead Passages (Noise Gating)
This is the most critical technique for cleaning up fast runs. The goal is to silence the lower strings without affecting the tone of the notes you are playing.
Do THIS to Play Guitar Fast *Without* Sounding Sloppy
The same video we just watched demonstrates this technique perfectly. Notice how he distinguishes this from the palm muting used in rhythm guitar.
Watch how to mute lower strings. Focus on how the heel of the palm rests on the lower strings and slides up and down as he moves across the fretboard. He even explains how to handle the lowest string by pretending there's an imaginary 7th or 8th string to rest on—a concept you can directly apply to your 7-string.
This technique, sometimes called a "floating palm mute," is your primary defense against low-end rumble from the F# and B strings.
B. Muting for Rhythmic Effect (Palm Muting)
This is the familiar, percussive "chugging" sound common in metal and rock. While it's a sonic effect, it's also a form of noise control. On a 7-string, the amount of pressure you apply is key to keeping the tone tight and not muddy.

This next video is specifically about palm muting on a 7-string and offers some excellent, nuanced advice.
7 STRING - How to Improve Your PALM MUTING Guitar Lesson
This lesson from Jason Stallworth is tailored for 7-string players. He demonstrates how to adjust your palm muting pressure depending on the type of riff you're playing.
Watch the riff demonstrations. Notice the difference in his hand pressure between the slower, down-stroked riff (firmer pressure) and the faster, alternate-picked riff (lighter pressure). This is a key insight for maintaining clarity at speed.
4. Fretting-Hand Muting Techniques
While your picking hand handles the low strings, your fretting hand silences the high strings. This is often the missing piece for many guitarists. The primary technique involves using the underside of your fretting fingers.
Do THIS to Play Guitar Fast *Without* Sounding Sloppy
Let's return to the HowToPracticeGuitar video for a clear demonstration of fretting-hand muting.
Watch muting higher strings. The key technique here is using the flat part of your index finger to lightly touch the strings above (higher in pitch than) the note you are fretting. This single habit will clean up your playing immensely.
To reinforce this and other fretting-hand strategies, have a look at this article.
How Do You Mute Strings? | ZOT Zin Guitar Lessons
This article from ZOT Zin Guitar Lessons, 'How Do You Mute Strings?', provides further examples of fretting-hand muting, including using your thumb for the lowest string.
Read the sections 'Cleaning Up The Playing', 'Muting With the Thumb', and 'Muting in Soloing'. This will solidify the concept of using all parts of your fretting hand to maintain control.
5. Your Practice Routine: Integrating Muting
Now, let's integrate these techniques into your practice. We'll adapt last week's chromatic exercise to force you to use the two-handed muting system.
Objective: To play a multi-string pattern with zero extraneous noise.
Tools: Guitar (with distortion), metronome, practice log.
Your Muting Practice Block (Approx. 25-30 minutes)
1. The "Audit" Exercise (15 mins)
This exercise is designed to make you hyper-aware of your muting.
- Pattern: A simple scale fragment across three strings. Let's use the G-major scale on the D, G, and B strings.
- On the D string, play frets:
5-7 - On the G string, play frets:
4-5-7 - On the B string, play frets:
3-5 - Play this up and down using strict alternate picking and 16th notes (four notes per click).
- On the D string, play frets:
- The Process:
- Set your metronome to a very slow speed (e.g., 50 BPM).
- Play the pattern. As you play the notes on the G string, your focus should be on two things:
- Picking Hand: Is the heel of your palm resting on and silencing the low F#, B, E, and A strings?
- Fretting Hand: Is the underside of your fretting finger(s) lightly touching and silencing the high E string?
- Debug Your Muting: After playing the pattern, stop and hold the last note (fret 5 on the B string). Now, use the middle or ring finger of your picking hand to tap on all the other strings. Do you hear a "thud" (muted) or a "ping" (ringing)? This is your diagnostic test. If you hear a "ping", adjust your hand positions until it's gone.
- Once you can play it perfectly and silently at 50 BPM, begin increasing the tempo in 4 BPM increments, just as you did last week.
- Log Your Results: In your practice log, create a new entry:
Multi-String Muting Exercise. Log your Max Clean and Silent Tempo (MCST) for the day.
2. Application: Revisiting the Speed Workout (10 mins)
- Go back to the BERNTH guided workout video from last week's lesson (
resource_id: eb75d). - Play along with the 'Guided Speed Workout Session' (02:57 - 09:50) again.
- This time, your primary focus is not speed, but silence. Listen intently for any unwanted noise between notes and phrases. Try to actively apply the two-handed muting system as you play.
- In your log, make a qualitative note: "Felt cleaner than last week," or "Still hearing noise on string changes," etc.
Conclusion
Today we've added a crucial layer of control to your playing. Cleanliness is not an afterthought; it's a fundamental technique that must be practiced with the same diligence as picking or fretting.
Key Takeaways:
- High-gain amplification is a diagnostic tool that reveals unwanted string noise.
- Effective muting is a two-handed system: the picking hand mutes lower strings, and the fretting hand mutes higher strings.
- There are distinct picking-hand techniques for noise-gating lead lines and creating a rhythmic palm-mute effect.
- You must actively "audit" or "debug" your muting by testing which strings are live while you play.
As you continue to build speed, these muting techniques must become an automatic, unconscious part of your playing. Think of it as the continuous garbage collection running in the background, keeping your performance clean and efficient.
In our next lesson, we will move on to a new articulation: "Execute smooth, multi-string legato runs (hammer-ons and pull-offs) with consistent dynamics." You will find that the muting skills you develop this week are even more critical for clean legato, as there is no pick attack to mask sympathetic vibrations.
Keep up the structured work, and focus on silence as much as speed.