Recommended resources
The freely available resources this lesson will direct you to.
Hello again. In our last lesson, we explored how HTMX provides visual feedback during requests using hx-indicator and the htmx-request class. This mechanism allows for simple, CSS-driven responses to the HTMX request lifecycle. However, many real-world scenarios require more than just toggling visibility; they demand custom client-side logic. You might need to initialize a third-party JavaScript widget on new content, send an analytics event, or orchestrate complex UI updates that go beyond a simple swap.
This lesson directly addresses that need. We will tackle the learning outcome: Listen and react to HTMX events (e.g., htmx:afterSwap) using vanilla JavaScript for custom client-side logic. For a developer accustomed to React's ecosystem of hooks (useEffect, useCallback), this is the key to understanding how HTMX allows you to write that necessary "glue code" while still retaining its hypermedia-centric model. We'll explore the events HTMX emits, how to listen for them, and how to use them to solve practical problems you'd typically handle with client-side state management in a SPA.
The HTMX Event Lifecycle
At its core, HTMX works by making an AJAX request, receiving HTML, and swapping it into the DOM. Throughout this process, it dispatches a series of standard browser CustomEvents on various elements. By listening for these events, you can hook into any stage of the request/response cycle.
The complete sequence of events can be quite detailed, but understanding the major phases is crucial. The flowchart below provides a simplified but effective mental model.
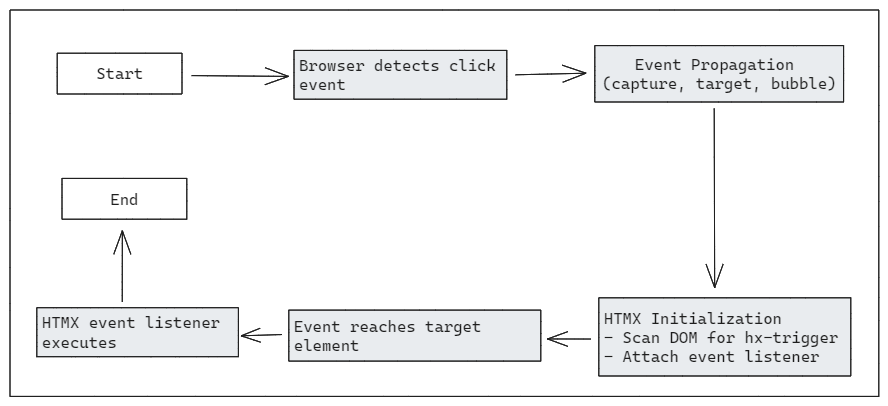
While a diagram is helpful, seeing the events fire in real-time is even better. HTMX exposes a global htmx object that includes a helpful debugging tool for this purpose. The following video segment from a talk by Duncan Hunter demonstrates how to use htmx.logAll() in the browser console to see the full stream of events for a single HTMX request. This is an invaluable technique for debugging and discovery.
HTMX: Why You Don't Always Need a SPA Framework - Duncan Hunter - NDC Sydney 2024
This clip shows how to inspect the HTMX event lifecycle in real-time.
Watch from this segment to see how to enable logging and observe the sequence of events like htmx:trigger, htmx:configRequest, htmx:beforeRequest, and htmx:afterSwap that fire during a single delete operation. This demonstrates the rich set of hooks available for your custom logic.
Two Ways to Listen: htmx.on() and hx-on
Now that we know these events exist, how do we listen to them? HTMX offers two primary approaches, each suited to different scenarios.
- Global Event Listeners with Vanilla JS: You can use standard JavaScript (
document.body.addEventListener(...)) or HTMX's helper function,htmx.on(), to set up listeners in your main script file. This is ideal for logic that applies broadly, or is too complex to comfortably fit inside an HTML attribute. - Inline Handlers with
hx-on: For logic that is tightly coupled to a specific element, thehx-onattribute allows you to write the handler directly in your HTML, embracing HTMX's principle of locality of behavior.
Let's explore both, starting with the JavaScript-based approach.
1. Listening with htmx.on()
The htmx global object provides a convenient API for interacting with its systems. The official documentation for the JavaScript API is your best reference here.
This resource covers the core JavaScript functions for adding event listeners.
First, focus on the htmx.on() method. This is a wrapper around addEventListener that simplifies attaching listeners, especially when dealing with event delegation. Also, review the htmx.onLoad() method. This is a very common and useful helper that specifically listens for the htmx:load event, which fires whenever HTMX adds new content to the DOM.
The most frequent use case for this pattern is initializing third-party libraries on dynamically loaded content. Imagine you have a data visualization library like Chart.js. In a React app, you might use a useEffect hook to initialize the chart when its data prop changes. With HTMX, you would use htmx:onLoad to find and initialize chart elements within the newly swapped-in HTML.
Here's a conceptual example:
// In your site's main javascript file
htmx.onLoad(function(content) {
  // Find all elements that need to be initialized as charts
  var chartElements = content.querySelectorAll('.chart-container');
  for (var i = 0; i < chartElements.length; i++) {
    // Assume chart data is stored in data-* attributes
    var chartData = JSON.parse(chartElements[i].dataset.chartData);
    new Chart(chartElements[i], chartData);
  }
});
This single htmx.onLoad callback ensures that no matter how or where new content is loaded by HTMX, your charts will always be properly initialized.
2. Inline Handlers with hx-on
For simpler or highly localized actions, the hx-on attribute is often a more direct solution. It allows you to embed JavaScript directly into the element that will handle the event. A fantastic video from BugBytes walks through its usage, from basic DOM events to advanced custom events.
HTMX 1.9 - hx-on Attribute for Responding to Events
This tutorial is a concise guide to the hx-on attribute.
Basic Usage: Watch the introduction from the beginning to this point to understand how hx-on works with standard browser events like click and mouseover. HTMX Events: The segment from here is crucial. It shows how to use hx-on to listen for HTMX-specific events like htmx:afterRequest and htmx:afterSettle, demonstrating the timing differences. Calling Functions: Finally, watch from this part to see how to move complex logic out of the attribute and into a separate JavaScript function, which is a much cleaner approach for anything non-trivial. The example of counting table rows after content settles is a perfect, practical demonstration.
Advanced Patterns and Practical Use Cases
With the "how" covered, let's explore the "why" with some powerful patterns that directly translate concepts from the React world.
Custom Confirmation Dialogs
The default hx-confirm attribute uses the browser's blocking window.confirm() dialog. To implement a more polished, asynchronous confirmation modal (e.g., using a library like SweetAlert2), you need to intercept the htmx:confirm event.
The process is:
- Listen for
htmx:confirm. - Call
event.preventDefault()to stop HTMX from proceeding. - Show your custom modal.
- If the user confirms, call the
event.detail.issueRequest()function to resume the HTMX request.
The official HTMX documentation provides a perfect, copy-pasteable example of this.
This section of the events documentation details how to create custom, asynchronous confirmation flows.
Read the section on the htmx:confirm event. Pay close attention to the example that integrates the SweetAlert library. It's a complete recipe for replacing the default confirmation dialog.
Modifying Requests on the Fly
A common task in SPAs is to add headers to outgoing requests, such as an Authorization token. In React, you might configure an Axios interceptor. The HTMX equivalent is to listen for the htmx:configRequest event. This event fires just before the AJAX request is sent, giving you a chance to modify its parameters, headers, and more.
We'll revisit the events documentation for another key pattern.
Find and read the example under the htmx:configRequest section. It shows exactly how to add a new parameter to the request, and the same evt.detail.headers object can be used to add request headers.
This event is your hook for any pre-flight request modifications.
Triggering Client Events from the Server
Perhaps the most powerful pattern is having the server trigger client-side behavior. After a successful POST request, you might want to show a "toast" notification, clear a form, or trigger an analytics event. You can do this by sending the HX-Trigger HTTP header in your response. The client can then listen for these custom events.
The BugBytes video we watched earlier concludes with an excellent demonstration of this pattern.
HTMX 1.9 - hx-on Attribute for Responding to Events
Let's return to the BugBytes video to see how to connect the backend to client-side events.
Watch the final segment from here. It shows how to add an HX-Trigger header in the backend (the example uses Django, but in Express.js it would be res.set('HX-Trigger', 'customEvent')). Then, it shows how to use hx-on:custom-event on the client to react by changing styles. You could just as easily call a function to show a toast notification.
Conclusion
Today we've bridged the gap between hypermedia-driven content and necessary client-side interactivity. While HTMX champions server-side rendering, it provides a complete and robust event system for the "last 10%" of your logic that must run in the browser.
Key Takeaways:
- HTMX fires a predictable sequence of DOM events (e.g.,
htmx:configRequest,htmx:beforeSwap,htmx:afterSwap,htmx:load) during its request/response cycle. - You can listen for these events using standard JavaScript (
addEventListenerorhtmx.on) for complex or global logic. - The
hx-onattribute provides a convenient way to handle events inline, promoting locality of behavior for simpler, element-specific logic. - These event listeners are your tool for tasks like initializing third-party libraries, creating custom confirmation flows, modifying outgoing requests, and reacting to custom events triggered from the server via the
HX-Triggerheader.
In this module, we've covered updating multiple page areas (OOB swaps), managing browser history, providing loading feedback, and now, executing custom JavaScript. All these patterns rely on the client pulling data from the server. In our next and final lesson for this module, we'll flip the script and explore how the server can push updates to the client in real-time using Server-Sent Events (SSE).