Recommended resources
The freely available resources this lesson will direct you to.
Hello! Welcome back.
In our last lesson, we successfully constructed our "digital factory"—the Coreboot build environment. With the toolchain compiled and the source code ready, we have all the software we need to forge our own firmware.
Before we start building, however, we must perform the single most important safety procedure of this entire project. Today, we will create a perfect, verified backup of your laptop's original firmware. Think of this as taking a precise mold of the factory-original key before we attempt to cut our own. This backup is your ultimate safety net, a guaranteed path to restore your x230 to its factory state should anything go wrong.
Lesson Outline
This lesson is dedicated to the learning outcome: Create and verify multiple redundant backups of the original proprietary BIOS firmware.
We will cover:
- The Principle: Why redundant, verified backups are non-negotiable in firmware work.
- Hardware Access: Safely disassembling the x230 to access the BIOS chips.
- Reading the Chips: Using
flashromto extract the firmware from the two separate BIOS chips. - Verification and Combination: Using cryptographic hashes to verify the integrity of our backups and combining them into a single master image.
By the end of this lesson, you will have a "golden image" of your stock firmware, securely backed up and ready for the next stage of modification.
Estimated time to complete: 60 minutes (This includes time for careful hardware disassembly and reassembly).
1. The Principle: Redundancy and Verification
In your work with financial systems and statistical modeling, you're intimately familiar with the concepts of risk management and data integrity. We're going to apply those same principles here, but with a physical device. Flashing firmware is an inherently risky operation; a corrupted write or a power failure at the wrong moment can "brick" the motherboard, rendering it unusable.
Our mitigation strategy is twofold:
- Redundancy: We won't just read the firmware once. We will read it multiple times. A loose connection on the SOIC clip or a burst of electrical noise can introduce transient errors. By taking multiple readings, we can compare them to ensure we have a clean, error-free copy. This is analogous to repeated measurements in an experiment to ensure consistency.
- Verification: How do we compare two 8-megabyte binary files? We use a cryptographic hash function (like SHA256). As you'll know from your CS background, these functions produce a unique, fixed-size "fingerprint" for a given input. If two files produce the exact same hash, we can be virtually certain they are identical. If the hashes differ, we know at least one of the reads was corrupted.
This read-verify-repeat cycle is the core of safe firmware handling.
🎥 Watch (1 min)
To see this principle in action, watch this short clip. The presenter is working on an x220, but the process of reading multiple times and checking the checksums is universal.
2. Hardware Access: Entering the Machine
Now for the hands-on part. We need to open the x230 to get to the motherboard.
⚠️ Important Pre-flight Checks:
- ESD Prevention: You've studied physics, so you know the danger of electrostatic discharge to sensitive electronics. Work on a non-conductive surface, and ground yourself periodically by touching a large metal object (like a radiator or the metal case of a plugged-in-but-turned-off desktop PC). If you have an anti-static wrist strap, use it.
- Programmer Voltage: The BIOS chips on the x230 operate at 3.3V. Many common CH341A programmers are configured for 5V by default, which can damage the chips. Ensure your programmer is modified or confirmed to operate at 3.3V.
📖 Review (2 mins)
Please review the section on the 3.3V modification to ensure your hardware is safe to use.
The "ultimate" Thinkpad X230 - Cal Bryant (CH341A programmer modification)
Disassembly Steps
- Power Down Completely: Disconnect the AC adapter and remove the main battery. Press the power button a few times to drain any residual charge.
- Remove Keyboard & Palm Rest: Follow the visual guides below to remove the necessary screws and carefully detach the keyboard and palm rest. The process is very similar to the one shown in the video for the x220.
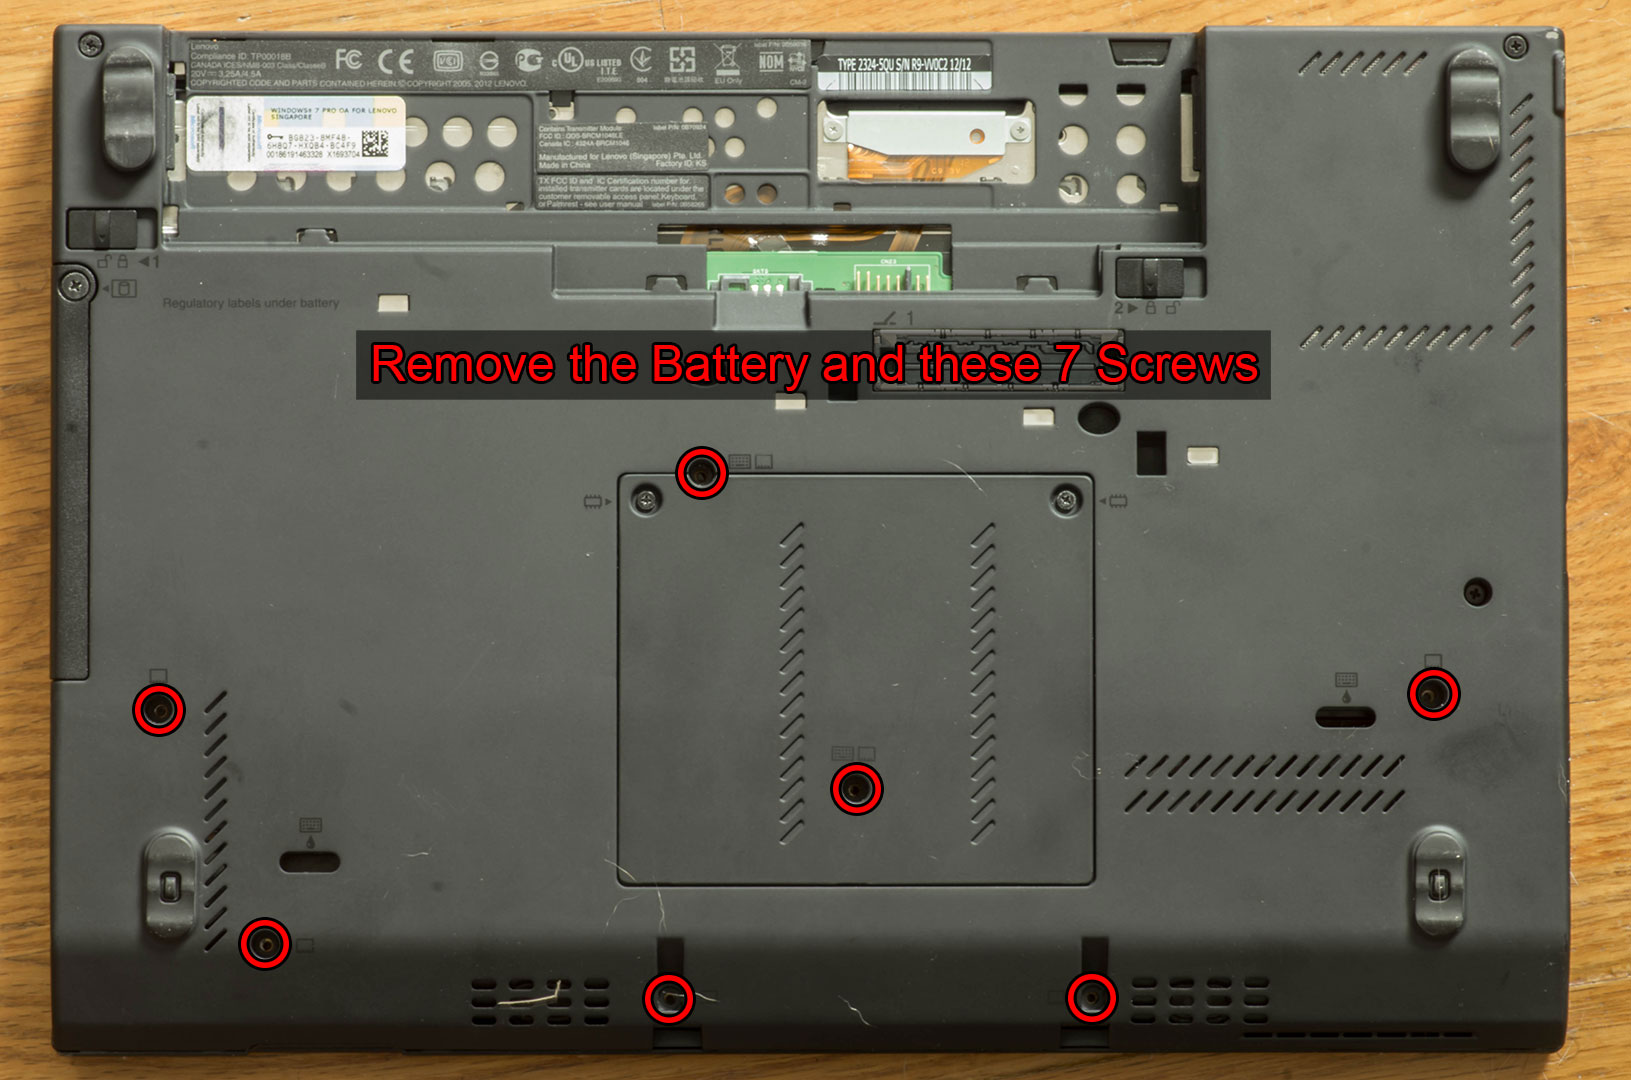
Caption: First, ensure the battery is removed. Then, remove the seven screws on the underside of the laptop that secure the keyboard and palm rest, as highlighted in red.
🎥 Watch (2 mins)
Watch this segment to see how the keyboard and palm rest are removed after the screws are out. The process on your x230 will be nearly identical.
- Locate the BIOS Chips: Once the palm rest is removed, you will see a black protective film on the bottom-right of the motherboard. Carefully peel this back to reveal the two BIOS chips. Unlike the x220, the x230 has its 12MB BIOS split across two physical chips: an 8MB chip and a 4MB chip.

Caption: A close-up of the x230 motherboard showing the two BIOS chips. The bottom chip is 8MB and the top chip is 4MB. Note the pin 1 indicator (a small dot on the chip), which must align with the red wire on your SOIC clip's ribbon cable.
3. Reading the Firmware with flashrom
With the chips exposed, we can now connect our flashing hardware and read their contents. You will need to do this for each chip separately.
The tool for this job is flashrom. It's a powerful open-source utility for identifying, reading, writing, and erasing flash chips.
The flashrom Command
The basic command structure we'll use is:sudo flashrom -p <programmer> -c <chip_model> -r <output_file.bin>
-p ch341a_spi: Specifies that we are using a CH341A programmer in SPI mode. If you are using a Raspberry Pi, this would be-p linux_spi:dev=/dev/spidev0.0,spispeed=1024or similar.-c "...": Specifies the chip model.flashromis good at auto-detecting, but the x230 can have different chip models. Ifflashromprompts you with a choice, you can either try to read the tiny text on the chip itself or simply provide the most likely model as shown in the guides.-r: Tellsflashromto read the chip's contents and save them to a file.
Reading Procedure
Let's create a directory for our backups and start reading.
# Create a directory to work in
mkdir -p ~/x230-backups
cd ~/x230-backups
1. Read the Bottom (8MB) Chip:
Carefully attach the SOIC8 clip to the bottom chip, ensuring pin 1 on the clip (the red wire) aligns with pin 1 on the chip.
Now, run the read command at least twice, saving to different files. The chip model may vary, but "MX25L6406E/MX25L6408E" or "EN25QH64" are common. flashrom will tell you if it can't identify the chip.
# First read of the bottom chip
sudo flashrom -p ch341a_spi -c "MX25L6406E/MX25L6408E" -r bottom1.bin

# Second read of the bottom chip
sudo flashrom -p ch341a_spi -c "MX25L6406E/MX25L6408E" -r bottom2.bin
2. Read the Top (4MB) Chip:
Carefully detach the clip and connect it to the top chip, again ensuring correct pin alignment. Run the read command at least twice. A common chip model is "MX25L3206E/MX25L3208E".
# First read of the top chip
sudo flashrom -p ch341a_spi -c "MX25L3206E/MX25L3208E" -r top1.bin

# Second read of the top chip
sudo flashrom -p ch3a41a_spi -c "MX25L3206E/MX25L3208E" -r top2.bin
📖 Reading (3 mins)
For a detailed account of this process, including pictures of the clip attached, read the "Backup time" and "Extracting the original BIOS image" sections from these excellent community guides.
ThinkPad X230 + coreboot: success - Nicholas Tay (Backup time)
The "ultimate" Thinkpad X230 - Cal Bryant (Extracting the original BIOS image)
4. Verification and Combination
Now we verify our redundant copies. We'll use the sha256sum utility.
# Verify the bottom chip dumps
sha256sum bottom*.bin

# Verify the top chip dumps
sha256sum top*.bin
You should see output like this:
$ sha256sum bottom*.bin
e3b0c44298fc1c149afbf4c8996fb92427ae41e4649b934ca495991b7852b855  bottom1.bin
e3b0c44298fc1c149afbf4c8996fb92427ae41e4649b934ca495991b7852b855  bottom2.bin

$ sha256sum top*.bin
5a8a58ec63814838a488349281a145a339962073715363450970e303434199e0  top1.bin
5a8a58ec63814838a488349281a145a339962073715363450970e303434199e0  top2.bin
The hashes for each pair of files must be identical. If they are not, your clip connection was likely unstable. Do not proceed. Re-attach the clip and re-read the chip that produced mismatching hashes until you get two identical files.
Once verified, we can combine the dumps into a single 12MB firmware image. The standard convention is to concatenate the bottom chip (8MB) followed by the top chip (4MB).
cat bottom1.bin top1.bin > factory-12MB.bin
This file, factory-12MB.bin, is your golden image. Back it up immediately to a separate USB drive, cloud storage, or another machine. This is your insurance policy.
You can now carefully re-assemble your x230.
Conclusion
Excellent work. This was a critical, high-stakes lesson, and you've navigated it perfectly. You've moved from the digital realm of the build environment to the physical hardware, successfully extracted the original firmware, and applied rigorous principles of redundancy and verification to ensure you have a perfect backup.
Key Takeaways:
- Firmware flashing is risky; a verified backup is your only safety net.
- The process is Read -> Read -> Verify -> Combine.
- The x230 BIOS is split across two chips: an 8MB bottom chip and a 4MB top chip.
flashromis the tool used to read the physical chips.sha256sumis used to cryptographically verify that your redundant backups are identical.- The final 12MB image is created by concatenating the bottom chip's data and the top chip's data, in that order.
Next Up
With our factory-12MB.bin golden image safely stored, we are now ready to begin modifying it. In the next lesson, we will use our backup to produce a neutralized Intel ME firmware region using the me_cleaner script. This is the first major step in surgically reducing the attack surface of our machine.