Recommended resources
The freely available resources this lesson will direct you to.
- METAMASK - BEGINNERS TUTORIAL - 2025 - STEP BY STEP GUIDE - HOW TO SET UP AND USE METAMASK WALLETwww.youtube.com
- Deploy a Smart Contract to the Sepolia Testnet - Under 3 Minuteswww.youtube.com
- Tutorial: How to set up an Ethereum wallet on MetaMaskcodehs.com
- Connecting to Ethereum's Sepolia testnet andopencourse.inf.ed.ac.uk
Hello! Welcome to your seventh lesson.
In our last session, we demystified the costs of using Ethereum by breaking down the concepts of gas, base fees, and priority fees. You learned that every action on the network has a computational cost, which users pay for in ETH.
Today, we move from theory to practice. To send transactions and pay for gas, you need a wallet. Your learning outcome for this lesson is to set up a MetaMask wallet and connect to an Ethereum testnet (e.g., Sepolia).
This is a foundational step in your journey. As a developer, MetaMask will be your primary tool for interacting with the Ethereum network, deploying your smart contracts, and testing your decentralized applications. Think of it as your personal gateway to the blockchain.
What is a Self-Custody Wallet?
Before we jump in, it's crucial to understand what kind of tool MetaMask is. It's a self-custody (or non-custodial) wallet. This means that you—and only you—have full control over your private keys and, therefore, your assets.
This is fundamentally different from an account on a centralized cryptocurrency exchange (like Coinbase or Binance), where the exchange holds your keys on your behalf (a custodial service).
- Custodial (Exchange): Convenient, but you trust a third party with your funds. "Not your keys, not your coins."
- Self-Custody (MetaMask): You have complete control and responsibility. You are your own bank.
MetaMask works as a browser extension that injects the necessary tools into your browser, allowing websites (which we call decentralized applications or "dApps") to request actions from your wallet, such as sending a transaction.
Part 1: Installing and Creating Your Wallet
The best way to learn is by doing. We'll now install the MetaMask extension and create your first wallet. The following video provides a clear, step-by-step visual guide.
METAMASK - BEGINNERS TUTORIAL - 2025 - STEP BY STEP GUIDE - HOW TO SET UP AND USE METAMASK WALLET
Watch this section of the 'METAMASK - BEGINNERS TUTORIAL' from Kiel Wilson to guide you through the initial setup process. It covers downloading the extension, creating a new wallet, and setting a password.
Please watch from 01:06 to 03:38. Follow the instructions to install MetaMask and create your wallet. Pay close attention to the part where the Secret Recovery Phrase is introduced.
The Secret Recovery Phrase: Your Master Key
As you saw in the video, the most critical part of the setup process is securing your Secret Recovery Phrase (also called a seed phrase). Let's be crystal clear about what this is:
The 12-word Secret Recovery Phrase IS your wallet. It is the master key that can be used to regenerate your private keys and access your account on any device in the world.
Your local MetaMask password only encrypts your wallet on your current browser. If your computer is lost or stolen, or if you want to access your wallet on a new device, the password is useless. You will need the Secret Recovery Phrase.
Security Best Practices (Non-Negotiable):
- Write it down: Use pen and paper. Store it in a secure, physical location (e.g., a safe).
- Store it offline: Do not store it as a text file, in a cloud drive (Google Drive, Dropbox), in an email, or as a screenshot. Anything connected to the internet is a potential target for hackers.
- Never share it: No legitimate service or support person will ever ask for your seed phrase. Anyone who asks for it is trying to steal your funds.
- Create multiple backups: Store backups in different, secure physical locations.
Your background in development gives you a strong understanding of security, but the self-custody model of blockchain puts the responsibility entirely on you. Treat your seed phrase with the utmost seriousness.
Test your understanding!
You've installed MetaMask on your laptop and secured your 12-word Secret Recovery Phrase. A few weeks later, you buy a new desktop computer and want to access the same Ethereum account. What piece of information do you need?
- Your MetaMask password from the laptop.
- The Secret Recovery Phrase.
- Your public Ethereum address.
Show answer
The correct answer is 2. The Secret Recovery Phrase. When you install MetaMask on the new computer, you will choose the "Import an existing wallet" option and enter your 12-word phrase. This will restore full access to your account. The password is device-specific, and the public address is for receiving funds, not accessing them.
Part 2: Connecting to a Testnet
Now that your wallet is set up, it will be connected to the Ethereum Mainnet by default. This is the live network where transactions involve real money. For development, this is risky and expensive.
Instead, we will use a testnet. A testnet is a parallel blockchain that functions almost identically to the main network, but the currency (test ETH) is free and has no real-world value. This is our sandbox for development. The most commonly used testnet today is Sepolia.
Let's connect your MetaMask wallet to the Sepolia testnet.
- Open MetaMask: Click the fox icon in your browser's toolbar.
- Open the Network Selector: In the top-left corner of the MetaMask window, you'll see a dropdown menu that currently says "Ethereum". Click on it.
- Enable Testnets: At the bottom of the network list, you will see a toggle for "Show test networks". Click this to turn it on.
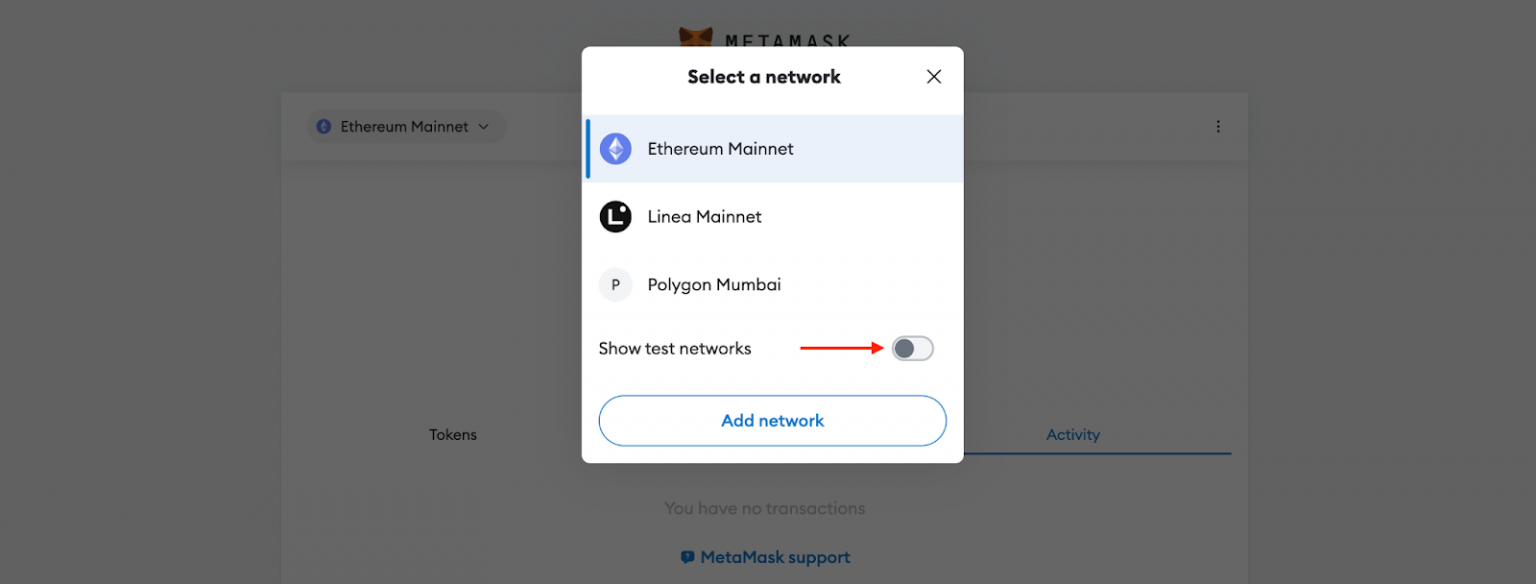
- Select Sepolia: Once testnets are visible, you will see "Sepolia" in the list. Click on it.
Your wallet is now connected to the Sepolia testnet! You'll notice the network indicator in the top-left has changed to "Sepolia", and your balance is 0 Sepolia ETH.
Your public address (the long string starting with 0x...) remains the same across all Ethereum-compatible networks. You can copy it by clicking on it. This is the address you'll use to receive test ETH and identify your account on the testnet.
Conclusion
Congratulations! You've completed a crucial rite of passage for any blockchain developer. You now have the primary tool for interacting with Ethereum.
Key Takeaways:
- MetaMask is a self-custody wallet that gives you full control over your Ethereum account.
- The Secret Recovery Phrase is your master key. Its security is your absolute priority.
- Testnets like Sepolia are sandboxes for developers to build and test applications without financial risk.
- You can easily switch between networks directly within MetaMask.
Preview of the Next Lesson:
Your wallet is connected to Sepolia, but it's empty. To do anything on the network, you'll need some test ETH to pay for gas fees. In our next lesson, you will acquire testnet ETH from a faucet and inspect transactions on a block explorer. This is where you'll see the concepts of transactions and gas in action for the first time.