Recommended resources
The freely available resources this lesson will direct you to.
Hello! Welcome to the first lesson in our module on building autonomous agents with frameworks.
In the previous module, we delved into the mechanics of agent capabilities, including multi-step tool use and, crucially, robust error handling. You learned how to build agents from first principles, giving you a deep appreciation for the components involved. While this is powerful, building everything from scratch can be time-consuming.
This is where frameworks come in. In software engineering, frameworks like Spring, Django, or React provide abstractions and pre-built components to accelerate development. The same principle applies in the world of LLMs. In this lesson, we will introduce LangChain, a popular framework for building AI applications.
Our learning outcome for today is to build a simple conversational agent using a framework like LangChain. You'll see how the concepts we've covered—like tools and agent loops—are encapsulated in higher-level abstractions, allowing you to build sophisticated applications more efficiently.
What is an AI Agent Framework?
Before we dive into coding, let's clarify what a framework like LangChain offers and how it helps build "agents" that are more capable than simple LLM chatbots.
An agent can be thought of as an LLM-powered system with three key additions:
- Tools: The ability to interact with the outside world (e.g., search the web, query a database, call an API).
- Memory: The ability to remember previous interactions within a conversation.
- Reasoning: The ability to use the LLM to decide which tools to use and in what order to accomplish a task.
Frameworks provide the "scaffolding" to connect these pieces together. To get a high-level overview, let's watch a short video.
LangChain Explained in 10 Minutes (Components Breakdown + Build Your First AI Chatbot)
The video 'LangChain Explained in 10 Minutes' from KodeKloud provides an excellent introduction to what LangChain is and the problems it solves.
Please watch from 00:42 to 02:27. This segment distinguishes between a standard LLM and an autonomous agent, and it positions LangChain as the abstraction layer that facilitates building these more complex systems.
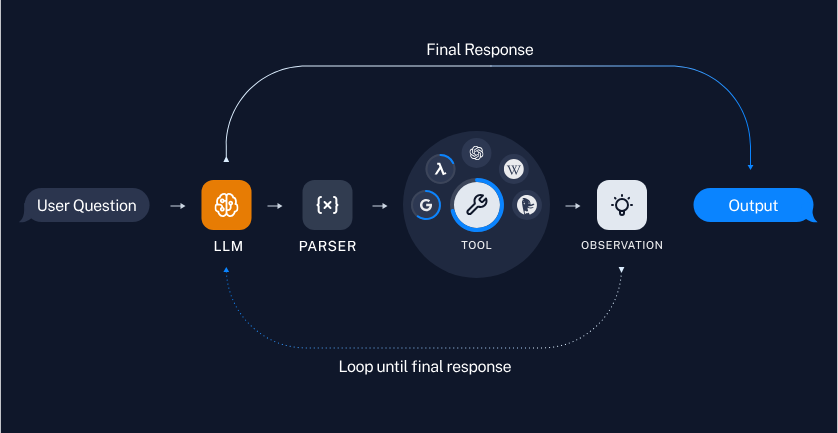
This core idea of an agent using tools in a loop is central. The diagram below visualizes this iterative process, which LangChain helps orchestrate.
Setting Up Your Environment
Let's get your development environment ready. As an experienced software engineer, this process of setting up a new project with its dependencies will be familiar. We will install LangChain and the necessary OpenAI integration, and configure your API key.
Building LangChain AI Agents Tutorial | Beginner to Advanced Guide
The article 'Building LangChain AI Agents Tutorial' provides a straightforward guide for the initial setup. We will follow its first two steps.
Please read 'Step 1: Install the Tools You Need' and 'Step 2: Set Up Your Project'. You can install langchain and langchain-openai instead of the longer list in the article. The key steps are: Create a project directory and a Python virtual environment. Run pip install langchain langchain-openai python-dotenv. Create a .env file and add your OPENAI_API_KEY to it.
Building a Conversational Agent
Now for the hands-on part. We'll build a simple conversational agent that has access to a tool and can remember the conversation history. We will use the modern create_agent function from LangChain, which provides a high-level and intuitive way to assemble an agent.
The following video provides a practical, code-first walkthrough of building an agent. We'll watch it in two parts to focus on specific concepts.
Part 1: Creating a Basic Agent with a Tool
First, let's see how to define a tool and create a simple agent that can use it.
LangChain Full Crash Course - AI Agents in Python
This segment from the 'LangChain Full Crash Course' by NeuralNine will guide you through creating a basic agent.
Watch from 06:55 to 11:48. Don't worry about following the setup at the beginning, as you've already done that. Focus on these key parts of the code: How the @tool decorator is used to turn a Python function into a tool the agent can use. The structure of the create_agent function, which takes a model, a list of tools, and a system prompt. How the agent.invoke() method is used to run the agent with a user message. Notice the get_weather function uses a real API. For simplicity in our example, we can just use a mock function that returns a fixed string.
Part 2: Adding Conversational Memory
A simple request-response agent is useful, but a true conversational agent needs to remember what was said before. LangChain handles this through a "checkpointer" and a thread_id to manage distinct conversations.
Let's see how to add this crucial piece.
LangChain Full Crash Course - AI Agents in Python
Now, we will extend the agent with memory using the same video.
Watch the segment from 18:24 to 25:24. This part is packed with information, but the core concepts for our purpose are: Checkpointer: The InMemorySaver is used to store conversation history. In a production app, you might use a database like Redis or Postgres. create_agent arguments: The function is now called with the checkpointer argument. invoke arguments: The invoke call now includes a config dictionary. The thread_id within this config is the key that tells the agent which conversation history to load. Observe how making a second call with the same thread_id allows the agent to answer a follow-up question, whereas changing the thread_id makes it lose context.
Putting It All Together: Your First Agent
Let's consolidate what you've seen into a single, runnable script. The official LangChain documentation provides an excellent, up-to-date example that mirrors the concepts from the video.
Quickstart - Docs by LangChain
The LangChain Quickstart documentation provides a complete, self-contained example of a conversational agent. This is a great reference to solidify your understanding.
Read the section 'Build a real-world agent'. It walks through the same six steps we've been discussing: Defining a system prompt. Creating tools (notice the mock functions here, which are easier to start with). Configuring the model. Defining a response format (this is optional but good practice). Adding memory with InMemorySaver. Creating and running the agent with a config and thread_id. Try to run this code yourself. You can copy the complete script, ensure your .env file is set up, and see it in action.
After running the code, you should have a functioning agent. You can ask it for the weather, and it will respond. Then, you can ask a follow-up question, and because of the InMemorySaver and the consistent thread_id, it will remember the context of your first question.

Conclusion
Congratulations! You have successfully built your first conversational agent using the LangChain framework. You've seen how LangChain provides high-level abstractions that handle the complex orchestration of the agent loop, tool execution, and memory management, allowing you to focus on the application's logic.
Key Takeaways:
- LangChain as an Abstraction: LangChain is a framework that simplifies building LLM applications by providing standardized components for agents, tools, and memory.
- The
create_agentFunction: This is the modern, high-level entry point for creating agents in LangChain. It wires together the LLM, tools, system prompt, and memory. - Conversational Memory: Memory is achieved using a
checkpointer(likeInMemorySaver). Conversations are tracked and distinguished using athread_idpassed in theconfigof eachinvokecall. - Tools: Standard Python functions can be turned into tools that the agent can reason about and use by simply adding a
@tooldecorator.
In this lesson, our agent's knowledge was limited to its pre-trained data and what its tools could provide in real-time. But what if you want an agent to be an expert on your company's internal documentation or a specific technical domain?
In our next lesson, Integrate a RAG system into an agent to answer questions from a knowledge base, we will tackle this exact problem. You will learn how to combine the agentic framework we built today with a Retrieval-Augmented Generation (RAG) system, giving your agent access to a vast, private knowledge base.