Recommended resources
The freely available resources this lesson will direct you to.
- Gradle for Beginners (Build Types, Product Flavors, Build Variants, Source Sets)www.youtube.com
- The Ultimate Gradle Kotlin Beginner's Crash Course For 2025www.youtube.com
- Configure build variants | Android Studiodeveloper.android.com
- Gradle tips and recipes | Android Studio | Android Developersdeveloper.android.com
Hello! Last time, you moved dependency and plugin versions into a Gradle version catalog. That keeps the inputs to a build consistent. This lesson tackles a different question: how can one app module produce intentionally different apps without maintaining separate projects?
You’ll configure product flavors and build types, see how Android Gradle Plugin combines them into variants, and give those variants different identifiers, generated values, resources, and dependencies. The example uses a small “demo” edition alongside a full edition—a pattern you could also apply to a system-integrated app that needs a safe demonstration build.
Two independent decisions make a variant
A product flavor describes which edition of an app you are building. A build type describes how that edition is built: for example, whether it is debuggable or prepared for release. Each selected flavor combines with each build type.
With demo and full flavors plus debug and release build types, you get four variants: demoDebug, demoRelease, fullDebug, and fullRelease. The distinction matters in practice. “Demo” need not mean “debuggable”; you may want a non-debuggable demo release. Conversely, you may need to debug the full edition.
Watch the relevant portion of Philipp Lackner’s The Ultimate Gradle Kotlin Beginner’s Crash Course For 2025. It shows the build-script and Android Studio workflow before we assemble a configuration of our own.
The Ultimate Gradle Kotlin Beginner's Crash Course For 2025
Philipp Lackner’s video introduces build types, product flavors, their resulting variants, and source sets. Watch for the difference between defining an edition and defining a development or release configuration.
Watch build types for debug, release, staging, and build-specific settings; product flavors for editions and flavor dimensions; and build variants for how the two combine. Finish with source sets, focusing on where code and resources for a particular variant belong.
Android’s official Configure build variants guide is useful alongside the video. Read its Configure build types and Configure product flavors sections, including Change the application ID for build variants. Pay particular attention to why two installs on one device need different application IDs.
Configure build variants | Android Studio
Read the Android Developers guide for the definitions and application-ID rules that govern the example below.
In Configure build types, start with the build-type explanation; inspect the Kotlin example immediately below it. In Configure product flavors, read from flavor configuration through the named-dimension requirement. Continue through the variant names, then read Change the application ID for build variants to its final explanation of installing differently identified apps together, ending where it says suffixes combine.
An application ID is the installed app’s identity. It is not the same decision as the code’s namespace, which controls generated code such as R and BuildConfig. Adding .demo to an application ID can make the demo edition install separately; it does not require moving every Kotlin file into a different package.
Configure an edition and a build type
The following is an illustrative app/build.gradle.kts. Keep your project’s working SDK and plugin versions rather than changing them merely to copy the example. It assumes the plugin aliases introduced in the previous lesson.
plugins {
    alias(libs.plugins.android.application)
    alias(libs.plugins.kotlin.android)
}

android {
    namespace = "com.example.variantlab"
    compileSdk = 35

    defaultConfig {
        applicationId = "com.example.variantlab"
        minSdk = 26
        targetSdk = 35
        versionCode = 1
        versionName = "1.0"
    }

    buildFeatures {
        buildConfig = true
    }

    flavorDimensions += "edition"

    productFlavors {
        create("demo") {
            dimension = "edition"
            applicationIdSuffix = ".demo"
            resValue("string", "variant_label", "Variant Lab Demo")
            buildConfigField("Boolean", "ENABLE_SAMPLE_CONTENT", "true")
        }
        create("full") {
            dimension = "edition"
            resValue("string", "variant_label", "Variant Lab")
            buildConfigField("Boolean", "ENABLE_SAMPLE_CONTENT", "false")
        }
    }

    buildTypes {
        getByName("debug") {
            applicationIdSuffix = ".debug"
            versionNameSuffix = "-debug"
            buildConfigField(
                "String",
                "API_BASE_URL",
                "\"https://sandbox.example.invalid/\""
            )
        }
        getByName("release") {
            isMinifyEnabled = true
            proguardFiles(
                getDefaultProguardFile("proguard-android-optimize.txt"),
                "proguard-rules.pro"
            )
            buildConfigField(
                "String",
                "API_BASE_URL",
                "\"https://api.example.invalid/\""
            )
        }
    }
}
The defaultConfig block supplies shared defaults. Each flavor then supplies its edition-specific choices. In this example, fullRelease keeps the base application ID, com.example.variantlab; demoRelease receives com.example.variantlab.demo. The debug build type adds another suffix, so demoDebug is installed as com.example.variantlab.demo.debug. Its version name becomes 1.0-debug.
resValue generates a string resource for each edition. If your manifest’s existing <application> element sets android:label="@string/variant_label", the installed editions can display different labels. Do not also define variant_label in a resource file for the same variant; choose one place to supply each value.
buildConfigField generates values accessible from app code, such as BuildConfig.ENABLE_SAMPLE_CONTENT and BuildConfig.API_BASE_URL. The string argument needs escaped quotation marks because Gradle is generating a Kotlin/Java string literal. The .invalid URLs here are deliberately non-working placeholders. A build field is packaged into the app, so it is appropriate for a public endpoint or a feature setting, not for a secret API key.
Debug and release serve different purposes. Android provides a debuggable, debug-signed debug build type even when you have not declared it explicitly; the block above customizes it. The release example enables minification but does not configure release signing or make the artifact ready to publish. If your project lacks proguard-rules.pro, create it or adapt that line to your existing rules file.
A third build type can be useful when an internal staging install should coexist with debug and production. Add this inside buildTypes only if you actually need that workflow:
create("staging") {
    initWith(getByName("debug"))
    applicationIdSuffix = ".staging"
    versionNameSuffix = "-staging"
    matchingFallbacks += listOf("debug")
    buildConfigField(
        "String",
        "API_BASE_URL",
        "\"https://staging.example.invalid/\""
    )
}
initWith copies the debug type’s starting settings; the following lines replace the suffix and endpoint. matchingFallbacks helps if this app depends on an Android library module that has a debug variant but no staging variant. Because this example inherits debug settings, treat staging as an internal, not a production, build. With three build types and two flavors, the module now has six variants.
Put code and resources in the right source set
Build settings are only part of variant configuration. A source set determines which files a variant compiles and packages. src/main/ is shared. For demoDebug, Android also considers files in src/demo/, src/debug/, and src/demoDebug/.
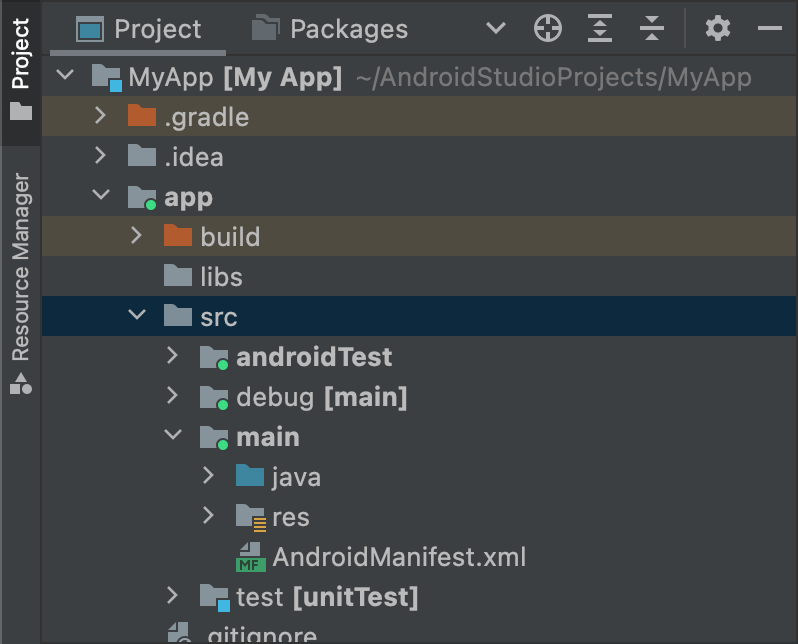
Suppose the demo edition needs sample resources, while a debugging panel should never be present in release. You could organize files like this:
app/src/main/                 shared UI and app behavior
app/src/demo/res/             demo-only resources
app/src/full/res/             full-edition resources
app/src/debug/kotlin/          debug-only tools
app/src/demoDebug/res/        a resource specific to demoDebug
For resources with the same name, the simplified priority for demoDebug is: demoDebug takes precedence over debug, then demo, then main. That lets a specific variant replace a shared string or drawable. Kotlin and Java classes do not work like replaceable resources: defining the same fully qualified class in both main and debug causes a duplicate-class build error. If implementations must vary, keep a shared contract in main and place the variant-specific implementations in source sets that do not overlap.
Read Create source sets, especially Build with source sets, in the official guide. Then look at Declare dependencies for the equivalent idea applied to libraries.
Configure build variants | Android Studio
Return to the Android Developers guide to connect directory layout, merge priority, and variant-specific dependencies.
In Create source sets, read from shared and specific files. Locate the pictured debug directory and the explanation immediately after it. In Build with source sets, start where the guide says variant priority, then continue through the note beginning “For a given build variant” to see why duplicate Kotlin or Java classes fail. Finally, under Declare dependencies, read dependency naming and its Kotlin sample.
A dependency declared with implementation(...) is available to all variants. A dependency declared with debugImplementation(...) is available to debug variants; a flavor-specific configuration can similarly use "demoImplementation"(...) in a Kotlin build script. This is useful for a debugging tool or a demo-only support module, provided the referenced library or module actually exists. The catalog from the previous lesson can still supply its coordinates: the catalog names a dependency; the configuration decides which variants receive it.
Verify the variants you intended
After editing app/build.gradle.kts, sync the project. In Android Studio, Build > Select Build Variant lets you choose which variant the IDE builds and runs. You can also check explicitly from the command line:
./gradlew :app:assembleDemoDebug
./gradlew :app:assembleFullRelease
./gradlew :app:sourceSets
On Windows, use gradlew.bat. The sourceSets task shows where Gradle expects files for each source set. If you added staging, :app:assembleFullStaging checks that configuration too. Inspect the resulting installed app or artifact rather than relying solely on a successful sync: confirm the application ID, label, and generated behavior match the selected variant.
When something differs from expectation, first ask which axis owns the choice. An edition-specific resource belongs to a flavor or variant source set; debuggability belongs to a build type. Then check whether a more-specific source set overrides a resource, whether both suffixes contribute to the application ID, and whether a dependency was assigned to the intended configuration. Keeping those decisions deliberate prevents a convenient internal build from accidentally becoming a release configuration.
Key takeaways
A build variant combines one flavor from each flavor dimension with one build type. Use flavors for distinct app editions, build types for build behavior, and source sets or dependency configurations for files and libraries that only certain variants need. Verify both the assembled artifact and the identity under which it installs.
This completes the build-foundations module. Next, the course moves to a reactive search mini-project, beginning with how coroutine dispatchers keep blocking work off the main thread.