Recommended resources
The freely available resources this lesson will direct you to.
Hello! Welcome back to our course on designing security products.
In our previous lesson, we successfully architected an OpenID Connect (OIDC) layer on top of our OAuth 2.0 server. We now have a fully functional Identity Provider (IdP) that can authenticate users and issue verifiable ID tokens. This central IdP is the foundation for managing identity across multiple applications.
This lesson directly builds on that foundation to address our next learning outcome: Design advanced session management for federated identity, including single sign-on/sign-off and channel-bound tokens.
We will explore how to leverage our central IdP to create a seamless and secure user experience across a distributed landscape of applications. Specifically, we will architect the following systems:
- Single Sign-On (SSO): We'll design the mechanism that allows a user to log in once and gain access to multiple services without re-entering credentials.
- Single Logout (SLO): We'll tackle the surprisingly complex challenge of ensuring that when a user logs out, their session is terminated across all applications.
- Channel-Bound Tokens: We'll dive deep into an advanced security mechanism that cryptographically binds tokens to the client, mitigating the significant risk of token theft.
This lesson will focus on the architectural patterns and design trade-offs involved in building a robust federated identity system.
1. Architecting Single Sign-On (SSO)
SSO is the primary user-facing benefit of having a centralized IdP. The goal is to authenticate a user once and then reuse that authentication event for subsequent access to different applications (Service Providers, or SPs).
Let's begin by understanding the core concepts and the "magic" that makes SSO work.
Single Sign-On (SSO) Explained
The article 'Single Sign-On (SSO) Explained' from AlgoMaster.io provides a clear overview of the key roles, the concept of trust, and the high-level flow of SSO.
Please read the introduction and the first three sections: 'What is Single Sign-On?', 'Core Concepts', and 'How SSO Works'. Pay close attention to the diagram and the explanation of 'The Magic: Subsequent Logins'.
As the article explains, SSO hinges on the session established at the Identity Provider. Let's break down the architecture of this flow:
-
Initial Authentication and IdP Session:
- A user tries to access Application A (SP1).
- SP1, seeing no local session, redirects the user to our IdP (using the OIDC flow we designed).
- The user authenticates with the IdP (e.g., username/password, MFA).
- Upon successful authentication, two things happen:
- The IdP completes the OIDC flow, issuing tokens for SP1.
- The IdP creates its own session for the user, typically by setting a secure, HttpOnly cookie in the user's browser scoped to the IdP's domain. This is the IdP Session.
-
Accessing a Second Application:
- The user now navigates to Application B (SP2).
- SP2, also seeing no local session, redirects the user to the IdP for authentication.
- This is the key step: The user's browser sends the IdP session cookie along with the request to the IdP.
- The IdP validates the session cookie, recognizes the already-authenticated user, and skips the login prompt entirely.
- The IdP immediately proceeds to the consent step (if necessary) and then completes the OIDC flow by issuing tokens for SP2.
The user is now logged into both SP1 and SP2, having only entered their credentials once. This architecture distinguishes between two types of sessions.
Single Sign-On (SSO) Explained
The AlgoMaster.io article also clearly defines the different session types involved in SSO.
Please read section 5, 'Session Management'. Focus on the 'Session Types' and 'Session Lifecycle' subsections. This distinction is critical for design.
As an architect, you must manage these two distinct session lifecycles:
- IdP Session: The "master" session that enables SSO. Its duration is a critical security parameter. A typical duration might be 8-12 hours, corresponding to a workday.
- SP Sessions: Each application maintains its own local session, created after validating the ID token from the IdP. These are often shorter-lived and may be refreshed based on activity.
2. The Architectural Challenge of Single Logout (SLO)
If signing in everywhere is "Single Sign-On," then signing out everywhere should be "Single Logout." When a user clicks "Logout" in one application, they expect to be logged out of their master IdP session and all other applications they accessed.
This is much harder than it sounds because it requires coordinating state across multiple independent systems, some of which may be offline.
OpenID Connect: How Single Logout Works
The article 'OpenID Connect: How Single Logout Works' from Curity provides an excellent and detailed breakdown of the three standard mechanisms for implementing SLO in OIDC.
First, read the introductory sections: 'What is the Single Logout Feature?', 'Single Sign-On vs. Single Logout', and 'How OpenID Connect Logout Works'. This will frame the problem and introduce the different approaches.
All SLO flows begin when a user initiates a logout from a participating application (the Relying Party, or RP). The RP invalidates its local session and then redirects the user to the IdP's end_session_endpoint. From there, the IdP must notify all other RPs that the user's session has ended. OIDC provides three main patterns for this notification process.
SLO Design Pattern 1: Front-Channel Logout
In this pattern, the IdP uses the user's browser as a messenger to notify other RPs.
OpenID Connect: How Single Logout Works
Let's explore the first SLO mechanism, which operates through the user's browser.
Read the 'Front-Channel Logout' section to understand how iframes are used to propagate the logout request.
- Architecture:
- The IdP, after receiving the initial logout request, terminates its own session.
- It then returns an HTML page to the user's browser.
- This page contains a series of hidden
<iframe>elements, one for each RP the user has logged into during their IdP session. Thesrcof each iframe points to a pre-registeredfrontchannel_logout_urifor that RP. - The browser loading these iframes effectively sends a
GETrequest to each RP's logout endpoint, allowing them to terminate their local sessions.
- Design Trade-offs:
- Pro: Relatively simple for RPs to implement (just need a
GETendpoint that clears a cookie). - Con: Unreliable. The user might close the browser before all iframes load. More importantly, modern browsers increasingly block third-party cookies and tracking, which can break this mechanism entirely. It's a "best-effort" approach.
- Pro: Relatively simple for RPs to implement (just need a
SLO Design Pattern 2: Back-Channel Logout
This pattern uses direct server-to-server communication, avoiding reliance on the browser.
OpenID Connect: How Single Logout Works
Now let's look at a more robust, server-to-server approach to SLO.
Read the 'Back-Channel Logout' section. Note the introduction of a new artifact: the 'logout token'.
- Architecture:
- The IdP terminates its session.
- The IdP's backend then iterates through the list of RPs the user has visited.
- For each RP, the IdP sends a direct, server-to-server
POSTrequest to a pre-registeredbackchannel_logout_uri. - The body of this request contains a Logout Token, which is a signed JWT. This token securely communicates which user (
sub) and session (sid) should be terminated. - The RP validates the logout token and terminates the corresponding session(s).
- Design Trade-offs:
- Pro: Much more reliable than front-channel logout as it doesn't depend on the user's browser.
- Con: More complex for RPs to implement. They must expose a public endpoint, validate the JWT, and have a mechanism to map the
sidto an application session and terminate it. It also cannot clear browser-only state like cookies directly.
SLO Design Pattern 3: Session Management
This is a different approach where the RP actively monitors the IdP session state.
OpenID Connect: How Single Logout Works
Finally, let's look at the polling-based approach where the client application keeps an eye on the IdP session.
Read the 'Session Management' section. This is a client-driven pull model, as opposed to the push models of front- and back-channel logout.
- Architecture:
- During login, the IdP provides a
session_statevalue to the RP. - The RP application page loads a hidden iframe pointing to the IdP's
check_session_iframeendpoint. - The RP's JavaScript periodically posts a message to this iframe, asking if the
session_stateis still valid. - If the user logs out elsewhere (e.g., directly at the IdP), the
session_statewill change. - The
check_session_iframewill reportchanged, signaling to the RP that it should terminate its local session.
- During login, the IdP provides a
- Design Trade-offs:
- Pro: Gives the RP more control.
- Con: Complex to implement correctly, adds continuous network traffic (polling), and suffers from the same browser-related fragility as front-channel logout.
For a new system design, Back-Channel Logout is generally the preferred architectural choice due to its reliability, despite its implementation complexity. Often, it's combined with a Front-Channel mechanism as a fallback to help clear browser cookies.
3. Advanced Security: Channel-Bound Tokens
Standard OAuth 2.0 access tokens are bearer tokens. This is a critical architectural weakness.
OAuth and Proof of Possession - The long way round - Dominick Baier - NDC Oslo 2023
To understand why we need something more advanced, let's first review the problem with bearer tokens. Dominick Baier explains this clearly in his talk 'OAuth and Proof of Possession'.
Watch the segment from 04:35 to 06:22. He explains that bearer tokens are like cash: whoever holds them can use them. This assumes a 'perfect world' that rarely exists.
If a bearer token is leaked (e.g., via XSS, a compromised log file, or a malicious browser extension), an attacker can replay it and impersonate the user. Channel-bound tokens, also known as sender-constrained or proof-of-possession (PoP) tokens, solve this by cryptographically tying the token to the client that requested it.
Design Pattern 1: mTLS Certificate-Bound Tokens
The first approach uses Mutual TLS (mTLS) to bind the token to the client's TLS certificate.
OAuth and Proof of Possession - The long way round - Dominick Baier - NDC Oslo 2023
The same talk by Dominick Baier details how mTLS can be used to create sender-constrained tokens. This is a very powerful pattern, especially in high-security environments.
Watch from 17:39 to 25:13. Focus on the architectural flow: how the client certificate hash is embedded in the access token's 'cnf' (confirmation) claim, and how the API validates it.
- Architecture:
- Token Request: The client establishes an mTLS connection with the IdP's token endpoint, presenting its client certificate.
- Token Issuance: The IdP takes a SHA-256 hash of the client certificate and embeds it inside the access token in a special claim:
cnf: { "x5t#S256": "<hash>" }. - API Call: The client makes a call to a resource server, also using mTLS with the same client certificate.
- Token Validation: The resource server performs two checks:
a. Validates the access token itself (signature, expiry, etc.).
b. Extracts the certificate hash from thecnfclaim and compares it to the hash of the certificate presented in the mTLS transport layer. If they don't match, the request is rejected.
- Design Trade-offs:
- Pro: Extremely high security. An attacker who steals the token cannot use it without also possessing the client's private key for the certificate.
- Con: High operational overhead. It requires a Public Key Infrastructure (PKI) to manage certificates, and all components in the path (load balancers, reverse proxies) must be configured to handle and forward mTLS correctly. This makes it a great fit for B2B or internal high-security APIs (like banking), but difficult for public-facing mobile or web apps.
Design Pattern 2: DPoP (Demonstrating Proof of Possession)
DPoP is a more modern, application-layer standard that achieves similar security goals without the infrastructural complexity of mTLS.
OAuth and Proof of Possession - The long way round - Dominick Baier - NDC Oslo 2023
DPoP provides an application-level solution for token binding. Dominick Baier's talk continues with a fantastic explanation of this mechanism.
Watch the final two segments. The first (25:31 - 36:39) is the core explanation of the DPoP flow, the 'DPoP proof JWT', and the two-way binding. The second, shorter segment (42:30 - 43:50) clarifies how DPoP works with refresh tokens.
The DPoP flow is more intricate but extremely powerful. The diagrams below illustrate the architecture.
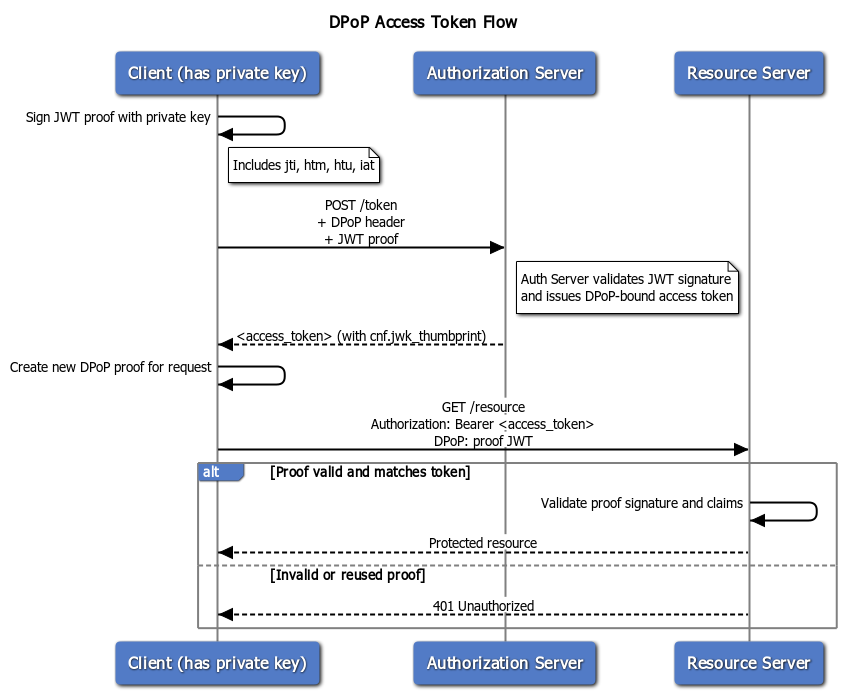
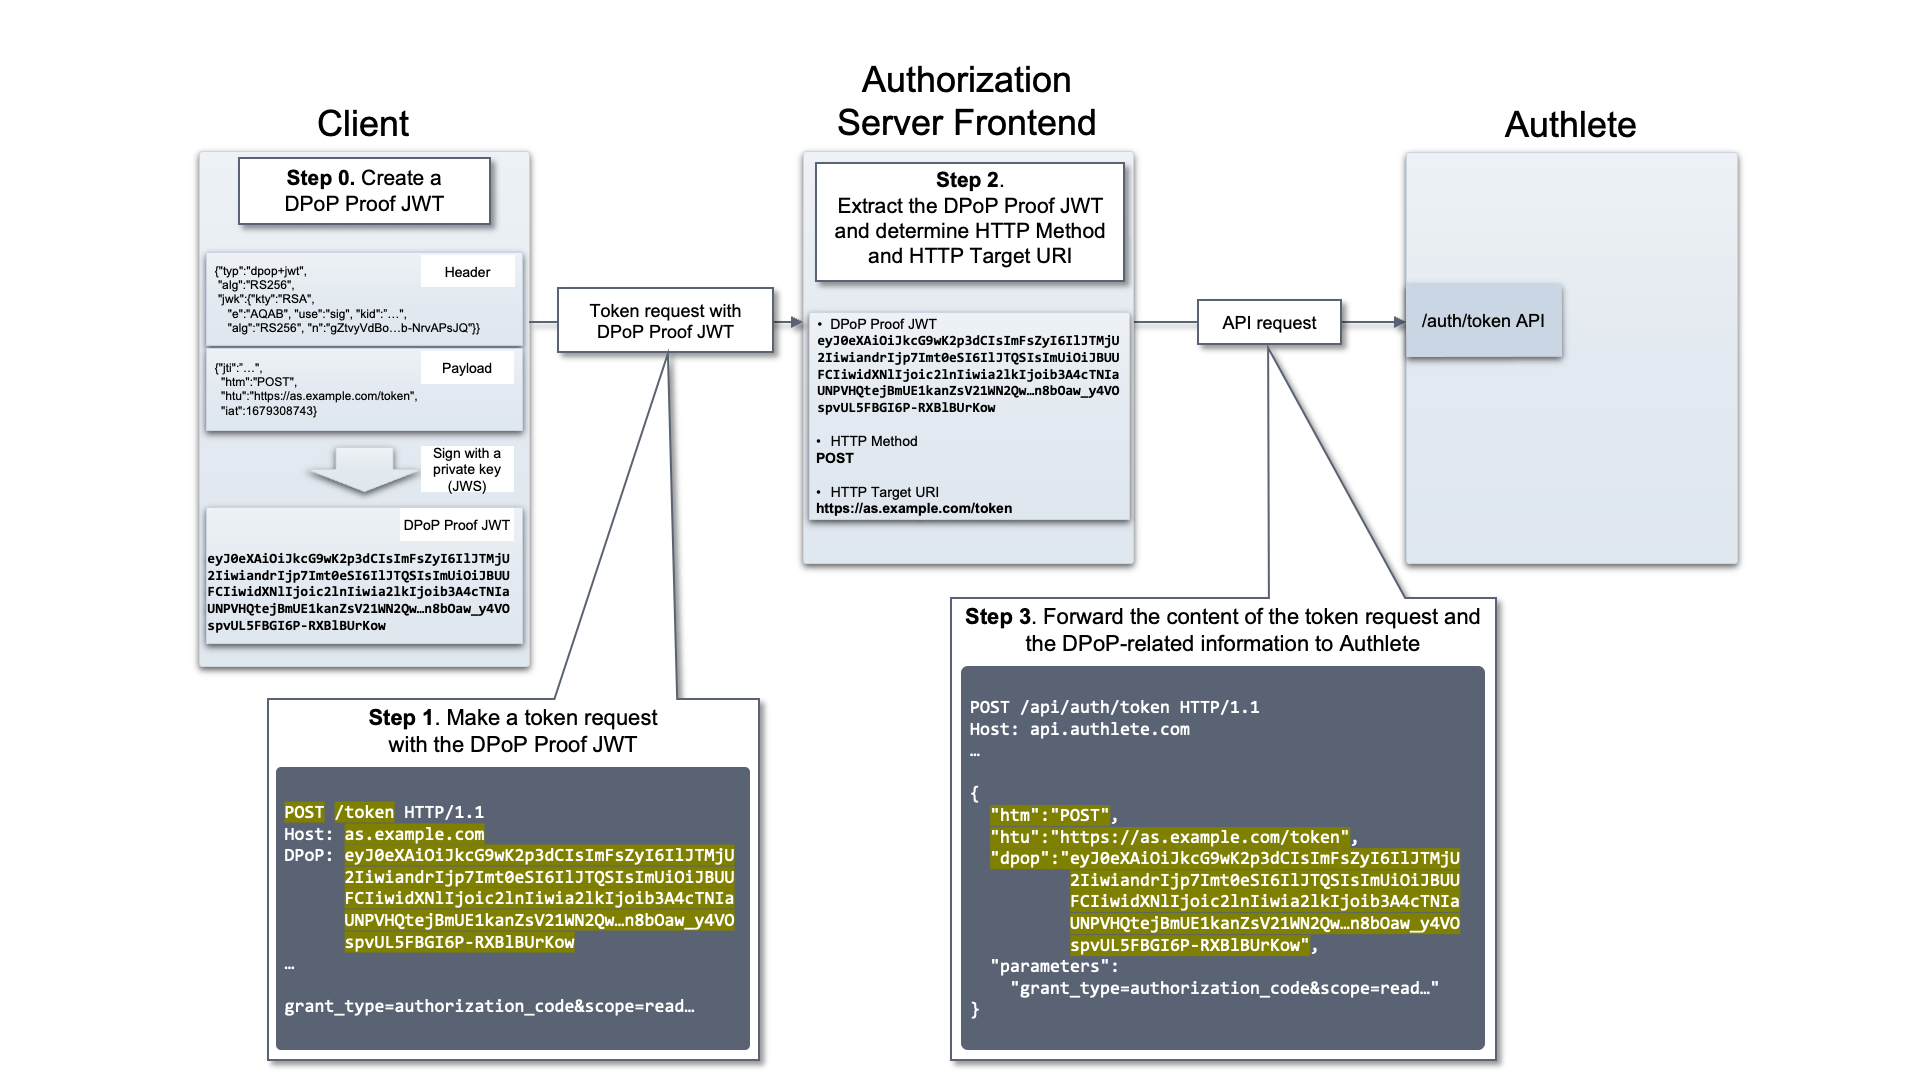
- Architecture:
- Key Generation: The client generates a new, ephemeral public/private key pair.
- Token Request:
a. The client creates a DPoP proof JWT. This is a short-lived JWT, signed with the private key. Its payload includes the HTTP method (POST) and URL of the token endpoint (htu).
b. The client sends a normal request to the/tokenendpoint but adds an extra HTTP header:DPoP: <proof_jwt>. - Token Issuance:
a. The IdP validates the DPoP proof.
b. It issues an access token withtoken_type: DPoP(instead ofBearer).
c. It includes acnfclaim in the access token containing a hash of the client's public key (jkt). - API Call:
a. The client creates a new DPoP proof JWT for the API request. This proof is signed with the same private key and includes the API's method and URL (GET,/resource). Crucially, it also includes a hash of the access token itself (ath).
b. The client sends the API request with two headers:Authorization: DPoP <access_token>andDPoP: <new_proof_jwt>. - Token Validation at API: The resource server performs a multi-step validation:
a. Verifies the access token.
b. Verifies the DPoP proof JWT.
c. Checks that the public key hash (jkt) in the access token'scnfclaim matches the public key used to sign the DPoP proof.
d. Checks that the access token hash (ath) in the DPoP proof matches the access token that was sent.
- Design Trade-offs:
- Pro: Provides strong protection against token theft without requiring mTLS. It is purely an application-layer protocol, making it ideal for modern SPAs and mobile apps.
- Con: Adds complexity to the client, which must now generate and sign a new proof for every single API request. It also adds a slight performance overhead on both the client (signing) and server (verifying).
Conclusion
In this lesson, we have designed the critical systems for managing federated sessions securely and efficiently. We moved from a simple authentication mechanism to a sophisticated system that provides a seamless experience for users while adding robust protections against common attacks.
Key Takeaways:
- SSO relies on a central IdP session, typically managed by a cookie, which allows the IdP to issue tokens for new applications without re-prompting the user for credentials.
- Single Logout (SLO) is a complex coordination problem. Back-channel logout is the most reliable architectural pattern, using server-to-server calls with signed logout tokens to propagate session termination.
- Bearer tokens are a security risk. They are vulnerable to theft and replay.
- Channel-bound tokens provide a powerful mitigation.
- mTLS-bound tokens offer the highest security but require significant infrastructure (PKI, mTLS).
- DPoP offers strong, application-layer protection that is well-suited for modern web and mobile clients, binding tokens to a client's key pair.
Preview of the Next Lesson:
Now that we have a secure way to manage who a user is across multiple applications, the next logical step is to manage what they are allowed to do. In our next lesson, we will focus on authorization policy models: "Compare RBAC and ABAC policy models and design their data structures for efficient evaluation." We will design the core of an authorization engine that makes access control decisions.