Recommended resources
The freely available resources this lesson will direct you to.
Hello! Welcome back to our journey into creating a classic JRPG engine.
In our last session, we designed the complete architecture for a data-driven event system. We established that events would be defined as JSON data, with each action represented as an object following the Command Pattern. We also outlined the logic for an EventInterpreter that would act like a virtual machine, processing these commands in sequence.
Today, we transition from blueprint to reality. This lesson directly addresses the learning outcome: Implement an event interpreter that processes a sequence of commands (e.g., Show Text, Move Character, Wait). We will write the JavaScript code for the EventInterpreter class, bringing our design to life. Given your extensive experience with front-end development, we'll leverage modern JavaScript features like async/await to create a clean, powerful, and understandable implementation for handling the time-based nature of game events.
1. Recapping the Design
Let's quickly recall the data structure we designed for an event attached to a game object (like an NPC):
{
  "trigger": "on_action",
  "pages": [
    {
      "conditions": { "switch": "main_quest_started", "value": false },
      "commands": [
        { "type": "show_text", "text": "A dark energy is growing..." },
        { "type": "set_switch", "switchId": "main_quest_started", "value": true }
      ]
    },
    {
      "conditions": { "switch": "main_quest_started", "value": true },
      "commands": [
        { "type": "show_text", "text": "Be careful on your journey." }
      ]
    }
  ]
}
Our interpreter's job is to receive this object, find the correct page based on game state, and then execute the commands array one by one.
2. The EventInterpreter Class: Structure and Execution Flow
The core of our system is the EventInterpreter class. Its main responsibility is to manage the execution of a command list. When an event starts, this interpreter will "take over" the game loop, pausing player input and running its commands until the list is empty.
A traditional approach might involve a complex state machine with flags like isWaitingForText, isWaitingForMovement, etc. However, this is a perfect use case for async/await, a pattern you're likely very familiar with. We can model the entire event as a single asynchronous function.
Let's define the skeleton of our class:
class EventInterpreter {
    constructor(game) {
        this.game = game; // A reference to the main game object
        this._isRunning = false;
        this._currentEvent = null;
    }

    isRunning() {
        return this._isRunning;
    }

    // Starts an event, finds the correct page, and runs it.
    async start(event) {
        if (this._isRunning) {
            console.warn("Cannot start a new event while one is already running.");
            return;
        }

        this._isRunning = true;
        this._currentEvent = event;

        // 1. Find the correct page to run
        const page = this.findValidPage();
        if (page) {
            // 2. Execute all commands on that page sequentially
            for (const command of page.commands) {
                await this.executeCommand(command);
            }
        }

        // 3. Clean up after the event is finished
        this.finish();
    }

    findValidPage() {
        // We'll add condition checking (switches/variables) in a later lesson.
        // For now, we'll just run the last page in the list, as per RPG Maker's default.
        if (this._currentEvent && this._currentEvent.pages.length > 0) {
            return this._currentEvent.pages[this._currentEvent.pages.length - 1];
        }
        return null;
    }

    async executeCommand(command) {
        // The command dispatcher will go here
    }

    finish() {
        this._isRunning = false;
        this._currentEvent = null;
        console.log("Event finished.");
    }
}
Notice the elegance of the start method. The for...of loop combined with await ensures that executeCommand for one command must fully complete before the next one begins. This perfectly models the sequential nature of a JRPG event script.
3. Implementing Core Commands
The executeCommand method acts as a dispatcher. It looks at the type of a command object and calls the appropriate handler function. Let's implement handlers for a few fundamental commands.
The WAIT command
This is the simplest asynchronous command. It just needs to pause execution for a specified duration.
// Inside the EventInterpreter class...
async executeCommand(command) {
    switch (command.type) {
        case 'wait':
            await this.command_wait(command);
            break;
        // ... other cases
    }
}

// Handler for the 'wait' command
// Command format: { type: 'wait', duration: 500 } // in milliseconds
async command_wait(command) {
    console.log(`Waiting for ${command.duration}ms...`);
    return new Promise(resolve => setTimeout(resolve, command.duration));
}
This uses a Promise wrapped around setTimeout, a standard JavaScript technique for creating an await-able delay.
The SHOW_TEXT command
This one is more complex because it depends on external input (the player pressing a button) to resolve. This demonstrates how the interpreter can wait for something other than time.
For this to work, we need a simple UIManager that can show a text box and emit a signal when the player confirms.
// A simplified UI Manager for demonstration
class UIManager {
    constructor() {
        this._onConfirm = null;
        // Listen for a key press to simulate confirming text
        window.addEventListener('keydown', (e) => {
            if (e.key === 'Enter' && this._onConfirm) {
                this.hideTextBox();
                this._onConfirm(); // Resolve the promise
                this._onConfirm = null;
            }
        });
    }

    showTextBox(text) {
        console.log(`--- UI: ${text} --- (Press Enter)`);
    }

    hideTextBox() {
        console.log("--- UI: (Text box hidden) ---");
    }

    // This method returns a promise that resolves when the player confirms
    awaitConfirmation() {
        return new Promise(resolve => {
            this._onConfirm = resolve;
        });
    }
}
// Assume `this.game.ui` is an instance of UIManager

// Inside the EventInterpreter class...
// Command format: { type: 'show_text', text: "Hello!" }
async command_show_text(command) {
    this.game.ui.showTextBox(command.text);
    await this.game.ui.awaitConfirmation();
}

// Add it to the dispatcher
async executeCommand(command) {
    switch (command.type) {
        case 'wait':
            await this.command_wait(command);
            break;
        case 'show_text':
            await this.command_show_text(command);
            break;
        // ... other cases
    }
}
Now, when executeCommand awaits command_show_text, game execution will pause indefinitely until the Enter key is pressed, triggering the resolution of the promise. This is exactly the behavior we need.
The MOVE_CHARACTER command
Moving a character involves smooth animation over several frames. This command needs to start the movement, wait for it to finish, and then resolve. We won't implement the full movement logic from Module 2 yet, but we can simulate the "wait" part.
// Inside the EventInterpreter class...
// Command format: { type: 'move_character', targetId: 'player', direction: 'up', distance: 3 }
async command_move_character(command) {
    console.log(`Moving ${command.targetId} ${command.direction} for ${command.distance} tiles.`);

    const character = this.game.findCharacter(command.targetId);
    if (character) {
        // This is where you would call the character's movement method.
        // That method would return a promise that resolves when the movement animation is complete.
        // await character.move(command.direction, command.distance);

        // For now, we'll simulate it with a wait.
        const moveDuration = command.distance * 300; // e.g., 300ms per tile
        await new Promise(resolve => setTimeout(resolve, moveDuration));
        console.log("Movement complete.");
    }
}

// Add it to the dispatcher
async executeCommand(command) {
    // ...
    case 'move_character':
        await this.command_move_character(command);
        break;
    // ...
}
This structure clearly separates the interpreter's job (waiting for completion) from the character's job (performing the movement).
4. Visualizing the Interpreter's Work
What we've just built in code is the engine that drives the visual event editors you see in tools like RPG Maker. Each line in the event editor is a JSON object in our commands array.
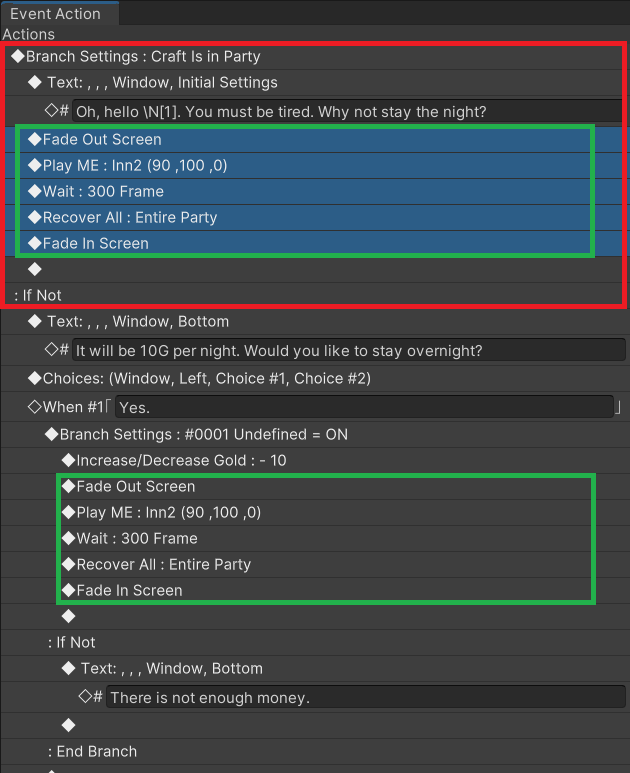
This interpreter design is incredibly powerful and extensible. To add new functionality, you simply:
- Define the JSON structure for the new command.
- Write a new
async command_...handler method. - Add a
casefor it in theexecuteCommanddispatcher.
The core loop in the start method never needs to change.
RPG maker MV script call list - video version
To get a sense of the sheer variety of commands our interpreter could eventually support, take a look at this video showcasing the script calls available in RPG Maker MV. Think of each script call shown as a potential command_* method we could add to our interpreter.
Watch the segments on the 'Wait' command (29:26 - 30:18), 'Movement' commands like Transfer Player (30:18 - 33:00), and 'Character' commands like Show Animation (45:10 - 47:30). Notice how each command has a specific set of parameters, just like our JSON command objects.
5. Integrating with the Game Loop
Finally, how does the interpreter take control? The main game loop needs to know when an event is active.
// A simplified main game object
class Game {
    constructor() {
        this.ui = new UIManager();
        this.interpreter = new EventInterpreter(this);
        // ... other properties like player, npcs, map...
    }

    update() {
        // Main game loop logic
        if (!this.interpreter.isRunning()) {
            // Only process player input and standard updates if no event is running
            // this.player.handleInput();
            // this.map.update();
        }
        // The interpreter runs on its own async timeline, so it doesn't need an update call here.
    }

    // This could be triggered by player interaction
    triggerEvent(eventData) {
        // We don't await this here, we just fire it off.
        // It will run in the background.
        this.interpreter.start(eventData);
    }
}
When an event is triggered (e.g., player presses a button in front of an NPC), the game calls game.triggerEvent(). This kicks off the interpreter.start() method. Because start is async, it runs without blocking the main thread, but our if (!this.interpreter.isRunning()) check effectively pauses normal game activities like player movement.
Test your understanding!
Based on the pattern we've established, how would you implement a PLAY_SOUND command?
- What would the JSON object look like?
- What would the
async command_play_sound(command)handler method look like? (You can assume a simpleaudioManager.playSound(name)function exists, and that it's a "fire-and-forget" action that doesn't need to be awaited).
Show answer
-
JSON object:
{ "type": "play_sound", "sfx": "treasure_open" } -
Handler method:
// Inside the EventInterpreter class
async command_play_sound(command) {
    console.log(`Playing sound: ${command.sfx}`);
    // this.game.audioManager.playSound(command.sfx);

    // Since we don't need to wait for the sound to finish,
    // we can resolve the promise immediately.
    return Promise.resolve();
}
Then you would add the
case 'play_sound'to theexecuteCommanddispatcher.
Conclusion
Congratulations! You have now implemented the heart of your JRPG's storytelling engine. By leveraging the async/await syntax you're already proficient with, we've created a clean, scalable, and powerful EventInterpreter.
Key Takeaways:
- An
asyncmain loop (for await...of) is a perfect fit for processing a sequential list of potentially time-consuming commands. - Command handlers are
asyncfunctions that encapsulate the logic for a single event action. They return aPromisethat resolves when the action is complete. - The
executeCommandmethod acts as a simple dispatcher, routing command objects to their corresponding handlers. - This design is highly extensible; adding new commands requires no changes to the core interpreter loop.
- The interpreter takes control of the game by setting a flag (
_isRunning) that the main game loop checks to pause player input and other updates.
Preview of the next lesson:
Our interpreter can run a list of commands, but it can't yet choose between different pages of commands. The findValidPage method is still a placeholder. In the next lesson, "Implement a system for game flags (switches/variables) to track story progression," we will build the Game_Switches and Game_Variables classes that our interpreter's conditional logic will rely on to bring our game world to life.