Recommended resources
The freely available resources this lesson will direct you to.
Hello! We’ll begin by setting up a working Unity environment on Windows. This first module will take you from an empty project to the 3D scene foundations for a Geometry Dash–inspired runner. Today’s goal is narrower: install Unity Hub, a Unity 6 Long Term Support (LTS) Editor, and Visual Studio; then create a 3D project and confirm that it runs in the Editor.
Unity Hub manages Editor installations and projects. The Unity Editor is where you build and run the game; Visual Studio is where you’ll edit and debug its C# scripts. Set aside roughly 40 minutes of active study and setup, plus whatever time the downloads take.
Install Unity Hub and choose a Unity 6 LTS Editor
Unity releases several versions within the Unity 6 family. For this course, choose a version marked LTS in Unity Hub, rather than assuming the highest version number—or a particular number shown in a tutorial—is the right one.
Read Unity Learn’s explanation of Editor versions so you know what to select when the Hub offers several Unity 6 releases.
In “3. Install a version of the Unity Editor,” read the paragraph beginning “When starting a new project” through its explanation of longer support: why LTS matters. Then look at “Install a new Unity Editor version” for the Installs and Install Editor controls. Focus on the LTS label, not the example version numbers elsewhere in the tutorial.
The following Windows walkthrough shows the complete installation path. Watch it once before acting; its Unity 6.3 LTS selection is an example of the LTS label to look for, not a requirement to install that exact patch.
How to Download and Install Unity in Windows 10/11 2026 Tutorial
Watch “How to Download and Install Unity in Windows 10/11 2026 Tutorial” by United Top Tech for a visual tour of the Hub, Editor modules, and Visual Studio installer.
Watch Hub installation, then account setup. In Editor installation, concentrate on choosing an LTS release and its modules; you do not need the video’s additional mobile-platform modules. Finally, Visual Studio setup shows where to select the Unity workload.
Now carry out the setup:
- Download and run the Windows Unity Hub installer from Unity’s download page, then launch Hub. Sign in or create a Unity account and complete the license prompts presented to you. Review the current terms rather than relying on a video’s description of eligibility.
- In Hub, open Installs and choose Install Editor. Select a Unity 6 release explicitly marked LTS. If Hub first offers to install an Editor automatically, you can skip that offer and choose the version from Installs instead.
- On the modules screen, include Microsoft Visual Studio Community if offered and you do not already have an appropriate Visual Studio installation. Windows Build Support is useful for the standalone build later in the course, but it is not required to run a project inside the Editor. Leave unrelated platform modules unchecked for now; you can add them later.
- Complete any installer and license dialogs. Wait until Hub shows the Editor as installed under Installs. The Editor is a separate, substantially larger installation than Hub, so this may be the longest step.
If you already have Visual Studio installed, there is no need to install a second copy merely because Hub offers one. What matters is its Unity development workload.
Check Visual Studio’s Unity workload
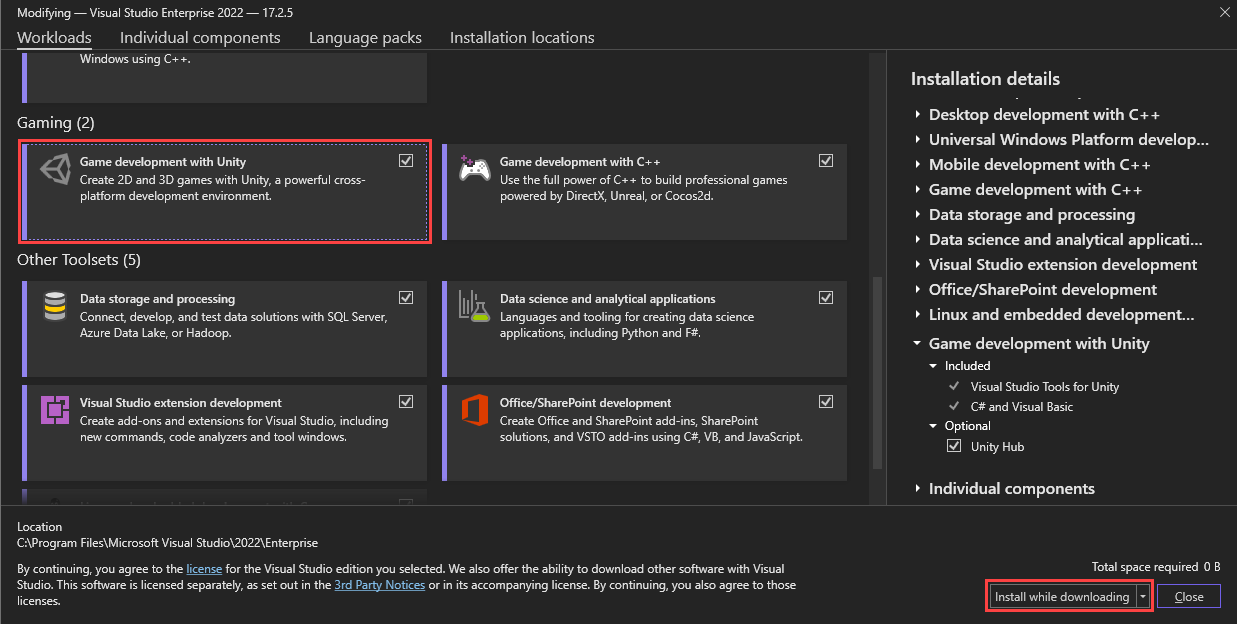
Visual Studio needs more than a basic C# installation for the intended Unity editing and debugging workflow. Microsoft’s setup guide identifies the workload to check.
Install & configure Visual Studio Tools for Unity | Microsoft Learn
Read Microsoft Learn’s Windows installation instructions to verify the required Visual Studio workload, especially if you installed Visual Studio before starting this lesson.
Under “Install Visual Studio and Unity,” read from the explanation of Unity tooling through completion of the Visual Studio installation: installation guidance. Find the instruction to open the installer’s Workloads tab and select Game development with Unity. The guide also describes installing Hub; you can skip that part if Hub is already installed.
Open Visual Studio Installer when it appears, or open it yourself if Visual Studio was installed previously. Choose Install or Modify, ensure Game development with Unity is selected under Workloads, and let installation finish. You do not need to select the other game-development or C++ workloads for this course.
Create the 3D project
A Unity project holds your scenes, assets, code, packages, and settings. Choose a Core 3D template—not a premade sample or a 2D template—so we have a clean starting point for the runner.
Return to Unity Learn’s Hub guide for the distinction between a Core template and a sample project.
In “5. Create a new Unity project,” find the list beginning “There are three main categories” and read through the Core description: template categories. Note that the guide’s example Editor version is not a substitute for checking the LTS label on the Unity 6 version you installed.
The final part of the video demonstrates project creation and a first Play-mode check. Unlike the presenter, select Universal 3D (or 3D (URP) if that is how your Hub labels the Core template).
How to Download and Install Unity in Windows 10/11 2026 Tutorial
Continue the same United Top Tech video to see the project-creation screen and the Editor’s Play button.
Watch create and run. Focus on selecting the installed Editor version, choosing the Universal 3D template, setting a project location, and pressing Play after the Editor opens.
In Hub, open Projects and select New project. The button is highlighted in the Hub view below; your list may be empty.
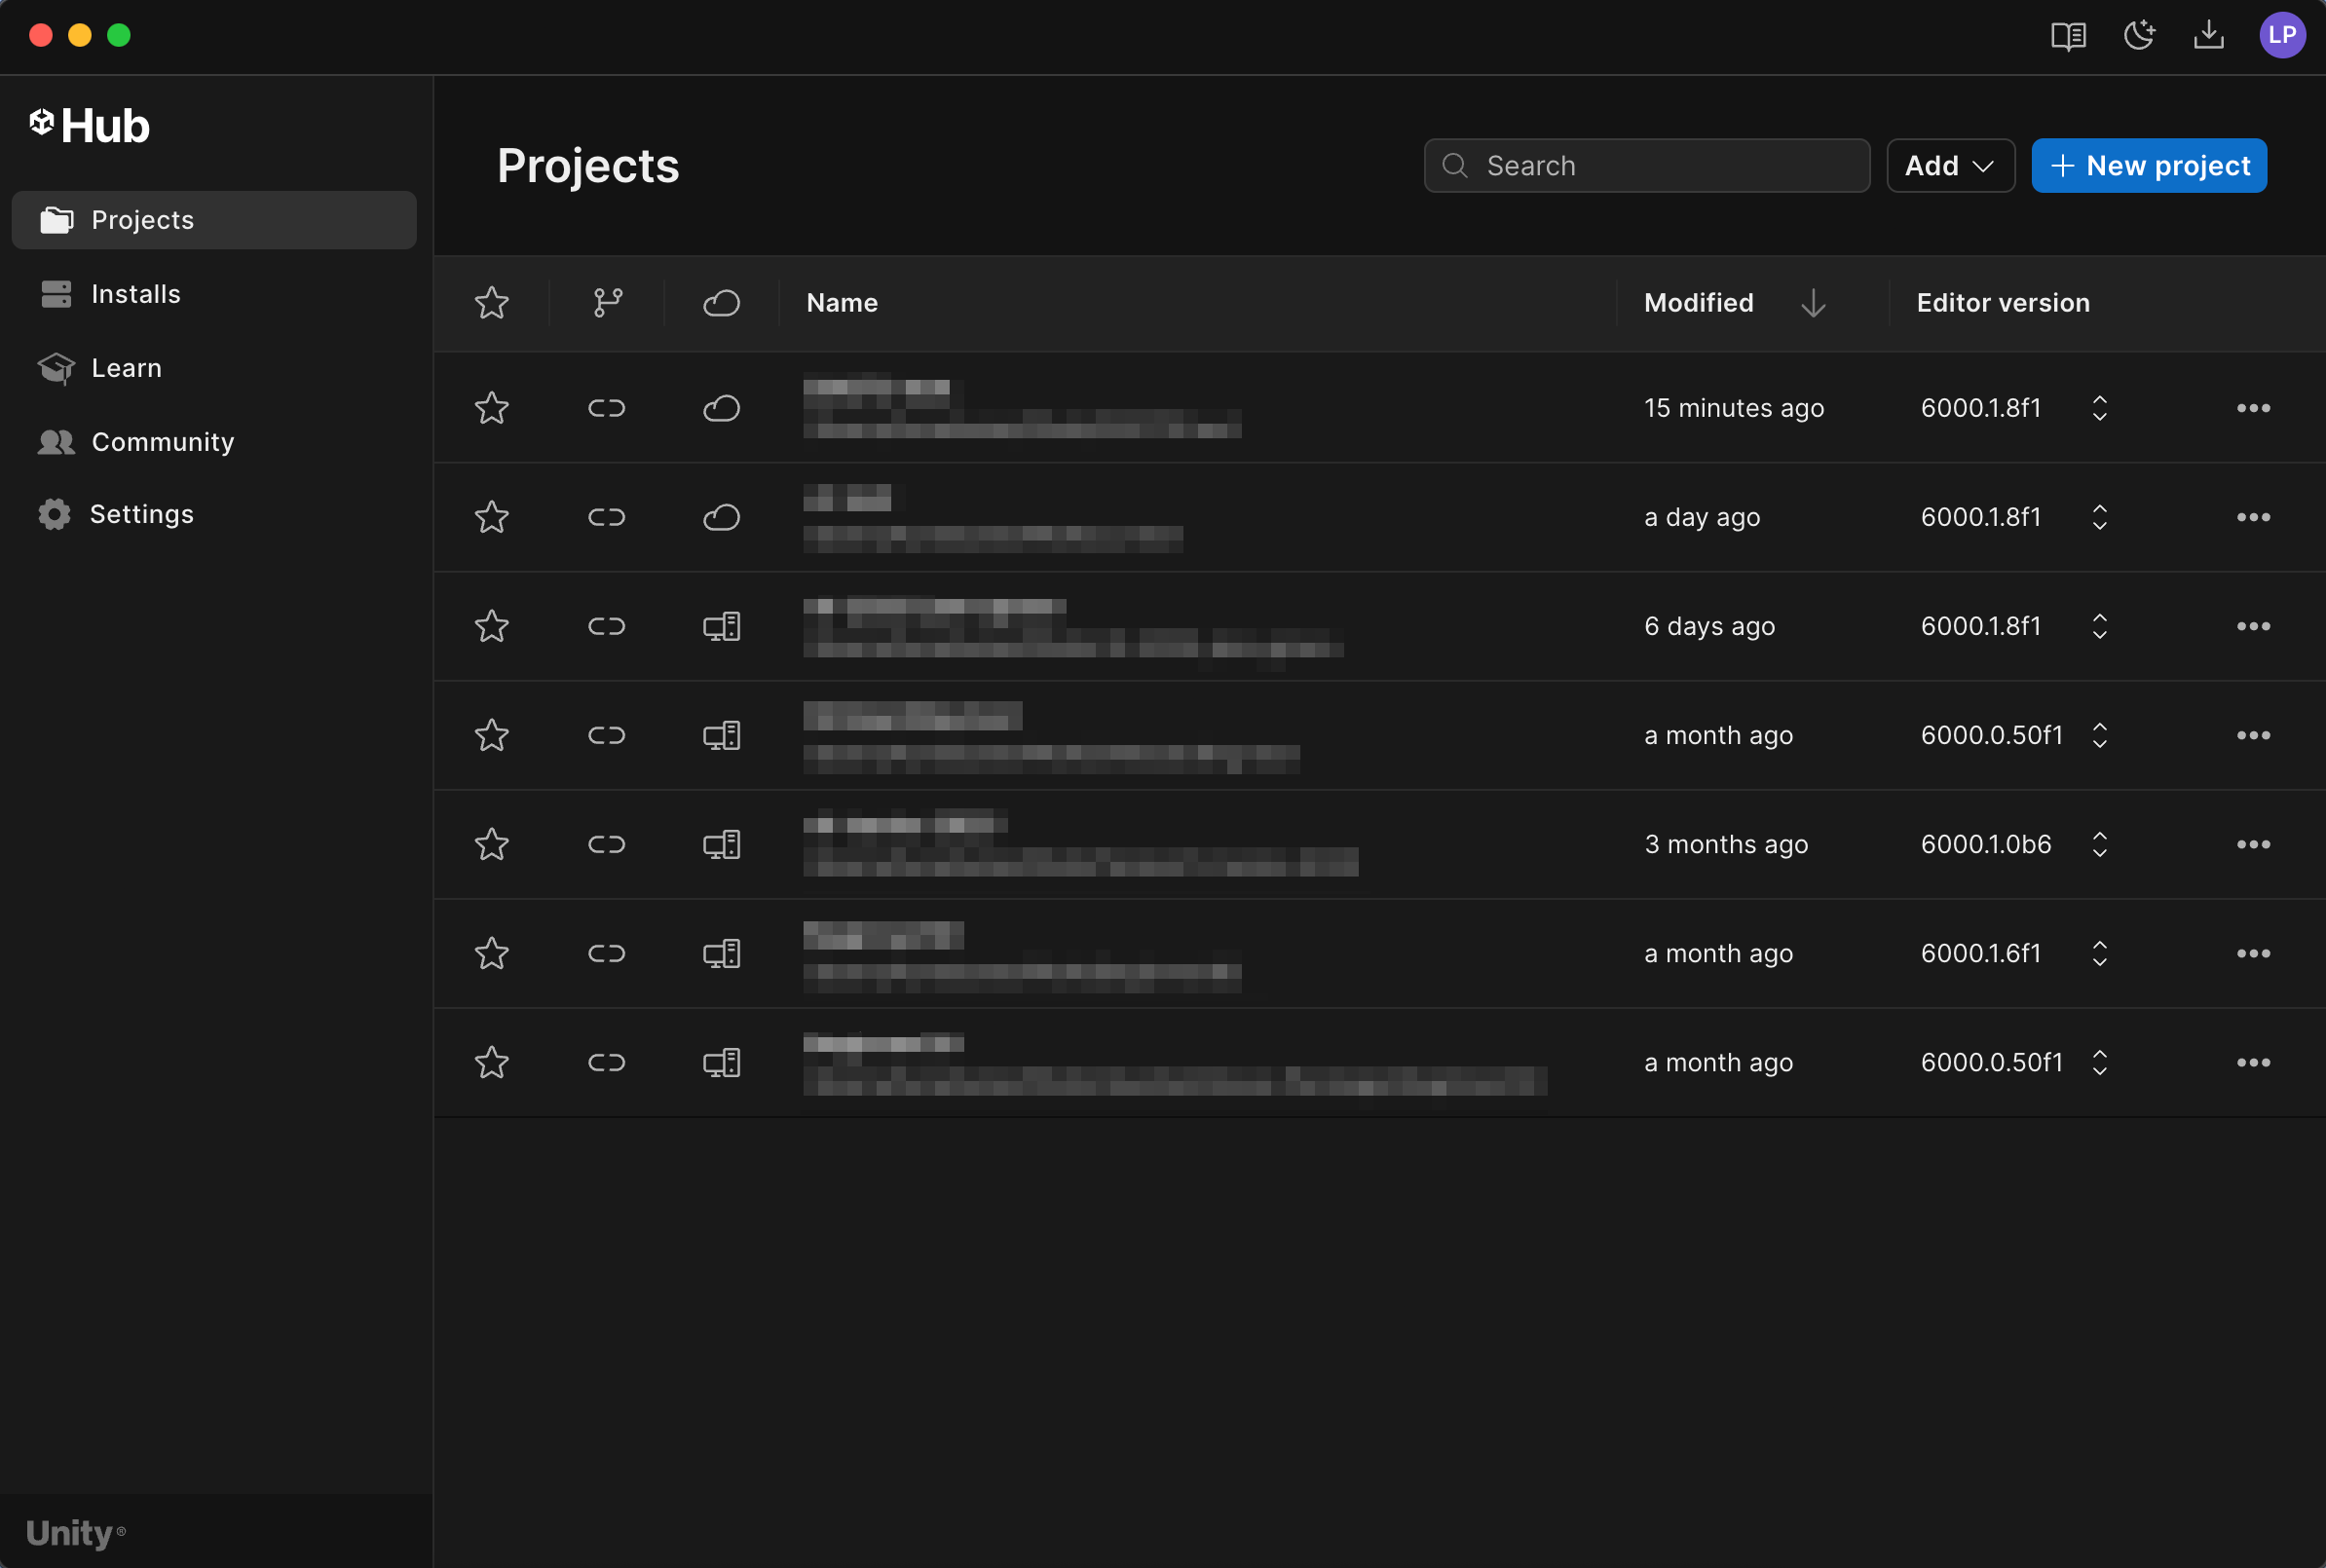
Select your installed Unity 6 LTS Editor and the Universal 3D / 3D (URP) Core template. Give the project a simple name, choose a local folder you can find again, and select Create project. If a Unity Version Control option appears, you can leave it off for this individual setup; it is not needed to enter Play mode.
The first launch may take a while as Unity imports the template and prepares its packages. Let that process finish before judging whether the project opened successfully.
Run it and verify the setup
Once the Editor opens, locate the Scene view, Game view, and Console. The Scene view is your workspace; the Game view shows what the project’s camera renders while it runs. You do not need to construct a level today. An otherwise empty Game view can still be a successful first run.
Click the Play button at the top of the Editor and inspect the Game view. Then click Play again to stop. Your installation check passes if the 3D project opens, enters and exits Play mode, and the Console shows no setup-blocking errors. You may see an empty background rather than an obstacle course—that is expected.
Finally, check the script-editor connection. Microsoft notes that Unity normally detects Visual Studio, but you can confirm it in Edit > Preferences > External Tools:
Install & configure Visual Studio Tools for Unity | Microsoft Learn
Use the Windows portion of Microsoft Learn’s guide to confirm which application Unity will open for C# scripts.
Under “Configure Unity to use Visual Studio,” start at editor configuration. Continue through the Windows instructions Edit > Preferences and External Tools, stopping before “Add a version of Visual Studio that isn't listed,” which turns to a different platform. In Unity, check that External Script Editor is set to your Visual Studio installation.
If Play mode does not start, check whether the Editor is still importing packages and look for errors in Console. If Visual Studio is absent from the external-editor setting, first confirm that its Game development with Unity workload finished installing; then reopen Unity and check again. Treat an actual Console error according to its message rather than assuming that a blank Game view is an error.
Where you are now
You should have Unity Hub, a Unity 6 LTS Editor, and Visual Studio with the Unity workload installed, plus a Core 3D project that runs in Play mode. Keep that project: in the next lesson, you’ll begin turning its empty scene into a game space by creating and organizing GameObjects, transforms, and components.