Recommended resources
The freely available resources this lesson will direct you to.
- Build A Web3 NFT Staking dAPP in ReactJS - Part 1 Enable the STAKE and UNSTAKE buttons.www.youtube.com
- How to create an ERC20 staking appwww.youtube.com
- How to Build a Staking Portal with Reward Visualizationwww.chainscorelabs.com
- How To Create An ERC20 Staking Smart Contract & Web ...blog.thirdweb.com
Hello! Welcome to the next lesson in building your dApp frontend.
In our last lesson, you built a fully functional UI for your token sale, mastering the crucial skill of sending Ether along with a transaction to a payable function. This was a major step in creating the economic foundation for your token.
Today, we will build on that foundation by adding utility to your token. We will develop a user interface that allows token holders to stake their tokens and claim rewards. This is a cornerstone of many DeFi applications, designed to incentivize holding and reward long-term supporters of your project.
By the end of this lesson, you will have created a staking dashboard where users can connect their wallet, view their token balances, stake tokens, see their rewards accumulate in real-time, and claim those rewards.
1. Designing the Staking Dashboard
A good staking interface should be transparent, intuitive, and provide users with all the information they need to make decisions. It's more than just a few buttons; it's a dashboard for managing a user's investment in your protocol.

To understand the key components of a well-designed staking portal, it's helpful to see what experts recommend.
How to Build a Staking Portal with Clear Reward Visualization
The article 'How to Build a Staking Portal with Clear Reward Visualization' from ChainScore Labs outlines the essential UI components for a transparent staking experience. We will use this as a conceptual blueprint for our dashboard.
Please read the introduction, 'The Need for Transparency in Staking', to understand why a clear UI is so important. Then, review the section 'Core UI Components for Staking Transparency'. Focus on the descriptions for the 'Real-Time Reward Calculator' and 'Portfolio & Earnings History', as these are the features we'll be implementing.
Based on these best practices, our staking UI will consist of three main parts:
- Information Display: Cards showing the user's balance of the stakeable token and the reward token.
- Staking Actions: An interface to stake and unstake tokens, showing the current staked amount.
- Rewards Section: A display for claimable rewards that updates in real-time, with a button to claim them.
For a clear picture of the application we're about to build, let's watch a short demo.
How to create an ERC20 staking app
The video 'How to create an ERC20 staking app' by thirdweb provides an excellent demonstration of the kind of staking dApp we will build. Watching this will give you a clear visual target for our lesson.
Watch the demo from the beginning until 02:56. Pay attention to the three main components: the token balance display at the top, the stake/unstake section in the middle, and the accumulating rewards display with a 'Claim' button.
2. Reading Staking and Token Data
Let's begin by creating a new component, Staking.tsx. The first step is to fetch and display all the relevant data from our smart contracts. This will involve interacting with three contracts:
- Your ERC-20 Token Contract (the token to be staked).
- Your Reward Token Contract (which may be the same as the staking token).
- Your Staking Contract, which you created in Module 8.
We need to read the user's balances from the token contracts and their staking information (staked amount, pending rewards) from the staking contract. The following article provides code snippets using thirdweb's hooks that we will adapt to use ethers.js.
How To Create An ERC20 Staking Smart Contract & Web ...
The article 'How To Create An ERC20 Staking Smart Contract & Web ...' from the thirdweb blog shows how to connect to contracts and read data. We will use the same logic but with the ethers.js library you're already using.
Review the section 'Connecting to the Smart Contract'. Notice the use of useContract to initialize the contracts and useTokenBalance and useContractRead to fetch data. We will replicate this functionality with ethers.Contract and direct contract calls.
Here is the initial structure for our Staking.tsx component, including the logic to fetch and display the necessary data.
// src/components/Staking.tsx

import { useState, useEffect } from 'react';
import { ethers } from 'ethers';

// Import ABIs and addresses
// import StakingABI from '../artifacts/contracts/Staking.sol/Staking.json';
// import TokenABI from '../artifacts/contracts/YourToken.sol/YourToken.json';

// const stakingContractAddress = 'YOUR_STAKING_CONTRACT_ADDRESS';
// const stakeTokenAddress = 'YOUR_STAKE_TOKEN_ADDRESS';
// const rewardTokenAddress = 'YOUR_REWARD_TOKEN_ADDRESS';

const Staking = () => {
    const [account, setAccount] = useState<string | null>(null);
    const [provider, setProvider] = useState<ethers.BrowserProvider | null>(null);

    // Token balances
    const [stakeTokenBalance, setStakeTokenBalance] = useState<string>('0');
    const [rewardTokenBalance, setRewardTokenBalance] = useState<string>('0');

    // Staking info
    const [stakedAmount, setStakedAmount] = useState<string>('0');
    const [earnedRewards, setEarnedRewards] = useState<string>('0');

    // User input
    const [amountToStake, setAmountToStake] = useState<string>('');
    const [amountToUnstake, setAmountToUnstake] = useState<string>('');

    // UI State
    const [isProcessing, setIsProcessing] = useState(false);
    const [error, setError] = useState<string | null>(null);

    useEffect(() => {
        if (window.ethereum) {
            const provider = new ethers.BrowserProvider(window.ethereum);
            setProvider(provider);

            provider.send("eth_requestAccounts", [])
                .then(accounts => setAccount(accounts[0]))
                .catch(err => console.error(err));
        }
    }, []);

    const fetchData = async () => {
        if (!provider || !account) return;

        const stakeTokenContract = new ethers.Contract(stakeTokenAddress, TokenABI.abi, provider);
        const rewardTokenContract = new ethers.Contract(rewardTokenAddress, TokenABI.abi, provider);
        const stakingContract = new ethers.Contract(stakingContractAddress, StakingABI.abi, provider);

        // Fetch balances
        const stakeBal = await stakeTokenContract.balanceOf(account);
        const rewardBal = await rewardTokenContract.balanceOf(account);
        setStakeTokenBalance(ethers.formatEther(stakeBal));
        setRewardTokenBalance(ethers.formatEther(rewardBal));

        // Fetch staking info from your contract's functions
        // Assuming your contract has `staked(address)` and `earned(address)` view functions
        const staked = await stakingContract.staked(account);
        const earned = await stakingContract.earned(account);
        setStakedAmount(ethers.formatEther(staked));
        setEarnedRewards(ethers.formatEther(earned));
    };

    useEffect(() => {
        fetchData();
        const interval = setInterval(fetchData, 5000); // Refresh data every 5 seconds
        return () => clearInterval(interval);
    }, [provider, account]);

    // We will implement handler functions next
    const handleStake = async () => {};
    const handleUnstake = async () => {};
    const handleClaim = async () => {};

    return (
        <div className="staking-container" style={{ border: '1px solid #ccc', borderRadius: '8px', padding: '20px', width: '500px' }}>
            <h2>Staking Dashboard</h2>

            <div className="balances" style={{ display: 'flex', justifyContent: 'space-between', marginBottom: '20px' }}>
                <div><strong>Stake Token Balance:</strong> {parseFloat(stakeTokenBalance).toFixed(4)}</div>
                <div><strong>Reward Token Balance:</strong> {parseFloat(rewardTokenBalance).toFixed(4)}</div>
            </div>

            <div className="staking-info" style={{ marginBottom: '20px' }}>
                <p><strong>Currently Staked:</strong> {parseFloat(stakedAmount).toFixed(4)} Tokens</p>
                <p><strong>Rewards Earned:</strong> {parseFloat(earnedRewards).toFixed(6)} Tokens</p>
            </div>

            {/* Staking/Unstaking/Claiming Forms will go here */}
        </div>
    );
};

export default Staking;
3. Implementing Stake and Unstake Actions
This is where we encounter a new, fundamental concept of ERC-20 interactions. Unlike the token sale where you sent ETH (msg.value), you cannot "send" tokens directly with a function call. Instead, you must first approve the staking contract to withdraw tokens from your wallet, and then call the stake function, which will internally use transferFrom to pull the approved amount.
This approve -> action pattern is central to DeFi.
Test your understanding!
Why is the approve step necessary before calling stake, but was not needed when buying tokens with ETH in the previous lesson?
Show answer
ETH is the native asset of the blockchain. When you call a payable function, you can attach ETH directly to the transaction, which is accessible inside the contract via msg.value. ERC-20 tokens, however, are not native; their balances are managed by a separate smart contract. The staking contract cannot unilaterally take tokens from your wallet. You must first call the approve function on the token contract itself, granting the staking contract permission to withdraw a specific amount on your behalf. The subsequent stake function call then triggers this withdrawal.
Let's implement the handleStake and handleUnstake functions. For handleStake, we'll perform two transactions: approve and stake.
// Inside the Staking component

const handleStake = async () => {
    if (!provider || !account || !amountToStake || parseFloat(amountToStake) <= 0) {
        setError("Please enter a valid amount to stake.");
        return;
    }
    setError(null);
    setIsProcessing(true);

    try {
        const signer = await provider.getSigner();
        const stakeTokenContract = new ethers.Contract(stakeTokenAddress, TokenABI.abi, signer);
        const stakingContract = new ethers.Contract(stakingContractAddress, StakingABI.abi, signer);

        const amountInWei = ethers.parseEther(amountToStake);

        // 1. Approve the staking contract to spend tokens
        console.log("Approving token spend...");
        const approveTx = await stakeTokenContract.approve(stakingContractAddress, amountInWei);
        await approveTx.wait();
        console.log("Approval successful!");

        // 2. Stake the tokens
        console.log("Staking tokens...");
        const stakeTx = await stakingContract.stake(amountInWei);
        await stakeTx.wait();
        console.log("Staking successful!");

        // Reset input and refresh data
        setAmountToStake('');
        fetchData();

    } catch (err: any) {
        console.error("Staking failed:", err);
        setError(err.reason || "An error occurred during staking.");
    } finally {
        setIsProcessing(false);
    }
};

const handleUnstake = async () => {
    // Unstaking is simpler, as it doesn't require prior approval
    if (!provider || !account || !amountToUnstake || parseFloat(amountToUnstake) <= 0) {
        setError("Please enter a valid amount to unstake.");
        return;
    }
    setError(null);
    setIsProcessing(true);

    try {
        const signer = await provider.getSigner();
        const stakingContract = new ethers.Contract(stakingContractAddress, StakingABI.abi, signer);
        const amountInWei = ethers.parseEther(amountToUnstake);

        console.log("Unstaking tokens...");
        const unstakeTx = await stakingContract.withdraw(amountInWei); // Or unstake()
        await unstakeTx.wait();
        console.log("Unstaking successful!");

        setAmountToUnstake('');
        fetchData();

    } catch (err: any) {
        console.error("Unstaking failed:", err);
        setError(err.reason || "An error occurred during unstaking.");
    } finally {
        setIsProcessing(false);
    }
};
Now let's add the UI for these actions inside our main return statement.
// Inside the return statement of Staking.tsx

<div className="actions" style={{ display: 'flex', justifyContent: 'space-between', gap: '20px' }}>
    <div className="stake-action" style={{ flex: 1 }}>
        <input
            type="text"
            value={amountToStake}
            onChange={(e) => setAmountToStake(e.target.value)}
            placeholder="Amount to Stake"
            style={{ width: '100%', padding: '8px', marginBottom: '10px' }}
        />
        <button onClick={handleStake} disabled={isProcessing} style={{ width: '100%', padding: '10px' }}>
            {isProcessing ? 'Processing...' : 'Stake'}
        </button>
    </div>
    <div className="unstake-action" style={{ flex: 1 }}>
        <input
            type="text"
            value={amountToUnstake}
            onChange={(e) => setAmountToUnstake(e.target.value)}
            placeholder="Amount to Unstake"
            style={{ width: '100%', padding: '8px', marginBottom: '10px' }}
        />
        <button onClick={handleUnstake} disabled={isProcessing} style={{ width: '100%', padding: '10px' }}>
            {isProcessing ? 'Processing...' : 'Unstake'}
        </button>
    </div>
</div>
{error && <p style={{ color: 'red', marginTop: '10px' }}>{error}</p>}
4. Claiming Rewards
The final piece of our dashboard is the ability for users to claim the rewards they've earned.
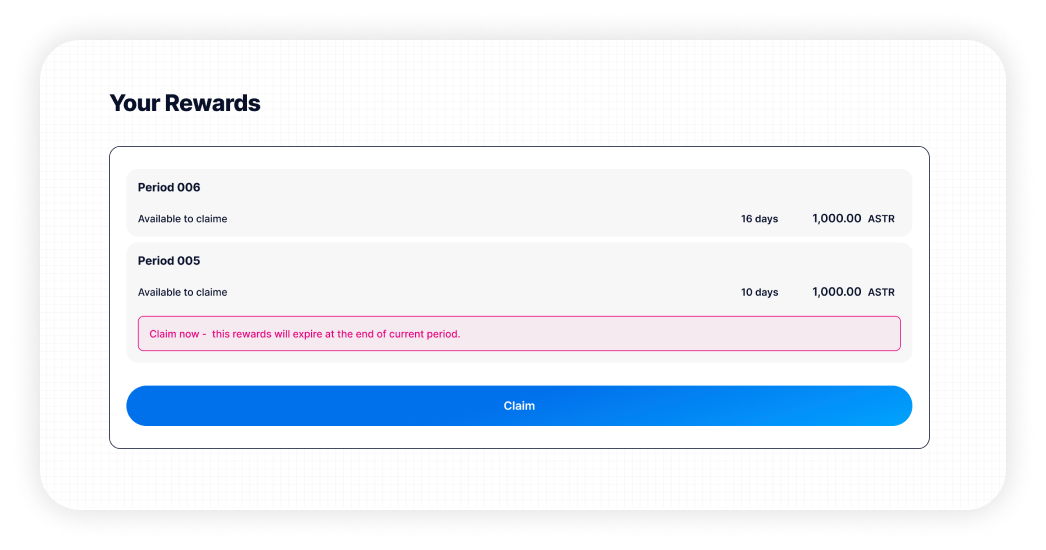
The logic for claiming is a straightforward transaction call to your staking contract's claimReward (or getReward) function.
// Inside the Staking component

const handleClaim = async () => {
    if (!provider || !account) return;
    setError(null);
    setIsProcessing(true);

    try {
        const signer = await provider.getSigner();
        const stakingContract = new ethers.Contract(stakingContractAddress, StakingABI.abi, signer);

        console.log("Claiming rewards...");
        const claimTx = await stakingContract.claimReward(); // Or getReward()
        await claimTx.wait();
        console.log("Rewards claimed successfully!");

        fetchData();

    } catch (err: any) {
        console.error("Claiming failed:", err);
        setError(err.reason || "An error occurred during claim.");
    } finally {
        setIsProcessing(false);
    }
};
And here is the UI to add below the staking/unstaking section:
// Inside the return statement, below the actions div

<div className="claim-action" style={{ marginTop: '20px' }}>
    <button onClick={handleClaim} disabled={isProcessing || parseFloat(earnedRewards) <= 0} style={{ width: '100%', padding: '10px', backgroundColor: '#28a745', color: 'white' }}>
        {isProcessing ? 'Processing...' : `Claim ${parseFloat(earnedRewards).toFixed(6)} Rewards`}
    </button>
</div>
The video below demonstrates this entire flow—staking, unstaking, and claiming—in a live application, which will help you verify your implementation.
How to create an ERC20 staking app
Now, let's watch the complete staking flow in action. This part of the 'How to create an ERC20 staking app' video shows exactly what you should experience when you test your component.
Watch the segment from 22:28 to the end. The first part (until 31:24) explains the code for the main component, which we've just built using ethers.js. The second part (from 31:24 onwards) shows a live demonstration of staking, rewards accumulating, and claiming. Use this to guide your testing.
Conclusion
Congratulations! You have now built a sophisticated staking dashboard, adding significant utility and a powerful incentive mechanism to your token ecosystem. This is a huge step forward in creating a real, valuable DeFi application.
Key Takeaways:
- The
approvePattern: You learned and implemented the essentialapproveandstakeworkflow, a fundamental pattern for any dApp that interacts with ERC-20 tokens. - Multi-Contract Interaction: You successfully orchestrated reading and writing to multiple contracts (Token, Staking) within a single UI component.
- Data-Driven UI: You built a dynamic dashboard that fetches, displays, and periodically refreshes on-chain data to give the user a live view of their investment.
- Complete Staking Lifecycle: Your UI now supports the full user journey: staking tokens, watching rewards grow, and claiming them.
Preview of the Next Lesson:
In our components, we've included basic isProcessing and error states. However, for a production-grade dApp, we need a more robust and user-friendly way to communicate transaction status. In the next lesson, we will focus on handling transaction states and providing feedback to the user, creating a polished experience with notifications for pending, successful, and failed transactions.