Recommended resources
The freely available resources this lesson will direct you to.
Welcome. This first lesson refreshes the environment layer that sits underneath every Java and Spring Boot project: the JDK that compiles code, Maven that builds it, and IntelliJ IDEA that imports, runs, and diagnoses the project. For junior full-stack work, being able to resolve a build that succeeds on one machine but fails in the IDE is a practical engineering skill—not just setup trivia.
By the end, you should be able to investigate a Java/Maven configuration failure systematically, identify which tool is using the wrong JDK or Maven installation, and apply a targeted fix rather than randomly changing settings.
The key idea: one project, several Java environments
A Java project can appear to have “one Java version,” but several tools may each select their own JDK:
| Layer | What it controls | Useful evidence |
|---|---|---|
| Shell Java | Java selected by your system PATH |
java -version, javac -version |
| Maven Java | JDK that actually runs Maven and its compiler | mvn -v or Maven Wrapper version command |
| Maven project configuration | Java language and bytecode level the project requires | pom.xml |
| IntelliJ Project SDK | IDE code analysis and ordinary project compilation | Project Structure |
| IntelliJ Maven Runner JRE | JDK used when IntelliJ runs Maven goals | Maven Runner settings |
| IntelliJ Maven Importer JDK | JDK IntelliJ uses while syncing the Maven project | Maven Importing settings |
| Run configuration JDK | Java used when launching the application | Run configuration |
The most common problem is not that Java is “broken.” It is that these layers disagree.
For example, suppose your Spring Boot project is configured to compile for Java 17, while Maven is launched using Java 11. Your editor may still show no errors because IntelliJ’s Project SDK is Java 17, but a Maven build fails because the compiler Maven invokes comes from Java 11.
The most useful diagnostic principle is:
Trust the output of the tool that failed. If Maven failed, start with Maven’s reported Java version—not the Java version shown somewhere else in the IDE.
Establish a baseline before changing anything
When you clone, reopen, or inherit a Java project, begin in the project root directory. First check whether the repository includes a Maven Wrapper:
- On macOS or Linux, look for
mvnw. - On Windows, look for
mvnw.cmd. - Also look for the
.mvndirectory.
When it exists, prefer the wrapper. It gives the team a defined Maven version and avoids “works with my Maven installation” differences.
# macOS or Linux
./mvnw -v
./mvnw clean verify
:: Windows Command Prompt
mvnw.cmd -v
mvnw.cmd clean verify
If there is no wrapper, use:
mvn -v
mvn clean verify
The version command is a compact configuration report. Note these fields:
Apache Maven ...
Maven home: ...
Java version: ...
Java home: ...
OS name: ...
Java home is the critical line. It tells you the JDK Maven actually uses. This may differ from the result of java -version.
Also run:
java -version
javac -version
java -version confirms the runtime selected by your shell. javac -version confirms that a compiler is available. A JRE-only installation can run Java programs but cannot compile a Maven Java project; for development, install a full JDK.
Read Apache Maven’s installation guidance to reinforce the relationship among a JDK, JAVA_HOME, PATH, and Maven’s own verification command.
In the Prerequisites section, read the JDK requirement. Then continue to the Binary distribution instructions and focus on steps 3 and 4: Maven’s bin directory must be on PATH, and mvn -v must be run in a new shell. Notice that the sample output reports both Maven and the Java home Maven selected.
JAVA_HOME and PATH: similar, but not interchangeable
Two environment variables often cause confusion:
JAVA_HOMEshould point to the root directory of a JDK installation, not itsbindirectory.PATHis a list of directories your terminal searches for commands such asjava,javac, andmvn.
Typical problems include:
| Symptom | Likely cause | Correct direction |
|---|---|---|
mvn is not recognized |
Maven bin directory is absent from PATH |
Add Maven bin, or use the project wrapper |
java works but javac does not |
A runtime is installed or selected instead of a JDK | Install/select a full JDK |
mvn -v shows an unexpected Java home |
Maven inherited an old JAVA_HOME or shell configuration |
Point JAVA_HOME to the intended JDK and open a fresh terminal |
| A fresh terminal works but an old terminal does not | Existing shells retain their environment | Close and reopen the terminal or IDE |
Do not edit Java-version values in a project simply because your machine is outdated. First determine what Java version the project genuinely requires. For a job-ready portfolio application, installing the required JDK is usually the appropriate fix.
Read the Java requirement from the POM
pom.xml is Maven’s project contract. The Java version may be configured in several legitimate ways. A common modern configuration is:
<properties>
    <maven.compiler.release>17</maven.compiler.release>
</properties>
Here, release means: compile using the Java 17 language/API contract and create Java 17-compatible bytecode. The JDK running Maven must be at least Java 17.
Some projects use separate settings instead:
<properties>
    <maven.compiler.source>17</maven.compiler.source>
    <maven.compiler.target>17</maven.compiler.target>
</properties>
A Spring Boot project may instead define:
<properties>
    <java.version>17</java.version>
</properties>
The parent POM and build plugins can use that property to configure compilation. Do not add every version property “just in case.” Locate the existing convention, understand whether it is inherited, and change only the setting the project already uses.
The classic failure: invalid target release
Consider this error:
Fatal error compiling: error: invalid target release: 17
It normally means Maven’s compiler is older than the Java level requested by the POM. It does not mean your source code is invalid.
A disciplined diagnosis looks like this:
- Read the exact requested release in the error, such as 17.
- Run
mvn -vor the wrapper equivalent. - Compare Maven’s reported Java version with the requested project release.
- If Maven uses a lower version, configure Maven to use a compatible JDK.
- Run the same Maven command again and retain the before-and-after output.
For example, a project asking for Java 17 cannot be compiled by Maven running on Java 11. Changing the project to Java 11 may make the immediate error disappear, but it can silently violate the project’s runtime requirements or make code incompatible with teammates’ environments.
Fix Maven Build Error: invalid target release:...
Watch “Fix Maven Build Error: invalid target release:...” by Reborn Developer for a short, concrete demonstration of the mismatch behind this error. The commands are broadly useful; the environment-variable screen shown later is Windows-specific.
Watch the root cause to connect the error message to Maven running under an older JDK. Then watch the diagnosis, paying particular attention to the comparison between the POM’s Java setting and mvn -v. Finally, watch the JDK fix to see why changing JAVA_HOME requires a fresh command prompt. The video demonstrates two possible fixes; in a real team project, prefer installing/selecting the version required by the project over downgrading the project requirement without agreement.
Make IntelliJ IDEA agree with Maven
IntelliJ has several JDK selectors because it performs several distinct jobs. Keeping them aligned removes a large class of confusing failures.
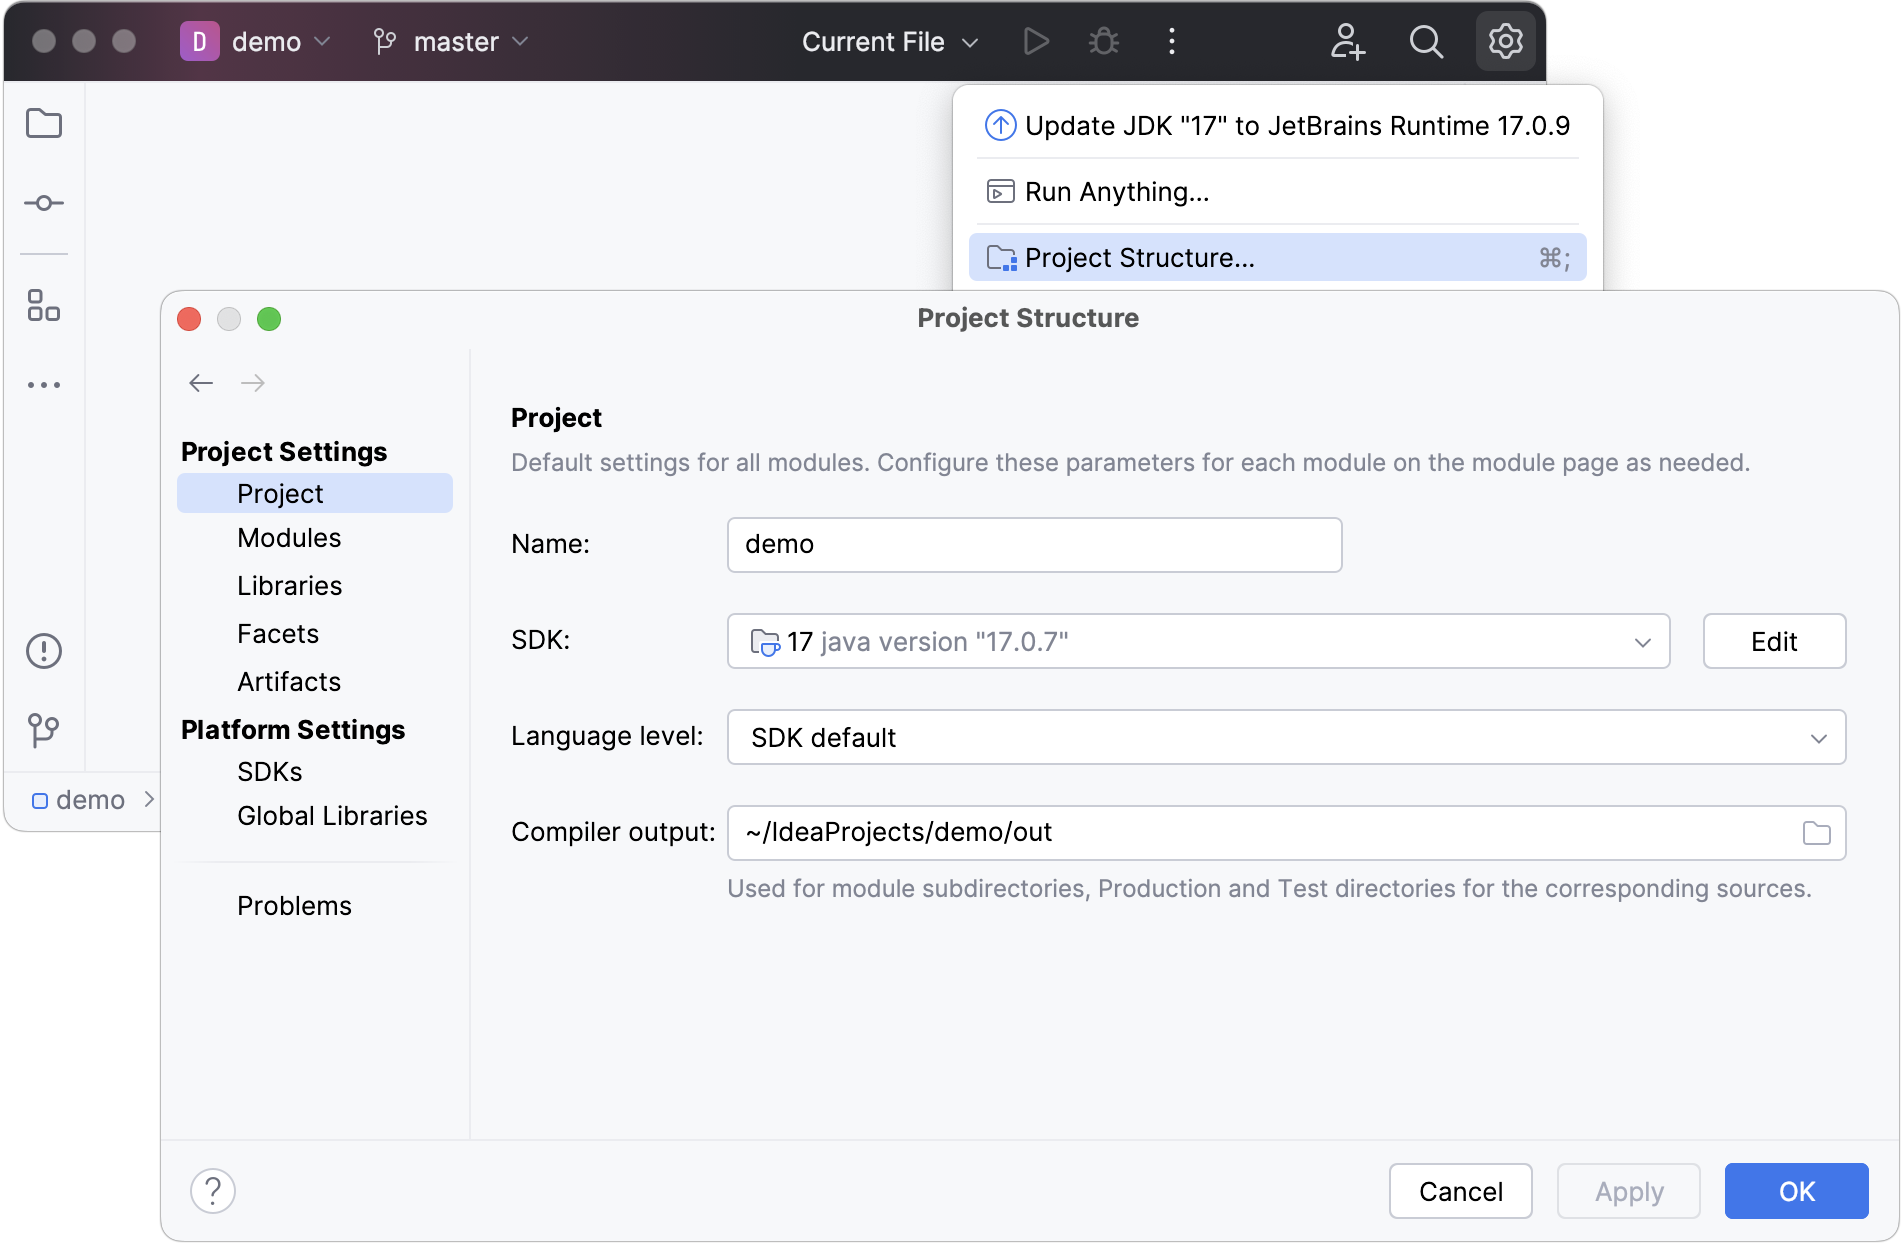
Start by setting the project-level SDK:
- Open File | Project Structure.
- Select Project under Project Settings.
- Set Project SDK to the required installed JDK—for example, JDK 17 if the POM requires release 17.
- Usually leave Language level at SDK default, unless the project explicitly requires a different language-level setting.
- Check Modules as well if a module has overridden the project SDK.
Then configure Maven within IntelliJ. Settings labels can vary slightly across IntelliJ versions, so use the Settings search field and search for Maven if the navigation is not identical.
- Under Build, Execution, Deployment | Maven, select the repository’s Maven Wrapper when it is available, or identify the intended Maven installation.
- Under Maven | Runner, set the JRE to the same compatible JDK. This governs Maven goals launched from IntelliJ.
- Under Maven | Importing, set the importer JDK consistently. This governs project synchronization and dependency resolution.
Maven | IntelliJ IDEA Documentation - JetBrains
Read JetBrains’ Maven configuration guidance to distinguish the project SDK from the JDK used for Maven importing and Maven execution. That distinction explains why a build can work in one context but fail in another.
First, in Access the Maven settings and Use the Maven wrapper or a custom version of Maven, read the Maven configuration instructions. Identify the Maven home path and the Wrapper option. Next, in Change the JDK version in a Maven project, read from the JDK overview through the subsections on Project Structure, Maven runner, and Maven importer. Focus on the different scope of each setting rather than memorizing keyboard shortcuts.
Import first; do not merely open a folder
For an existing Maven project, IntelliJ needs to recognize the pom.xml as the build model. If IntelliJ treats the project as a plain collection of files, dependencies may appear missing even though the POM is correct.
Open the project from its root or explicitly select its main pom.xml during import. Once it opens:
- locate the Maven tool window;
- use its reload/reimport action after meaningful POM changes;
- wait for dependency resolution to finish;
- inspect the Maven build output when a goal fails.
Working With Maven in IntelliJ IDEA
Watch “Working With Maven in IntelliJ IDEA” from the IntelliJ IDEA channel for the import and build workflow inside the IDE.
Watch Maven import to see why selecting the main pom.xml lets IntelliJ discover the project structure and dependencies. Then watch Maven tool window and note where Maven phases run and where their output appears. Use that output as your evidence when an IDE build fails.
After any alignment change, test in both contexts:
./mvnw clean verify
Then run the equivalent Maven lifecycle goal from IntelliJ’s Maven tool window. This comparison isolates the problem:
| Terminal result | IntelliJ Maven result | Most likely interpretation |
|---|---|---|
| Fails | Fails | POM, dependency, JDK, or environment issue independent of IntelliJ |
| Passes | Fails | IntelliJ Maven Runner JRE, Maven home, importer state, or offline mode |
| Fails | Passes | Terminal JAVA_HOME, PATH, or global Maven installation differs from IDE configuration |
| Passes | Passes, but app will not start | Inspect the application run configuration and runtime configuration separately |
A repeatable troubleshooting playbook
Avoid changing several settings at once. Treat the build failure like a small incident: capture evidence, form one hypothesis, make one change, rerun the same command.
1. Maven command cannot be found
Typical error
mvn: command not found
or on Windows:
'mvn' is not recognized as an internal or external command
Likely cause: Maven’s bin directory is not on PATH.
Fix: First check for Maven Wrapper and use it. If the project has no wrapper, install Maven and add its bin directory to PATH. Close and reopen the terminal, then run mvn -v.
2. Maven cannot find Java or reports an unsuitable Java version
Typical signs
JAVA_HOME is not defined correctly
or Maven reports a Java version below the project’s configured release.
Likely cause: JAVA_HOME points to an old JDK, a JRE, the wrong directory, or no directory at all.
Fix: Point JAVA_HOME to the JDK root. Confirm with mvn -v, not only java -version. If the terminal becomes correct but IntelliJ Maven still fails, configure IntelliJ’s Maven Runner JRE rather than repeatedly changing your system environment.
3. invalid target release or release version ... not supported
Likely cause: Maven is using an older JDK than the POM requires.
Fix: Compare the POM version requirement with Maven’s Java version from mvn -v. Select or install a sufficiently new JDK, then make the Project SDK, Maven Runner JRE, and Maven Importer JDK consistent with it.
4. Dependencies are red in IntelliJ, but the POM looks valid
Likely causes:
- IntelliJ did not import the project as Maven.
- The POM was changed but not reloaded.
- Maven is in offline mode.
- Dependency resolution failed because of network, proxy, repository, or credentials configuration.
Fix sequence:
- Verify that
pom.xmlappears as the Maven project model. - Reload the Maven project from the Maven tool window.
- Check Maven settings and ensure Offline mode is not enabled when dependencies must be downloaded.
- Run the build in a terminal to get the full Maven error.
- Read the first meaningful “Could not transfer artifact” or authentication error. It identifies the repository or network boundary that failed.
Do not delete your entire local Maven repository as a first reaction. That can turn a focused issue into a long re-download and may conceal the actual problem. If Maven has cached a failed attempt and network access is now restored, a controlled retry such as the following can be useful:
./mvnw -U clean verify
The -U option asks Maven to check for updated releases and snapshots. It is not a substitute for correcting proxy credentials, repository access, or a wrong dependency declaration.
5. IntelliJ compiles, but Maven fails—or the reverse
This is a configuration mismatch signal. Capture these four facts before changing anything:
Project SDK:
POM Java requirement:
Terminal Maven Java home:
IntelliJ Maven Runner JRE:
Once written down, the disagreement is usually visible. This habit also produces a clear explanation when asking a teammate for help: “The POM requires Java 17; terminal Maven uses Java 17, but IntelliJ’s Maven Runner uses Java 11.”
A short operational checklist
Use this checklist whenever you begin a backend repository or encounter a configuration failure:
- Read the
READMEand inspectpom.xmlfor the intended Java version. - Check for
.mvn,mvnw, ormvnw.cmd; prefer the wrapper if present. - Run the version command and record Maven’s Java home.
- Run a clean verification build from the project root.
- Import the project through its
pom.xmlin IntelliJ. - Align Project SDK, Maven Runner JRE, and Maven Importer JDK.
- Reload Maven after POM changes.
- Compare terminal and IDE Maven results if they differ.
- Change one variable at a time and preserve the exact error output until the problem is understood.
Key takeaways
A Maven failure is often a disagreement among configuration layers, not a code failure. mvn -v is the most important first diagnostic because it shows the Java home Maven actually uses. The POM defines the project’s Java requirement; IntelliJ’s Project SDK, Maven Runner JRE, and Maven Importer JDK must be compatible with it, but they serve different purposes.
Prefer a repository’s Maven Wrapper, import existing projects through pom.xml, and validate a fix by running the same Maven build in both the terminal and IntelliJ. This converts configuration troubleshooting from trial-and-error into a repeatable workflow.
Next, you will move from the environment into Java design: refactoring a small domain model with encapsulation, interfaces, and composition.