Recommended resources
The freely available resources this lesson will direct you to.
- I Built an Entire Website with Claude Code… Here’s Howwww.youtube.com
- Beginner’s Guide: Setting Up Your Vibe Coding Environment with VSCode, GitHub, Cline & OpenRouterwww.youtube.com
- Build and Launch a Website Fast with Claude AI - Davydov Consultingwww.davydovconsulting.com
- Vibe Coding with Claude Code: No Coding Skills Neededcgstrategylab.com
Hello again!
In our last lesson, we successfully integrated Claude into your VS Code environment, creating a powerful setup where your AI creative partner is embedded directly in your digital workshop. You now have everything you need to start generating code.
Today, we'll take that crucial first step. The goal of this lesson is to use a Claude prompt to generate a basic HTML, CSS, and JavaScript project structure. Think of this as asking an assistant to lay out your canvas, paints, and brushes before you start a new piece. We will move from an empty folder to a complete, linked set of files, all with a single, well-crafted instruction.
The Art of the Prompt: Instructing Your AI Assistant
Before we ask Claude to do anything, let's talk about how to ask. Getting high-quality, predictable results from an AI like Claude is a skill. It's less like a search query and more like writing a clear, concise creative brief for a team member. In your work as a product designer, you know that a well-defined user story or problem frame leads to a much better outcome than a vague request. The same principle applies here.
A good prompt generally contains a few key ingredients. This simple visual illustrates the core components:
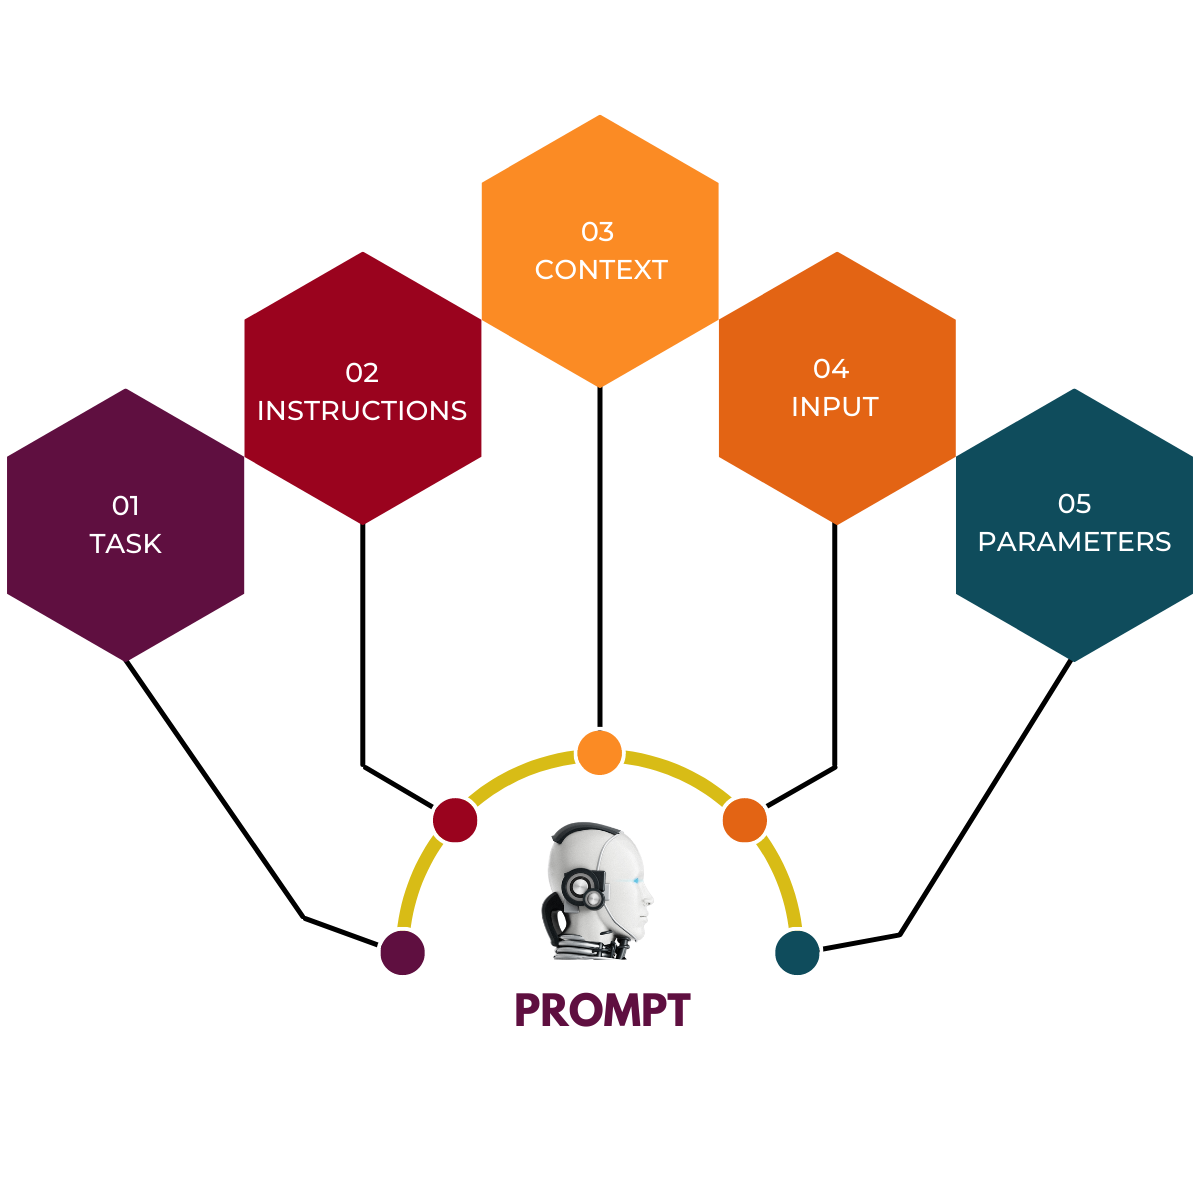
For our purposes today, we can simplify this to:
- Task: The main goal. What do you want it to do? (e.g., "Create a project structure.")
- Context: Why are you doing this? (e.g., "This is for a web-based animation.")
- Instructions & Format: What are the specific details and requirements? (e.g., "Use three separate files named
index.html,styles.css, andscript.js. Link them together.")
Mastering this structure will be fundamental to our workflow. For a deeper dive into crafting effective prompts, the following resource offers excellent general advice.
Build and Launch a Website Fast with Claude AI
This article, 'Build and Launch a Website Fast with Claude AI,' provides great insights into structuring prompts. While we are not building a full website, the principles are directly applicable.
Please read the sections 'Structuring Prompts for Maximum Output' and 'Creating HTML/CSS Code with Claude'. Also, review the examples under 'Best Prompt Examples to Use with Claude' for HTML and CSS. Focus on how they emphasize being clear, specific, and breaking down the request.
Crafting the Prompt for Our Project Structure
Now, let's apply these principles. Our goal is to create the standard three-file setup for any web-based project:
index.html: The document structure. In our analogy, this is the skeleton or canvas.styles.css: The visual presentation. This is the paint, lighting, and texture.script.js: The behavior and interactivity. This is the engine that will eventually drive our animations.
Based on the best practices you just read about, here is a structured prompt designed to generate exactly what we need.
Prompt to use:
Please create a basic project structure for a web animation project. I need three separate files inside my current folder:
1. **index.html**: This should be a standard HTML5 document. Inside the body, include an <h1> tag that says "My Animation Scene". Critically, make sure to add the necessary tags to link to styles.css and script.js.
2. **styles.css**: This file should contain a basic style rule to give the page a dark background color (like #282c34) and set the text color to white.
3. **script.js**: This file can be mostly empty, but please add a single-line comment inside it that says "// Animation logic will go here."
Go ahead and create these three files for me.
Notice how the prompt clearly states the task (create a project structure), provides context (for a web animation project), and gives specific instructions for each file, including naming and content.
Action: Generating Your First Files
It's time to put Claude to work.
- In VS Code, open the project folder you created in the first lesson.
- Open the Claude chat panel (click the "Spark" icon
✱in the top-right or status bar). - Copy the prompt above and paste it into the Claude chat input box.
- Press Enter to send the prompt.
Claude will process your request. It will likely show you a plan and ask for permission to create files in your workspace. This is a security feature. Approve the file creation.
Once you grant permission, you will see index.html, styles.css, and script.js appear in the Explorer panel on the left side of VS Code.
Reviewing the Output: Trust but Verify
Claude has created the files, but it's essential to quickly check its work.
- Open
index.html: Look for the<link rel="stylesheet" href="styles.css">tag (usually in the<head>) and the<script src="script.js"></script>tag (usually near the end of the<body>). This confirms the files are correctly connected. - Open
styles.css: You should see the CSS rule for the background and text color. - Open
script.js: You should see the comment// Animation logic will go here.
Congratulations! You have successfully directed an AI to build a complete, multi-file project foundation from a single natural-language command.
Pro Tip: Providing Persistent Context with CLAUDE.md
Constantly reminding Claude of your project's goals or tech stack in every prompt is inefficient. There's a better way. By creating a special file named CLAUDE.md in your project's root folder, you can provide persistent instructions that Claude automatically reads at the start of every session.
Think of it as a project brief that's always on the table for your AI assistant to reference.
Vibe Coding with Claude Code: No Coding Skills Needed
Let's explore this powerful feature. The following guide explains the purpose and usage of the CLAUDE.md file.
Read the section titled 'Feature 2: The CLAUDE.md File - Your Project Instructions'. Focus on understanding what this file does and see the example provided.
Let's create one for our project right now.
- In the VS Code Explorer, create a new file named
CLAUDE.md(the name must be exact). - Paste the following content into it:
# Motion Graphics Project


## Purpose
This project is for creating code-based motion graphics and animations using SVG, CSS, and JavaScript.


## Tech Stack
- HTML5 for structure
- CSS for styling and keyframe animations
- Vanilla JavaScript for any interactive logic (no frameworks unless specified)


## My Preferences
- Prioritize clean, readable code.
- Add comments to explain complex animation logic.
- Use a file structure of index.html, styles.css, and script.js.
By doing this, you're front-loading the context for all future interactions with Claude in this project, which will lead to more consistent and accurate results.
Key Takeaways
- Effective prompting involves providing clear Tasks, Context, and Instructions.
- You can command Claude to generate a complete project structure, including HTML, CSS, and JS files, and link them together.
- Always review the AI's output to ensure it matches your requirements.
- The
CLAUDE.mdfile is a powerful tool for giving Claude persistent context about your project, saving you time and improving its suggestions.
Next Up
You've now laid the foundation. The next step is to get something visual onto our canvas. In our next lesson, we will bridge the gap between Figma and your code editor. You will learn how to structure, optimize, and export SVG assets from a Figma design, and then use Claude to write the HTML and CSS needed to compose a static scene from those assets in the browser.