Recommended resources
The freely available resources this lesson will direct you to.
Hello! In our previous lesson, we taught your bot to handle a wide array of message types, from text and photos to documents, using grammY's powerful filter query system. You learned how to receive and send files, making your bot much more versatile.
This lesson focuses on presentation. So far, our bot's replies have been plain text. To build the kind of "tech UIs" you're interested in, we need to control the formatting of our messages. Today, we'll explore how to send messages with bolding, italics, links, and even code blocks. We will cover the two formatting standards supported by Telegram—Markdown and HTML—and I'll show you the robust, type-safe grammY plugin that makes this process a breeze.
The Two parse_mode Options
The Telegram Bot API allows you to style your text by embedding special formatting characters or tags directly into the message string. To tell Telegram how to interpret these markers, you must specify a parse_mode when you send the message. The two modes are MarkdownV2 and HTML.
Let's look at the basic grammY documentation for this.
Sending and Receiving Messages - grammY
This section of the grammY basics guide introduces the parse_mode option and provides simple examples for both Markdown and HTML.
Read the main section Sending Message With Formatting, and then review the short subsections for <tf start="Markdown" end="parse_mode: "MarkdownV2"">Markdown and <tf start="HTML" end="parse_mode: "HTML"">HTML. Pay attention to the options object passed to the send message call.
As you've just read, the process involves passing a second argument to ctx.reply() (or ctx.api.sendMessage()) with a parse_mode property.
MarkdownV2: Powerful but tricky
MarkdownV2 supports a familiar syntax for formatting:
*bold text*_italic text_[link text](http://example.com)`inline code`pre-formatted block
However, its key drawback is that any of the characters _, *, [, ], (, ), ~, `, >, #, +, -, =, |, {, }, ., ! must be escaped with a backslash (\) if you want them to appear as literal characters. This is a very common source of bugs, as forgetting to escape a period in a URL, for instance, will break the entire message's formatting.
Here's an example of sending a MarkdownV2 message. Notice the escaped . and !:
bot.command("md", (ctx) => {
  ctx.reply(
    "This is *bold*, this is _italic_, and this is a [link to grammY](https://grammy.dev)\\. Don't forget to escape special characters\\!",
    { parse_mode: "MarkdownV2" },
  );
});
HTML: A More Familiar Choice
For a front-end developer, the HTML parse mode is often a more natural and robust choice. You use standard HTML tags to format your text. The supported tags are a small subset of HTML:
<b>bold</b>,<strong>bold</strong><i>italic</i>,<em>italic</em><u>underline</u>,<ins>underline</ins><s>strikethrough</s>,<strike>strikethrough</strike>,<del>strikethrough</del><a href="http://example.com">link</a><code>inline fixed-width code</code><pre>pre-formatted fixed-width code block</pre>
Crucially, with HTML mode, you only need to escape three characters: < becomes <, > becomes >, and & becomes &. This is far more manageable than MarkdownV2's long list.
The <pre> tag is particularly powerful for creating the "tech UIs" you're aiming for. You can use it to display code or to create table-like layouts with monospaced fonts, ensuring that your spacing and alignment are preserved.
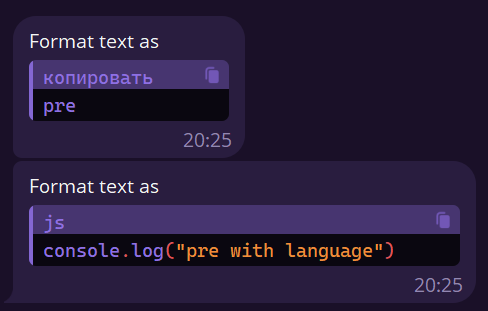

Here's how you'd send an HTML-formatted message:
bot.command("html", (ctx) => {
  ctx.reply(
    'This is <b>bold</b>, this is <i>italic</i>, and this is a <a href="https://grammy.dev">link to grammY</a>. Here is some <code>inline code</code>.',
    { parse_mode: "HTML" },
  );
});
The parse-mode Plugin: A Superior Abstraction
While using the parse_mode option directly works, it feels very low-level. You have to remember to add the option to every call, and you're still manually constructing strings, which is error-prone. This is a solved problem in front-end development, where libraries like React abstract away direct DOM manipulation. grammY offers a similar high-level abstraction with the @grammyjs/parse-mode plugin.
This plugin provides a type-safe, declarative API for building formatted messages. It handles the generation of the underlying entities array—Telegram's internal representation for formatted text—so you don't have to worry about parse_mode or escaping characters.
First, let's add it to the project:
bun add @grammyjs/parse-mode
Now, let's explore how to use it by reading its documentation.
Parse Mode Plugin (parse-mode) | grammY
This document covers the official grammY plugin for handling formatted text. It introduces the core concepts and provides examples for its two main APIs.
Please read through the following sections: Introduction: Understand the plugin's purpose. Two Approaches: Learn about the tagged template and class-based methods. Usage (using fmt): See the tagged template literal in action. This syntax may remind you of CSS-in-JS libraries. Usage (using FormattedString): Review the builder pattern approach. <tf start="Core Concepts" end="This is my response");">Core Concepts: This is the most important part. Understand how the plugin creates a unified, composable system for formatted text.
Implementing with the Plugin
Let's put what you've read into practice. The plugin offers two main ways to build formatted strings.
1. The fmt Tagged Template
This is often the most readable approach. It uses a tagged template literal, which is a standard JavaScript feature.
First, import the necessary functions from the plugin:
import { fmt, bold, italic, link } from "@grammyjs/parse-mode";
Now, let's create a new command that generates a formatted status report.
bot.command("status", async (ctx) => {
  const statusText = fmt(
    `${bold("Bot Status Report")}\n\n` +
    `Uptime: ${italic("42h 13m")}\n` +
    `CPU Load: <code>15%</code>\n` +
    `Memory: <code>256/1024 MB</code>\n\n` +
    `For more details, see the ${link("dashboard", "https://example.com")}.`
  );

  await ctx.reply(statusText);
});
Notice a few things here:
- We're composing the final message with simple helper functions (
bold,italic,link). - The
fmtfunction returns an object thatctx.replyunderstands directly. We don't need to specifyparse_modeor manually handletextandentitiesproperties. - We can mix formatted and plain strings seamlessly.
2. The FormattedString Builder
This approach uses a builder pattern, which can be very useful when you need to construct a message programmatically, perhaps inside loops or conditional branches.
Let's create the same status report using this method.
import { FormattedString } from "@grammyjs/parse-mode";

bot.command("status_builder", async (ctx) => {
  const statusText = new FormattedString("Bot Status Report").bold().text("\n\n")
    .plain("Uptime: ").italic("42h 13m").text("\n")
    .plain("CPU Load: ").code("15%").text("\n")
    .plain("Memory: ").code("256/1024 MB").text("\n\n")
    .plain("For more details, see the ").link("dashboard", "https://example.com").plain(".");

  await ctx.reply(statusText);
});
The end result is identical. The choice between fmt and FormattedString is largely a matter of style and the specific use case. The fmt template is often clearer for static or lightly dynamic text, while the builder pattern excels at complex, conditional text construction.
The true power of this plugin, as highlighted in the "Core Concepts" you read, is its composability. You can even pass an existing message from ctx.msg (which already has text and entities) into fmt and build upon its formatting. This demonstrates a level of API design that you, as a senior developer, can appreciate. It treats formatted text as a first-class, composable object.
Conclusion
You've now learned how to elevate your bot's communication from plain text to richly formatted messages. This is a fundamental skill for building bots that are not only functional but also user-friendly and aesthetically pleasing.
Key Takeaways:
- Telegram supports text formatting via two modes:
MarkdownV2andHTML. - The
HTMLmode is generally more reliable and easier to work with, especially given your background, due to its simpler escaping rules. - The
<pre>tag is invaluable for creating code blocks and table-like layouts. - The official
@grammyjs/parse-modeplugin is the recommended, type-safe, and declarative way to handle message formatting. - The plugin provides two powerful APIs: the
fmttagged template literal for readability and theFormattedStringclass for programmatic construction.
Now that your bot can present information clearly, the next logical step is to allow users to interact with that information directly through buttons. In our next lesson, we will dive into creating custom reply keyboards and inline keyboards, turning your bot's messages from static displays into truly interactive UI components.