Recommended resources
The freely available resources this lesson will direct you to.
Welcome to the final lesson of our module on the Telegram Bot API from first principles. In our last session, you successfully sent messages from your bot to Telegram, gaining a practical understanding of how to call API methods with raw HTTP requests. You've completed one half of the communication channel.
Today, we will complete the other half: receiving messages from Telegram. This will enable your bot to become truly interactive. We'll implement a basic "echo bot" that listens for incoming messages and replies with the same text. To achieve this, you will learn how to implement a long polling loop using the getUpdates API method, a fundamental pattern for building bots without a dedicated web server.
The Challenge: How Does a Bot Listen?
Our bot's code runs on our machine, and Telegram's servers are somewhere out on the internet. How does our code know, in a timely manner, when a user sends it a message?
One naive approach, known as short polling, would be to ask Telegram's API repeatedly, "Any new messages? Any new messages? Any new messages?" every second or so. As you can imagine, this is highly inefficient. Most of the time, the answer would be "No," leading to wasted network traffic and server resources for both you and Telegram.
A much smarter approach is long polling. With long polling, our bot asks the server, "Any new messages?" and the server doesn't reply immediately if there are none. Instead, it holds the connection open for a period of time (e.g., 30 seconds). If a new message arrives during that time, the server sends it back immediately. If the timeout is reached with no new messages, the server sends an empty response, and our bot immediately makes a new request. This pattern is far more efficient as it reduces the number of empty responses and delivers updates with low latency.
To get a clearer picture of these concepts, the following video provides a concise explanation of short polling, long polling, and a third method, WebSockets, which we will explore later in the course.
Short Polling vs Long Polling vs WebSockets - System Design
This video from the "Be A Better Dev" channel offers a great conceptual overview of different client-server communication patterns.
Watch the explanations for short polling and long polling. Pay attention to the diagrams and the explanation of why long polling is more efficient. You can also watch the recap and comparison at the end to solidify your understanding.
The Telegram Bot API is designed to work perfectly with the long polling model using the getUpdates method.
The getUpdates Long Polling Flow
The sequence diagram below illustrates the entire long polling interaction between your bot's code and the Telegram API.
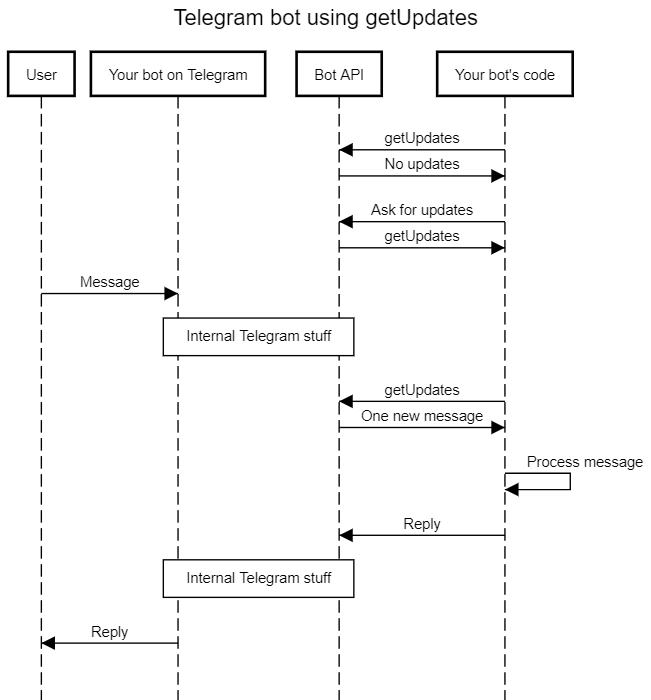
As you can see, the core of our bot will be a loop that continuously calls getUpdates. To make this work correctly, we need to understand its key parameters.
getUpdates: The offset and timeout Parameters
You've already used getUpdates to find your chat_id. When we use it in a loop, two parameters become critical:
timeout: A non-zero integer value (in seconds) for how long the server should wait before responding if there are no new updates. This is what turns a regular poll into a long poll. A value of30is common.offset: An integer identifier for the first update to be returned. This is the crucial mechanism that prevents you from receiving the same updates over and over again.
Every update from Telegram has a unique, sequentially increasing update_id.
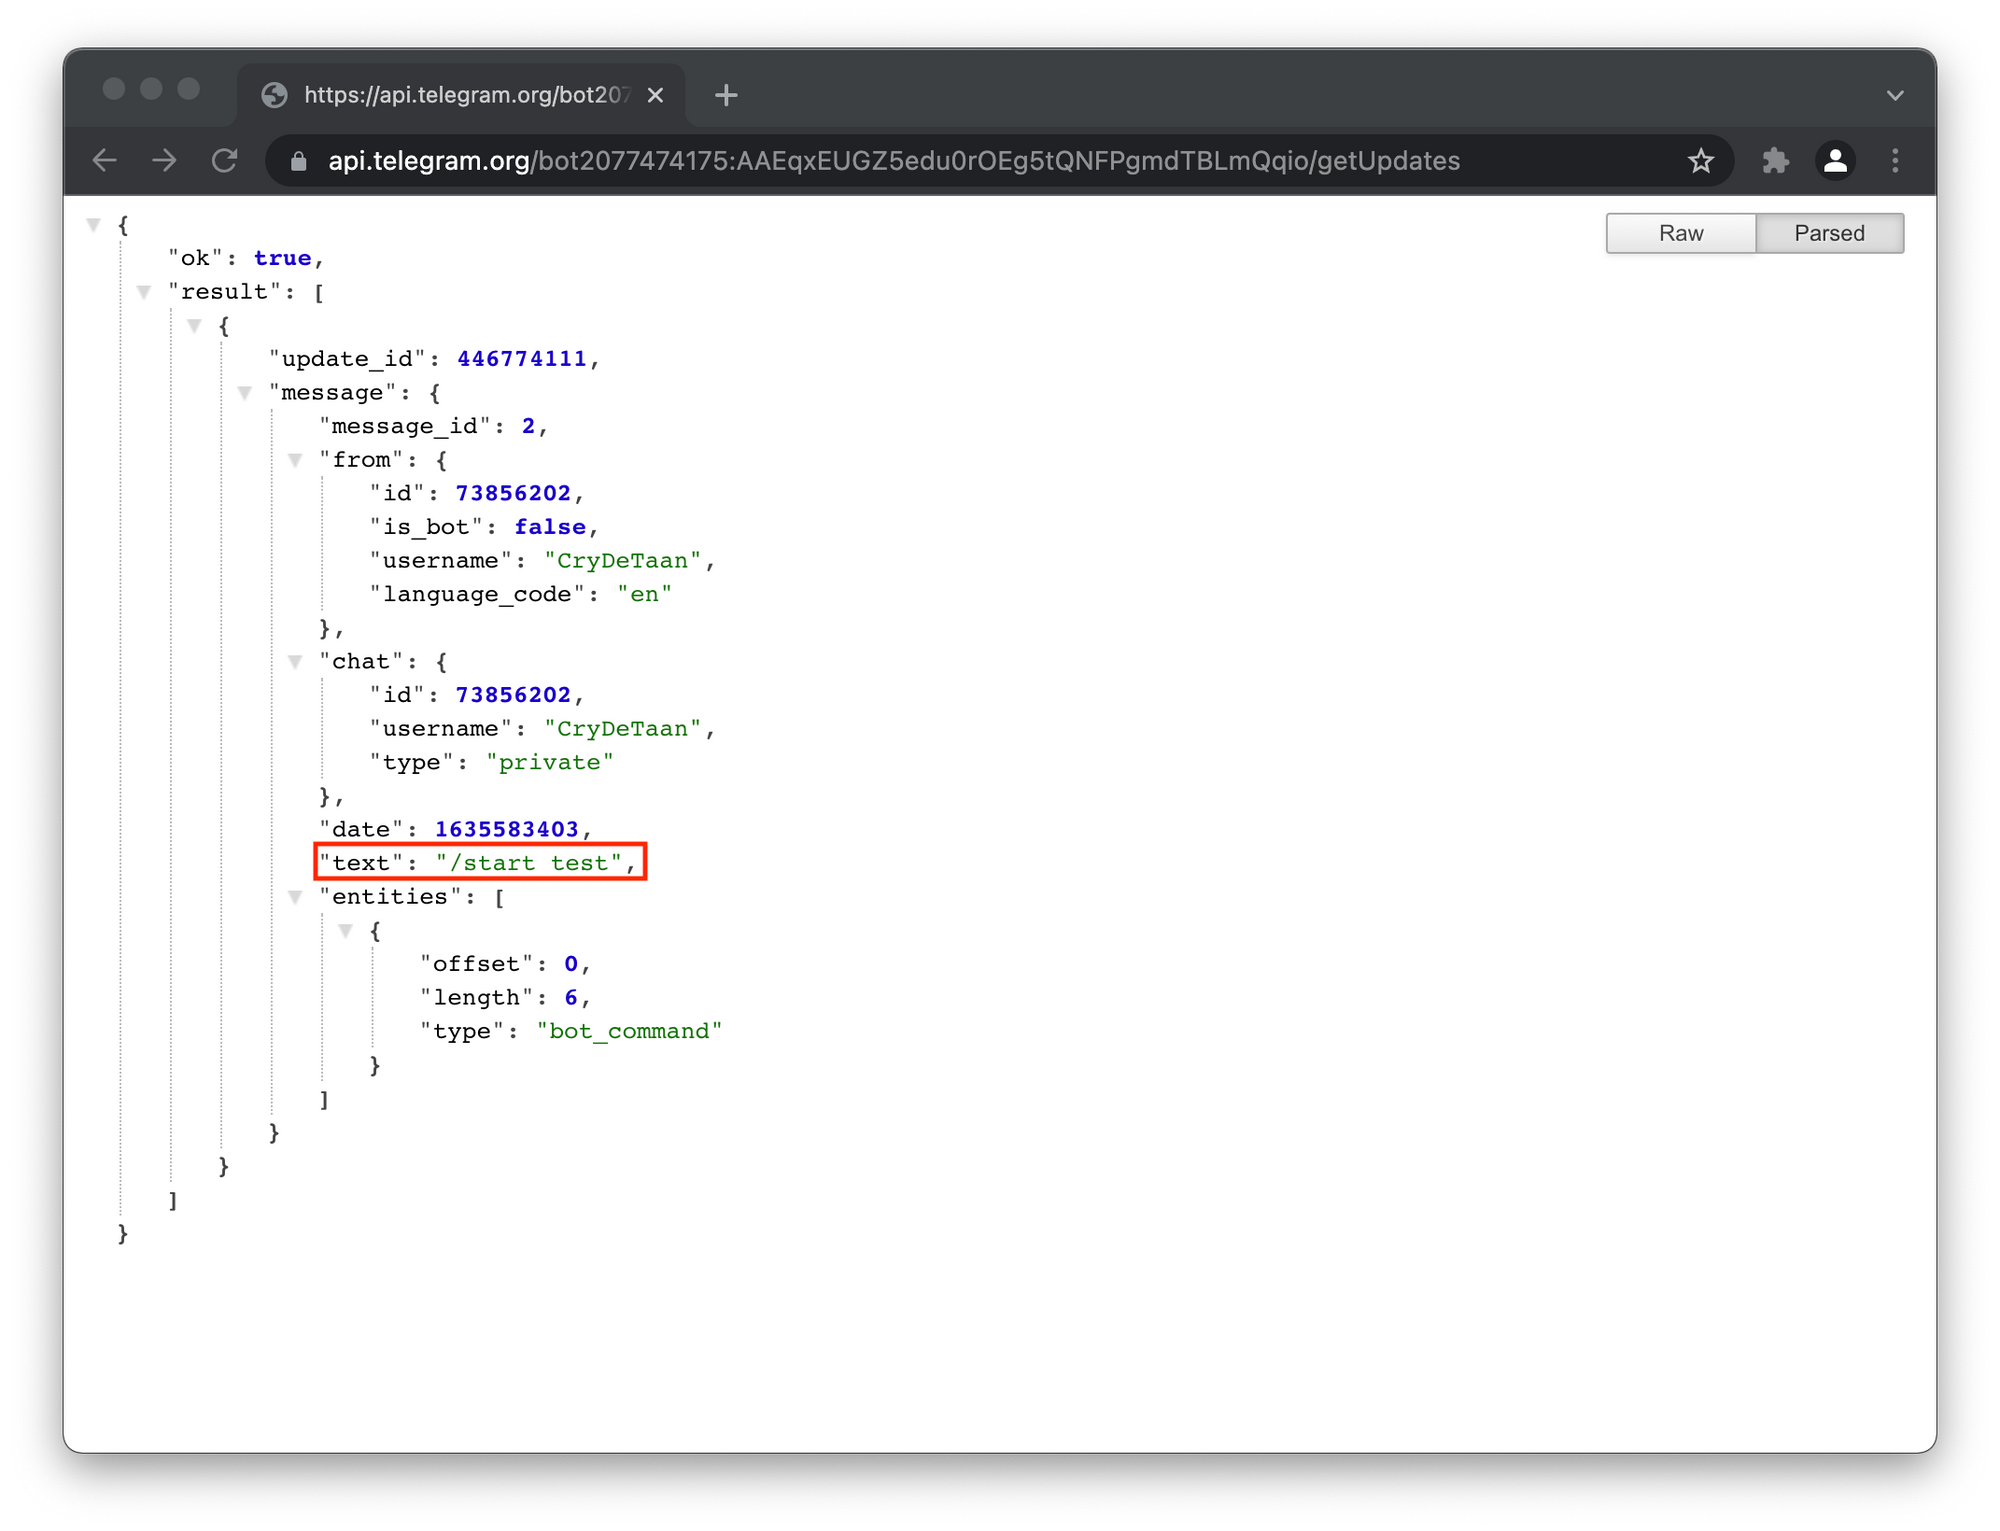
After your bot processes an update, it must tell the API, "I'm done with this one, please give me the next one after it." You do this by setting the offset parameter in your next getUpdates call to be update_id + 1. This effectively acts as a bookmark, telling Telegram where you left off. Without managing the offset, every call to getUpdates would return the same old messages.
The following article passionately—and correctly—argues for the importance of the offset parameter.
Offset in Telegram getUpdates: Key Parameter Guide
This article provides an excellent, in-depth explanation of why the offset parameter is not just optional, but essential for an efficient bot.
Start by reading the introduction and the section Why 93% of Telegram getUpdates Calls Stall to understand the problems that offset solves. Then, read Method #1: Sequential Fetching for the core logic of how to use it. Finally, review the 5-Step Setup, which outlines the exact loop we are about to build.
Implementing an Echo Bot
Now, let's combine everything into a functional echo bot. The script will contain:
- A
sendMessagefunction, similar to the one from our last lesson. - An infinite
whileloop that implements the long polling logic we've just discussed.
Create a new file in your project named echo-bot.ts and add the following code. This script is self-contained and brings together concepts from both this and the previous lesson.
const BOT_TOKEN = Bun.env.TELEGRAM_BOT_TOKEN;

if (!BOT_TOKEN) {
  console.error("Error: TELEGRAM_BOT_TOKEN is not set in your environment.");
  process.exit(1);
}

const API_BASE_URL = `https://api.telegram.org/bot${BOT_TOKEN}`;

/**
 * Sends a text message to a specified chat.
 * This function is adapted from our previous lesson.
 */
async function sendMessage(chatId: number, text: string): Promise<void> {
  const url = `${API_BASE_URL}/sendMessage`;
  console.log(`Replying to chat ${chatId} with: "${text}"`);

  const response = await fetch(url, {
    method: 'POST',
    headers: { 'Content-Type': 'application/json' },
    body: JSON.stringify({ chat_id: chatId, text: text }),
  });

  if (!response.ok) {
    console.error(`Error sending message: ${response.status} ${response.statusText}`);
    // Log the error response body for more details
    const errorBody = await response.json();
    console.error(errorBody);
  }
}

/**
 * The main function to start the long polling loop.
 */
async function startPolling(): Promise<void> {
  let offset = 0; // The 'bookmark' for which updates we have processed.
  console.log("Bot started. Polling for updates...");

  while (true) {
    try {
      const url = `${API_BASE_URL}/getUpdates?offset=${offset}&timeout=30`;
      const response = await fetch(url);

      if (!response.ok) {
        throw new Error(`Failed to get updates: ${response.status}`);
      }

      // The response is a JSON object with 'ok' and 'result' fields.
      const { ok, result: updates } = await response.json();

      if (!ok || !Array.isArray(updates)) {
        throw new Error("Telegram API response format was unexpected.");
      }

      // Process each update received.
      for (const update of updates) {
        // We only care about new messages with text for this simple bot.
        if (update.message && update.message.text) {
          const message = update.message;
          console.log(`Received: "${message.text}" from chat ${message.chat.id}`);

          // Echo the message back to the same chat.
          await sendMessage(message.chat.id, message.text);
        }

        // IMPORTANT: Update the offset to the next ID.
        // This tells Telegram we've handled all updates up to this one.
        offset = update.update_id + 1;
      }
    } catch (error) {
      console.error("An error occurred during polling:", error);
      // In case of a network error, wait a few seconds before retrying.
      await new Promise(resolve => setTimeout(resolve, 5000));
    }
  }
}

// Start the bot.
startPolling();
Let's break down the startPolling function:
- It initializes
offsetto0to get all updates from the beginning. - The
while (true)loop runs forever, representing the bot's lifecycle. - Inside the loop, it calls
getUpdatesusingfetch, passing the currentoffsetand atimeoutof 30 seconds. - It iterates through the
updatesarray returned by the API. - For each
update, it extracts the message text and chat ID, then calls oursendMessagefunction to echo the message. - Critically, after processing an update, it sets
offset = update.update_id + 1, ensuring we don't process this update again. - A basic
try...catchblock handles potential network errors, preventing the bot from crashing.
To run your bot, open your terminal, set your environment variable, and use Bun:
TELEGRAM_BOT_TOKEN=<YOUR_TOKEN> bun run echo-bot.ts
Now, go to your Telegram client and send a message to your bot. You should see it instantly reply with the exact same message! In your terminal, you will see the log output for the received message and the reply. To stop the bot, press Ctrl+C in your terminal.
Conclusion
Congratulations! You have now built a fully interactive, albeit simple, Telegram bot from first principles. You understand the complete, two-way communication flow: sending messages with sendMessage and receiving them with a getUpdates long polling loop. This low-level knowledge of the API's mechanics is invaluable, as it forms the foundation for all bot development.
Key Takeaways:
- Long polling is an efficient technique for receiving updates, where the server holds a connection open until data is available or a timeout occurs.
- The
getUpdatesmethod is the core of long polling in the Telegram API. - The
timeoutparameter enables long polling by telling the server how long to wait. - The
offsetparameter is essential for tracking which updates have been processed, preventing your bot from handling the same message multiple times. - A basic bot can be structured as an infinite loop that calls
getUpdates, processes the results, and updates theoffset.
While it's powerful to understand and implement this loop manually, you've probably noticed it involves a fair amount of boilerplate code (managing the offset, the loop itself, error handling). This is where bot frameworks come in. In our next module, we will begin using grammY, a modern TypeScript-first framework that handles all this low-level machinery for you, allowing you to focus purely on your bot's features and logic.