Recommended resources
The freely available resources this lesson will direct you to.
Welcome to the second module of our course! Having established a solid foundation with the Bun.js runtime in Module 1, we now pivot to the core subject: the Telegram Bot API. This module is designed to give you a first-principles understanding of how Telegram bots work under the hood, before we introduce the convenience of a framework.
In the previous lesson, we successfully used Bun's fetch to make HTTP requests and even simulated a call to the Telegram API. That experiment highlighted a crucial missing piece: a valid API token. This lesson directly addresses that. We will be using Telegram's own "bot for creating bots," the BotFather, to register your first bot and obtain the API token that will serve as its unique key. This token is the essential credential that authorizes your code to control your bot.
By the end of this lesson, you will have created your bot entity within the Telegram ecosystem and securely stored its API token, ready for use in your Bun project.
1. Meet the BotFather
The entire lifecycle of a Telegram bot, from creation to deletion, is managed by another bot: the BotFather. It is the official and exclusive tool provided by Telegram for registering and configuring bots. You interact with it just like any other user in Telegram—by sending it messages and commands in a chat.
The grammY documentation, which we will use extensively later, also points to this as the mandatory first step for any bot developer.
The grammY documentation reinforces that obtaining a bot token from BotFather is the universal starting point.
Read the brief paragraphs that instruct you to talk to @BotFather in both the Node.js and Deno getting started guides. This highlights that the process is independent of the framework or runtime you choose.
The BotFather provides a command-based interface for managing all aspects of your bots, but for now, we are interested in just one command: /newbot.
2. Creating Your First Bot
The process of creating a bot is a straightforward conversation with BotFather. The video below provides a clear, step-by-step walkthrough of this entire interaction.
Master BotFather Telegram In 8 Minutes | Create Your First Telegram Bot Today
This video from the Microlearn channel demonstrates the complete bot creation process in just a few minutes, from finding BotFather to receiving the API token.
Watch the following segments to see the process in action: Finding and starting the conversation with BotFather. Pay attention to the instruction to select the correct, verified account. Choosing a name and username. This part explains the distinction between the public display name and the unique, functional username that must end in "bot". Receiving and securing the token. This is the most critical part, showing the final message from BotFather that contains your API token.
As you saw in the video, the process consists of a few simple steps:
- Find BotFather: Open your Telegram client (desktop or mobile), use the search bar to find
BotFather, and be sure to select the official account with the blue verified checkmark. - Start the conversation: Send the
/startcommand, which will show you a list of available commands. - Create a new bot: Send the
/newbotcommand. - Choose a name: This is the friendly, human-readable name for your bot (e.g., "My Project Bot"). It does not have to be unique.
- Choose a username: This is the bot's unique identifier. It must be globally unique across all of Telegram and must end with the suffix
bot(e.g.,myproject_bot). BotFather will let you know if the username is already taken.
Once you successfully choose a unique username, BotFather will congratulate you and provide the all-important API token.
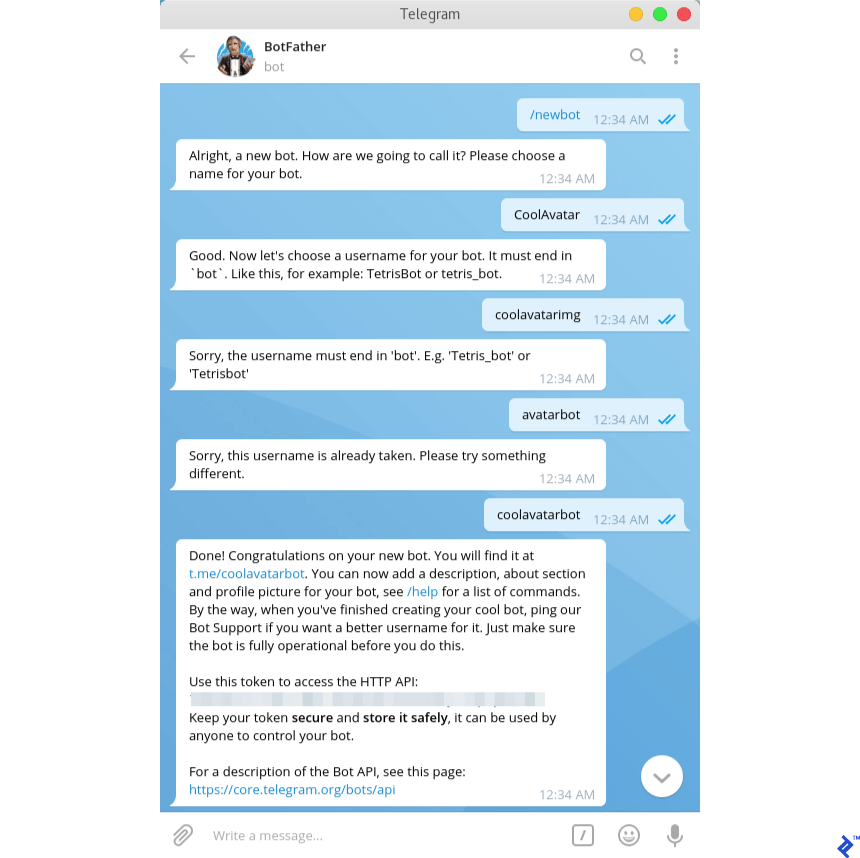
3. The API Token: Your Bot's Secret Key
The token you receive is a long alphanumeric string, for example: 1234567890:ABC-DEF1234ghIkl-zyx57W2v1u123456789. This token is effectively the password for your bot. Anyone who has this token can send commands to the Telegram API on behalf of your bot.
The official Telegram Bot Tutorial emphasizes its importance.
From BotFather to 'Hello World' - Telegram APIs
This section of the official tutorial reinforces the process and highlights the nature of the token.
Please read the section titled Obtain Your Bot Token. It formally defines the token as an authentication string and confirms that BotFather is the way to get it.
It is critical that you keep this token secure and private. Never commit it to a public Git repository or expose it in client-side code. This is precisely why we learned to use .env files in the previous module.
Your Turn: Create Your Bot and Store the Token
Now it's time to put this into practice.
-
Open your Telegram application and follow the steps outlined above to create your own bot.
-
Once BotFather provides your API token, copy it.
-
Open the
my-telegram-botproject you created in Module 1. -
Open the
.envfile and replace the placeholder token you had before with your new, real token:# .env BOT_TOKEN="YOUR_REAL_API_TOKEN_HERE"
4. Verifying Your Token with a Simple Request
With your token secured, you can perform your first successful interaction with the Telegram API. You don't even need to write any code yet. The API provides a simple method called getMe that returns basic information about the bot associated with a given token. It's a perfect way to verify that your token is working.
You can call this method directly from your browser's address bar. Construct the following URL, replacing <YOUR_BOT_TOKEN> with the token you just saved:
https://api.telegram.org/bot<YOUR_BOT_TOKEN>/getMe
When you visit this URL, you should see a JSON response in your browser. It will look something like this:
{
  "ok": true,
  "result": {
    "id": 1234567890,
    "is_bot": true,
    "first_name": "My Project Bot",
    "username": "myproject_bot",
    "can_join_groups": true,
    "can_read_all_group_messages": false,
    "supports_inline_queries": false
  }
}
Seeing "ok": true and the details of your bot confirms that your token is valid and you are ready to start communicating with the API. This simple GET request is the first successful step on our journey.
Conclusion
In this lesson, you have crossed a major milestone: you have officially registered a bot with Telegram and obtained the credentials required to control it. You now understand the role of BotFather and have completed the essential first step for any Telegram bot developer. You've also put your knowledge of environment variables from the previous module into practice by securely storing your new, real API token.
Key Takeaways:
- BotFather is the central command bot for creating and managing all other Telegram bots.
- The creation process involves a simple conversation:
/newbot, followed by choosing a display name and a unique username ending inbot. - The API token is a secret key that authorizes access to your bot. It must be kept private and secure, for instance, in a
.envfile. - You can quickly verify a token's validity by making a
getMerequest via your browser.
Now that we have a real bot and a valid token, we can move on to understanding the API's architecture. In the next lesson, we will explore the concepts of updates, methods, and types, which form the fundamental building blocks of all communication between your code and Telegram's servers.