Recommended resources
The freely available resources this lesson will direct you to.
Introduction
Welcome back! In our last lesson, you successfully secured your bot's webhook endpoint with a secret token. This was the final and most critical step in preparing your bot for the public internet, moving it from a development-only setup using ngrok to a production-ready application.
This lesson takes that final leap. We will leave the temporary world of local hosting behind and deploy your bot to a permanent home on a cloud platform. You will learn how to deploy your Bun.js and grammY-based bot to a modern Platform-as-a-Service (PaaS), making it accessible 24/7 from anywhere. We will explore two excellent platforms that have first-class support for Bun: Railway and Fly.io.
By the end of this lesson, you will have a live, deployed Telegram bot and a repeatable process for deploying any future bots you build.
Preparing for Production Deployment
Before we push our code to the cloud, there are a few adjustments we need to make to ensure our application behaves correctly in a containerized, production environment. These changes are standard practice for deploying any web service.
1. The start Script
Cloud platforms need a command to start your application. By convention, they look for a start script in your package.json file. We will define this script to run our main server file using Bun.
Add the following scripts section to your package.json:
package.json
{
  "name": "telegram-bot",
  "module": "src/index.ts",
  "type": "module",
  "scripts": {
    "start": "bun run src/index.ts"
  },
  "devDependencies": {
    "@types/bun": "latest"
  },
  "peerDependencies": {
    "typescript": "^5.0.0"
  },
  "dependencies": {
    "dotenv": "^16.4.5",
    "grammy": "^1.24.0"
  }
}
2. Port and Host Binding
When running inside a container, a web server must listen on the host 0.0.0.0 to accept connections from outside the container itself (forwarded by the platform's router). The default localhost (127.0.0.1) would only accept connections from within the same container, making it inaccessible. We also need to ensure we're using the PORT environment variable, which platforms like Railway and Fly.io provide to tell your app which port to listen on.
Let's update src/index.ts to reflect this:
src/index.ts
import { webhookCallback } from "grammy";
import { bot } from "./bot";

const secret = process.env.TELEGRAM_WEBHOOK_SECRET;
if (!secret) throw new Error("TELEGRAM_WEBHOOK_SECRET is not set");

const handleUpdate = webhookCallback(bot, "std/http", {
  secretToken: secret,
});

Bun.serve({
  hostname: "0.0.0.0", // Listen on all network interfaces
  port: Number(process.env.PORT) || 3000, // Use platform's port or default to 3000
  fetch: async (req) => {
    try {
      const url = new URL(req.url);
      // We only expect POST requests to the root path
      if (req.method === "POST" && url.pathname === "/") {
        return await handleUpdate(req);
      }
      return new Response("Not Found", { status: 404 });
    } catch (err) {
      console.error(err);
      return new Response("Internal Server Error", { status: 500 });
    }
  },
  error() {
    return new Response("Internal Server Error", { status: 500 });
  },
});

console.log(`Bot server listening on port ${process.env.PORT || 3000}...`);
With these changes, your project is ready. The next step is to get your code into a Git repository and push it to a provider like GitHub, as both Railway and Fly.io integrate directly with it.
Path A: Quick Deployment with Railway
Railway is a platform designed for maximum simplicity. It analyzes your repository, automatically determines the correct build and deployment steps, and gets you running with minimal configuration. This is often the fastest way to get a project live.
The following blog post and video give an excellent overview of the Railway philosophy and workflow.
Bot-tastic! Building My Own AI Telegram Bot with TypeScript
This post explains why the author chose Railway for a bot project and gives a high-level overview of the deployment steps.
Read the short section on choosing a server to understand the appeal of Railway. Then, review the deployment overview, which outlines the simple, four-step process.
The process detailed in the article is what we'll follow. The video below demonstrates a similar deployment for a Bun-based API.
Deploy a Bun API in Under 5 Minutes - Fly.io & Railway
This video from CodeBrew provides a practical walkthrough of deploying a Bun application on Railway.
Watch the segment on deploying to Railway. The author sets up a project from scratch, configures a nixpacks.toml file (which we won't need as Railway's Bun support has improved), links a GitHub repo, and sets environment variables. Pay close attention to the UI for adding services and managing variables.
Step-by-Step Deployment on Railway:
-
Create a GitHub Repository: Ensure your bot project is pushed to a GitHub repository.
-
Sign Up for Railway: Create an account on Railway.app and link your GitHub account.
-
Create a New Project: From the Railway dashboard, click "New Project" and select "Deploy from GitHub repo". Choose your bot's repository.
-
Automatic Build: Railway will automatically detect your
package.jsonand thebun.lockbfile. It will use its built-in Bun support (via Nixpacks) to install dependencies and prepare your service. -
Configure Environment Variables: Once the service appears, navigate to its "Variables" tab. Here, you must add your two secrets:
TELEGRAM_BOT_TOKEN: Your bot's API token from BotFather.TELEGRAM_WEBHOOK_SECRET: The secret UUID you generated in the previous lesson.
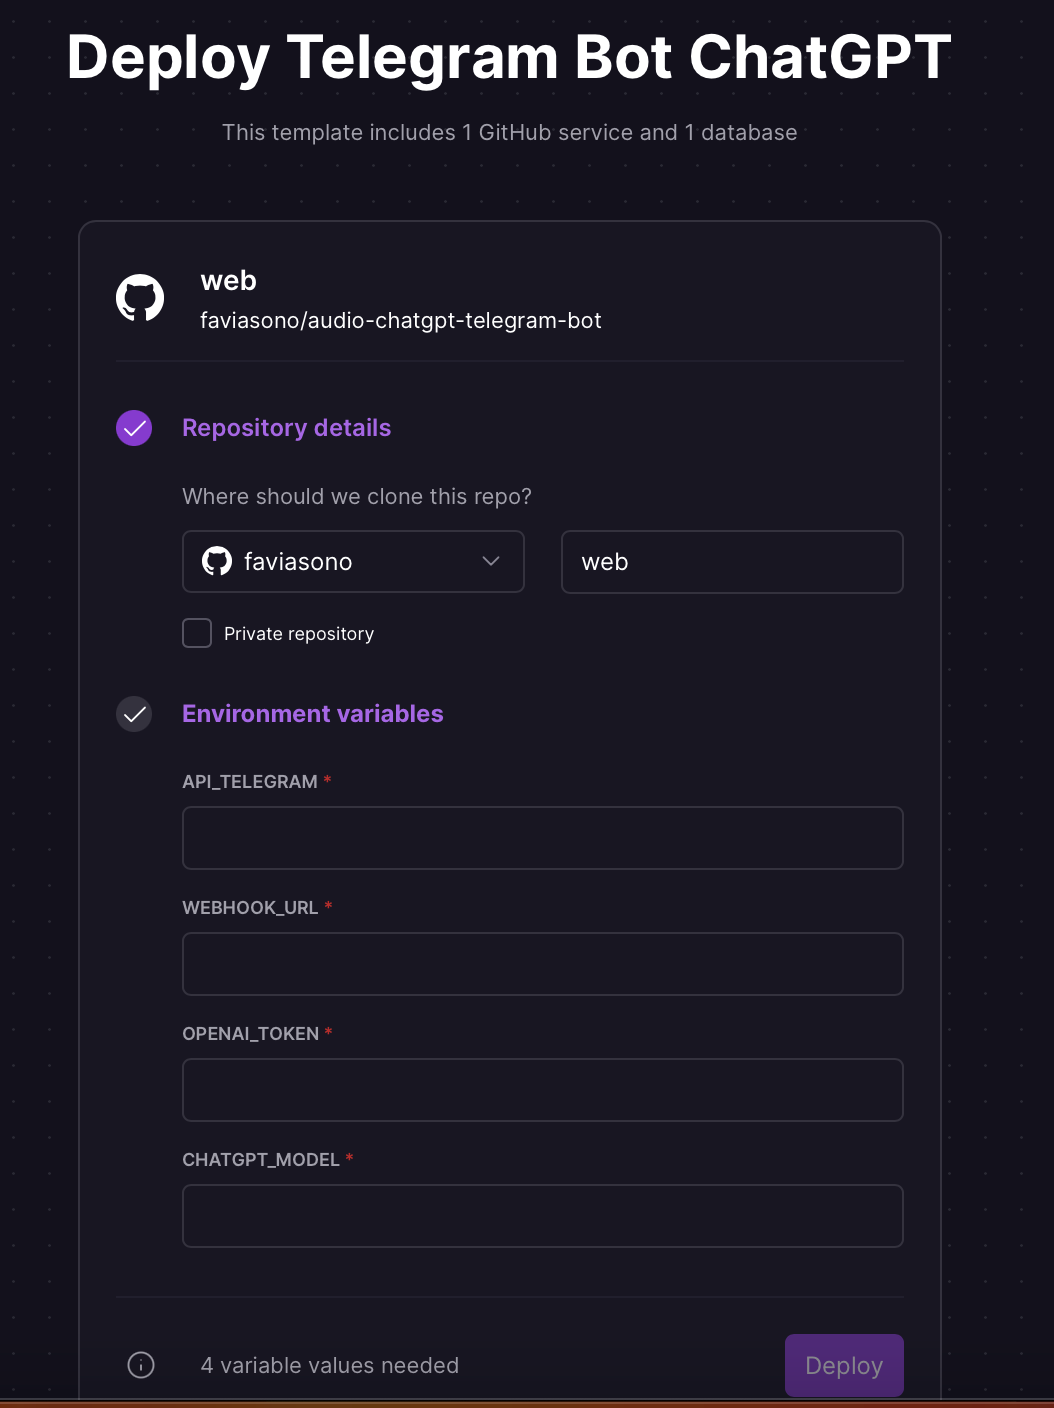
The image below shows a similar setup for another Telegram bot, highlighting where you'll add these variables.
- Generate a Public Domain: Navigate to the "Settings" tab of your service and find the "Networking" section. Click "Generate Domain" to get a public, permanent URL for your bot (e.g.,
my-bot-123.up.railway.app). - Set the Webhook: Copy the generated URL. Now, on your local machine, run your
webhook.tsscript one last time to tell Telegram about this new, permanent endpoint.bun src/webhook.ts set https://your-new-railway-url.up.railway.app - Verify: Your bot is now live! Send it a message in Telegram. You can monitor the deployment logs in the Railway dashboard to see incoming requests and any console output.
Path B: Controlled Deployment with Fly.io and Docker
Fly.io offers a slightly different, more explicit deployment model. It containerizes your application using Docker and deploys it on Firecracker micro-VMs. This approach gives you more control and is built on standard container technology. Given your extensive development background, you may find this container-first workflow familiar and powerful.
The core idea is to package everything your app needs—code, runtime, and dependencies—into a self-contained Docker image.
Deploy Hono & React to Fly.io - Docker, Bun, Vite, TypeScript
This video from Nick Olson Codes gives a great conceptual overview of deploying a full-stack application to Fly.io using Docker.
Watch the short introductory chapter, the deployment plan, to understand how Docker bundles the code and dependencies into a container that runs on Fly.io's virtual machines.
Step 1: Create a Production Build Script
For a TypeScript project, it's best practice to transpile and bundle your code for production. Bun has a built-in bundler that is perfect for this. We'll add a build script to package.json.
package.json
{
  "name": "telegram-bot",
  // ...
  "scripts": {
    "start": "bun run dist/index.js", // We'll run the built file
    "build": "bun build ./src/index.ts --outdir ./dist --target bun" // New build script
  },
  // ...
}
Note the changes:
- The
buildscript tells Bun to takesrc/index.tsas input, output the result to a./distdirectory, and target thebunruntime. - The
startscript is updated to run the bundled JavaScript output from./dist/index.js.
Step 2: Create a Multi-Stage Dockerfile
A multi-stage Dockerfile is a professional best practice. It creates a temporary container to build your application and then copies only the necessary production artifacts into a final, lean container. This results in smaller, more secure, and faster-deploying images.
Create a Dockerfile in the root of your project:
Dockerfile
# ---- Stage 1: Build ----
# Use the official Bun image as a base for building
FROM oven/bun:1 as build

# Set the working directory inside the container
WORKDIR /app

# Copy package.json and bun.lockb to leverage Docker's layer caching
COPY package.json bun.lockb ./

# Install all dependencies (including devDependencies needed for building)
RUN bun install

# Copy the rest of the source code
COPY . .

# Run the build script to generate production artifacts in /app/dist
RUN bun run build

# ---- Stage 2: Release ----
# Start from a slim Bun image for the final production container
FROM oven/bun:1-slim as release

# Set the working directory
WORKDIR /app

# Copy only the production dependencies' definitions
COPY package.json bun.lockb ./

# Install only production dependencies
RUN bun install --production

# Copy the built application code from the 'build' stage
COPY --from=build /app/dist ./dist

# Expose the port the app will run on
EXPOSE 3000

# The command to run the application
ENTRYPOINT [ "bun", "run", "start" ]
You should also create a .dockerignore file to prevent unnecessary files from being copied into your build context, which speeds up the build process.
.dockerignore
node_modules
dist
.env
.git
Dockerfile
.dockerignore
Step 3: Deploy to Fly.io
- Install
flyctl: Follow the instructions at fly.io/docs/hands-on/install-flyctl/ to install the command-line tool. - Log in: Run
fly auth login. - Launch the App: In your project's root directory, run
fly launch. This command will:- Scan your project and detect the
Dockerfile. - Ask you to name your app and choose a region.
- Generate a
fly.tomlconfiguration file. Do not set up a Postgres database when prompted.
- Scan your project and detect the
- Set Secrets: Use the
fly secretscommand to securely provide your environment variables. Fly.io will inject these at runtime.fly secrets set TELEGRAM_BOT_TOKEN="your_bot_token_here" fly secrets set TELEGRAM_WEBHOOK_SECRET="your_secret_uuid_here" - Deploy: Run
fly deploy.flyctlwill build your Docker image, push it to Fly's registry, and deploy it. - Set the Webhook: After deployment, Fly will give you a public hostname (e.g.,
your-bot-name.fly.dev). Copy this URL and run your localwebhook.tsscript one last time.bun src/webhook.ts set https://your-bot-name.fly.dev - Verify: Your bot is live! Use
fly logsto stream your bot's logs in real-time and send it a message in Telegram to confirm it's working.
Conclusion
Congratulations! You have successfully deployed your Telegram bot to a production cloud environment. It's no longer tied to your local machine and is now a robust, permanent service on the internet.
Key Takeaways:
- Production deployment requires preparing your app to run in a containerized environment, specifically by listening on
0.0.0.0and using thePORTenvironment variable. - Railway offers a streamlined, "magic" deployment experience that is ideal for getting started quickly.
- Fly.io provides a more controlled, container-native workflow using Docker, which aligns with modern DevOps practices and offers great flexibility.
- Regardless of the platform, the core process is the same: push code, configure environment variables, get a public URL, and register that URL with Telegram's
setWebhookmethod.
Your bot is now operational, but our work isn't done. A production service needs to be observable. In our next lesson, we will explore how to implement structured logging to gain insight into your bot's behavior and diagnose issues in the wild.