Recommended resources
The freely available resources this lesson will direct you to.
In our previous lesson, we explored the "why" behind choosing grammY, focusing on its TypeScript-first design and powerful middleware architecture. We established that a framework handles the boilerplate, freeing us to focus on our bot's unique logic. Now it's time to transition from theory to practice.
This lesson is all about getting our hands on the keyboard. We will take the first concrete steps to build a bot with grammY. By the end of our session, you will have a fully initialized and configured grammY project running on Bun, ready to be brought to life. We will set up the project structure, install the necessary dependencies, and write the initial code to connect to the Telegram API using your bot token.
Step 1: Initialize Your Bun Project
Just as with any new software project, our first step is to create a dedicated directory and initialize a basic project structure. In Module 1, you learned about Bun's built-in tools for this. We'll start by using bun init to scaffold a new TypeScript project.
If you'd like a quick visual refresher on this process, the first part of this video from Fireship is a great summary.
This video provides a rapid overview of Bun. We are only interested in the project initialization part.
Watch the segment from the beginning of the demo, which shows the bun init command and the resulting file structure.
Create a new directory for your bot and run the following command inside it:
bun init
Bun will ask you a few questions, such as the package name and entry point. You can accept the defaults. Once complete, you will have a project structure similar to this:
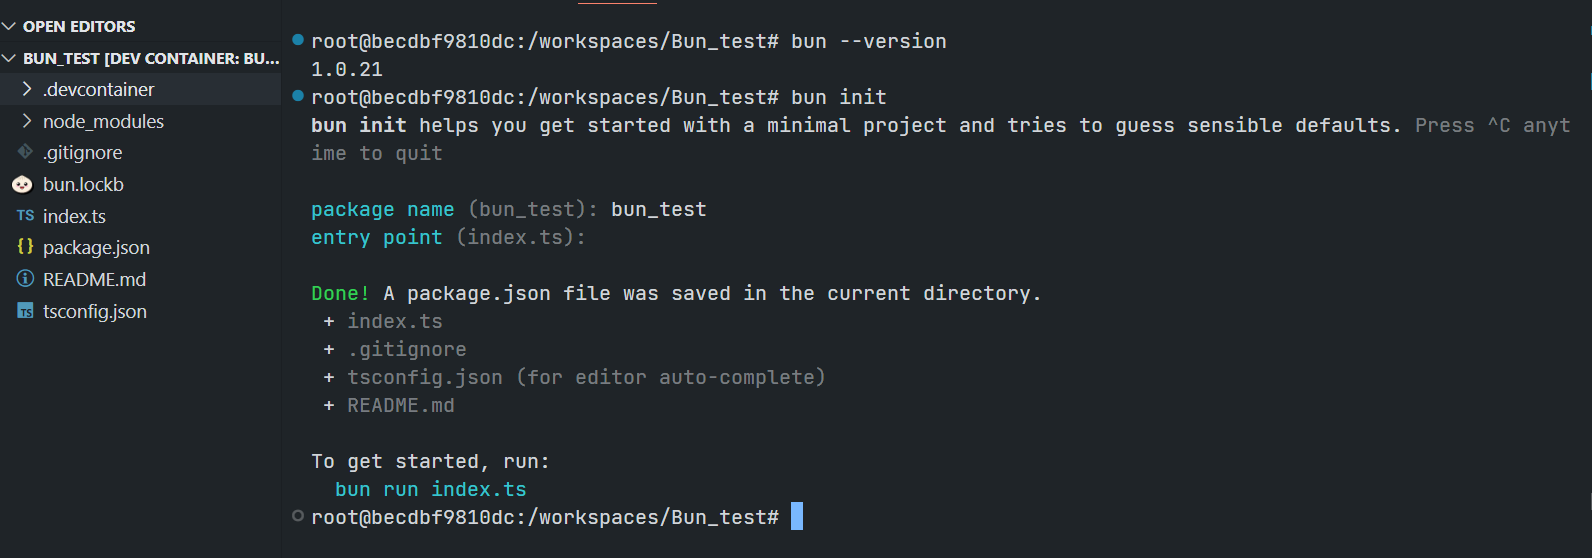
This gives us:
package.json: The standard project manifest file.index.ts: Our main application entry point, where we'll write our bot's code.tsconfig.json: The TypeScript configuration file, pre-configured by Bun for compatibility..gitignore: Sensible defaults for a version-controlled project.
Step 2: Add the grammY Dependency
With the project structure in place, the next step is to add the grammY framework itself. We'll use Bun's integrated package manager, which you've used before. The command is bun add.
The following tutorial, while focused on a different end goal (a payment bot), demonstrates the exact commands needed to add grammy to a Bun project.
Bot for selling dumplings | The Open Network
This guide shows how to build a bot using grammY. We are interested in the initial setup commands.
In the section "What you need to get started," find the list of terminal commands. We only need to install grammy for now, so you will run the bun add command, but only for the grammy package.
In your terminal, run the following command:
bun add grammy
Bun will fetch the latest version of the grammy package and its dependencies, add it to your package.json, and update the bun.lockb lockfile. The performance of Bun's package manager is one of its key features, so you'll notice this step completes very quickly.
Step 3: Configure Your Bot Token
As we established in Module 2, every bot needs a unique API token to authenticate with Telegram. We must never hardcode this token directly into our source code. Instead, we'll use environment variables, a practice you're well-versed in from your web development experience and which we covered in Module 1. Bun has first-class support for .env files.
- Create a
.envfile in the root of your project directory. - Add your bot token to this file. You should have this token from when you created a bot with BotFather in Module 2.
Your .env file should contain a single line:
BOT_TOKEN="123456:ABC-DEF1234ghIkl-zyx57W2v1u123ew11"
(Replace the placeholder with your actual bot token.)
This approach keeps your secrets out of version control and allows for different configurations between development and production environments. The "Telegram Bot Template" on GitHub provides a good reference for common environment variables used in a production-ready bot.
GitHub - bot-base/telegram-bot-template: Telegram bot template based on grammY · GitHub
This GitHub repository is a professional starter template for grammY bots. It's a great resource to see best practices.
First, read the brief section on Environment Variables Setup. Then, scroll down to the table under the "Environment Variables" heading and review the entry for BOT_TOKEN. This reinforces the role of this critical variable.
Step 4: Write the Initialization Code
Now we're ready to write some code. Open the index.ts file that bun init created for you. We will replace its contents with the code to import and initialize our bot.
The core of a grammY application is the Bot class. We need to:
- Import the
Botclass from thegrammypackage. - Create a new instance of the
Botclass, passing our token to its constructor.
The following reading demonstrates this exact process.
Bot for selling dumplings | The Open Network
Let's return to the dumpling bot tutorial. The logic for initializing the bot is universal.
Find the "Telegram bot" heading, then the subheading "Initialization". Read through this section carefully. Pay close attention to the line that reads // Initialize the bot. This is the central piece of logic we are implementing. We will adapt this slightly for Bun's environment variable handling.
Based on that reading, your index.ts file should now look like this:
import { Bot } from "grammy";

// Read the bot token from the environment variable.
const token = Bun.env.BOT_TOKEN;
if (!token) {
  throw new Error("BOT_TOKEN is not set in the environment variables!");
}

// Create a new bot instance.
const bot = new Bot(token);

console.log("Bot instance created. Ready to start...");
Let's break this down:
import { Bot } from "grammy";: We import the main class from the library. Thanks to grammY's TypeScript-first design, your IDE will already provide rich type information and autocompletion for this object.Bun.env.BOT_TOKEN: This is Bun's optimized way to access environment variables. While Bun supports the Node.js-styleprocess.envfor compatibility (which you saw in the resource), usingBun.envis idiomatic and performant.if (!token) {...}: This is a robust startup check. Instead of letting the bot fail obscurely later, we immediately check if the token was loaded and throw a clear error if it wasn't. This is a better practice than using the non-null assertion (!) on the environment variable directly.const bot = new Bot(token);: This is the key line. We instantiate theBotobject, which encapsulates all the logic for communicating with the Telegram API.
A Glimpse of a Full Project Structure
Our current project is minimal, which is perfect for learning. However, as a project grows, you'll want a more organized structure. The telegram-bot-template repository gives an excellent example of how you might structure a complex bot with clear separation of concerns.
GitHub - bot-base/telegram-bot-template: Telegram bot template based on grammY · GitHub
This is for your reference and to give you a sense of where we are headed. No action is needed right now.
Take a look at the Directory Structure. You can see dedicated folders for features, handlers, keyboards, and middleware. This is the kind of modular architecture that grammY's design encourages. Also, note the section titled "Bun (bun.sh)". This template has a dedicated branch showing how to use it with Bun, which could be a valuable resource for you later on.
Conclusion
Congratulations! You have successfully initialized and configured your first grammY project. While the bot doesn't do anything yet, all the foundational pieces are now in place.
Key Takeaways:
- Project setup starts with
bun initto create a standard TypeScript project. - Dependencies are added using
bun add <package-name>. - API tokens and other secrets must be stored in a
.envfile and loaded viaBun.env. - The core of a grammY application is an instance of the
Botclass, created with your bot token:const bot = new Bot(token);.
You now have a configured bot object, waiting for instructions. In our next lesson, we will give it those instructions. We will add a simple message handler to echo text back to the user and then launch the bot using bot.start(), officially bringing your grammY-powered echo bot online.