Recommended resources
The freely available resources this lesson will direct you to.
- #5. OAuth 2.0 | Generate Access Token Using Authorization Code Using For Google API|www.youtube.com
- OAuth is Broken Without This | Meet PKCEwww.youtube.com
- Using OAuth 2.0 for Web Server Applications | Authorizationdevelopers.google.com
- Implement an OAuth 2.0 server | Cloud-to-clouddevelopers.home.google.com
Hello! Let's continue our journey into building a secure authentication system with Google OAuth.
In our last lesson, we built the callback endpoint that receives the user after they grant consent on Google's page. We successfully validated the state parameter to protect against CSRF attacks and extracted the temporary authorization_code.
Today, we'll complete the authentication loop. The learning outcome for this lesson is to exchange the received authorization code for access and refresh tokens from Google. This is a critical server-to-server interaction that grants our application the credentials needed to access Google APIs on the user's behalf.
1. The Token Exchange Flow
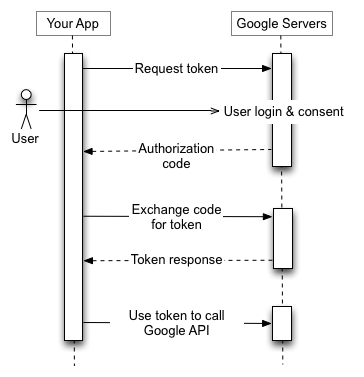
The authorization_code you received in the last step is a temporary, single-use credential. It proves that the user has granted consent, but it's not the key to access their data. To get that key, our server must exchange the code for an access token and a refresh token.
This exchange happens directly between our application's server and Google's OAuth 2.0 token endpoint. It's a secure backend communication, invisible to the user's browser.
This diagram illustrates the entire process. We are now implementing the step labeled "Exchange authorization code for token".
2. Anatomy of the Token Exchange Request
To perform the exchange, our server will make a POST request to Google's token endpoint: https://oauth2.googleapis.com/token. This request must be carefully constructed with several key pieces of information.
Let's start by watching a practical demonstration of this request being built and executed.
#5. OAuth 2.0 | Generate Access Token Using Authorization Code Using For Google API|
The video '#5. OAuth 2.0 | Generate Access Token...' by Amod Mahajan provides a clear, hands-on walkthrough of this process using Postman. It's a great way to see the raw HTTP request and its parameters in action.
Please watch the following segments: Configuring Postman (1:10 - 3:55): Pay close attention to the POST request URL and the list of required parameters in the request body: client_id, client_secret, code, grant_type, and redirect_uri. Executing the Request (3:55 - 4:51): Observe the successful JSON response from Google, which contains the access_token and refresh_token.
As the video demonstrated, the request body must be application/x-www-form-urlencoded and contain specific parameters. Let's formalize this with Google's official documentation.
Using OAuth 2.0 for Web Server Applications | Authorization
Google's official documentation, 'Using OAuth 2.0 for Web Server Applications', provides the definitive guide for this step. It details all the required parameters and shows the expected response format.
Please read the section 'Step 5: Exchange authorization code for refresh and access tokens'. Focus on the table under the 'HTTP/REST' tab that lists the required fields (client_id, client_secret, code, etc.) and the sample JSON response containing the access_token and refresh_token.
The Crucial Role of the code_verifier
There is one more critical parameter that wasn't highlighted in the Postman video but is essential for our modern, secure implementation: the code_verifier.
In a previous lesson, we implemented PKCE (Proof Key for Code Exchange) by generating a code_verifier and a code_challenge. We sent the challenge in the initial request to Google and stored the verifier in a secure cookie. Now is the time to use it.
By sending the original code_verifier in this token exchange request, our server proves that it is the same entity that initiated the authorization flow. Google verifies this by hashing our code_verifier and checking if it matches the code_challenge it received earlier.
OAuth is Broken Without This | Meet PKCE
To reinforce this concept, let's revisit the 'OAuth is Broken Without This | Meet PKCE' video from ByteMonk. It explains exactly how the code_verifier is used in this final step.
Please re-watch the section 'PKCE Flow for Token Exchange' (5:16 - 5:53). It clearly explains how providing the code_verifier replaces the reliance on just the client_secret and secures the flow.
3. Implementing the Token Exchange in TanStack Start
Now, let's translate this theory into code. We will update our callback handler at src/routes/api/auth/google/callback.ts to perform the token exchange.
First, we need Google's official Node.js client library, which simplifies this process immensely.
Open your terminal and install it:
npm install google-auth-library
Next, to keep our code organized, let's create a utility file to instantiate the OAuth2 client.
Create a new file: src/lib/google-auth.ts
import { OAuth2Client } from 'google-auth-library';

// This client will be used to interact with Google's OAuth servers.
// It's configured with our application's credentials.
export const oauth2Client = new OAuth2Client(
  process.env.GOOGLE_CLIENT_ID,
  process.env.GOOGLE_CLIENT_SECRET,
  process.env.GOOGLE_REDIRECT_URI
);
Now, let's update our callback handler to use this client and perform the exchange.
Update the file: src/routes/api/auth/google/callback.ts
import {
  eventHandler,
  getQuery,
  getCookie,
  deleteCookie,
} from "vinxi/http";
import { oauth2Client } from "../../../../lib/google-auth"; // Adjust path if needed

export default eventHandler(async (event) => {
  // --- Part 1: Validation (from previous lesson) ---
  const query = getQuery(event);
  const storedState = getCookie(event, "oauth_state");

  if (!query.state || !storedState || query.state !== storedState) {
    event.node.res.statusCode = 400;
    return { error: "State mismatch" };
  }

  if (query.error) {
    event.node.res.statusCode = 401;
    return { error: query.error, description: query.error_description };
  }

  // --- Part 2: Token Exchange (New for this lesson) ---

  // 1. Retrieve the auth code and PKCE verifier
  const authCode = query.code as string;
  const storedCodeVerifier = getCookie(event, "pkce_code_verifier");

  if (!authCode || !storedCodeVerifier) {
    event.node.res.statusCode = 400;
    return { error: "Missing authorization code or PKCE verifier" };
  }

  // 2. Clean up the single-use cookies immediately
  const cookieOptions = {
    httpOnly: true,
    secure: process.env.NODE_ENV === "production",
    path: "/",
  };
  deleteCookie(event, "oauth_state", cookieOptions);
  deleteCookie(event, "pkce_code_verifier", cookieOptions);

  try {
    // 3. Exchange the authorization code for tokens
    const { tokens } = await oauth2Client.getToken({
      code: authCode,
      codeVerifier: storedCodeVerifier,
    });

    // `tokens` object contains access_token, refresh_token, etc.
    // The library can automatically use these for subsequent API calls.
    oauth2Client.setCredentials(tokens);

    // For now, we'll return the tokens to confirm success.
    // In a real app, you would store the refresh_token securely
    // and redirect the user to their profile page.
    return {
      message: "Token exchange successful!",
      tokens: tokens,
    };
  } catch (error: any) {
    console.error("Token exchange failed:", error.response?.data || error.message);
    event.node.res.statusCode = 500;
    return { error: "Failed to exchange authorization code for tokens." };
  }
});
Code Breakdown:
- Retrieve Credentials: We get the
authCodefrom the query parameters and thestoredCodeVerifierfrom the cookie we set before the redirect. - Clean Up Cookies: With the
statevalidated and thecodeVerifierretrieved, these single-use cookies have served their purpose. We delete them immediately for security. - Exchange Code for Tokens: This is the core of the lesson. We call
oauth2Client.getToken(), passing an object containing thecodeand ourcodeVerifier. Thegoogle-auth-libraryhandles the securePOSTrequest to Google's token endpoint behind the scenes. - Handle Response: If successful, the
tokensobject will contain ouraccess_token,refresh_token,expiry_date, and more. We return them in the response for now so you can see them. If an error occurs (e.g., the code is invalid or expired), we catch it and return a server error.
If you run your application and complete the Google sign-in flow, you should now see a JSON response containing your brand new access and refresh tokens!
Conclusion
Congratulations! You have successfully completed the entire OAuth 2.0 Authorization Code with PKCE flow. You've navigated the user to Google for consent, securely handled their return, and exchanged the temporary code for powerful, long-lived credentials.
Key Takeaways:
- The token exchange is a secure, server-to-server
POSTrequest tohttps://oauth2.googleapis.com/token. - The request requires the
authorization_code, yourclient_idandclient_secret, theredirect_uri, and the PKCEcode_verifier. - The
google-auth-libraryfor Node.js greatly simplifies this process, handling the request construction and PKCE verification. - A successful exchange yields an
access_token(for making API calls) and arefresh_token(for maintaining the session offline), provided you requestedaccess_type=offline.
Next Lesson Preview:
An access token is only useful if you use it. In our next lesson, we will retrieve and validate the user's profile information from Google's APIs using the access token. We'll use the token to make an authenticated request to the Google People API to get the user's name, email, and profile picture. This is the final step before we can create a user session within our own application.