Recommended resources
The freely available resources this lesson will direct you to.
Welcome to the final lesson in our module on shaping the body and character of your lead sounds. In our previous session, we deconstructed the "expressive lead," identifying its two main pillars: timbral grit and dynamic pitch modulation. You learned the theoretical blueprint for creating these sounds, focusing on FM synthesis, creative filtering, and performance techniques like glide and vibrato.
Today, we transition from theory to practice. Your objective is to synthesize a gritty, expressive lead from scratch, applying the concepts of Frequency Modulation (FM), distortion, and performance modulation to create a sound with energy and character, much like those used by artists such as Fox Stevenson. We'll build the patch step-by-step in Serum, focusing on the intentional decisions that shape the final sound.
Step 1: Building a Gritty Foundation with FM
The core of our lead's character will come from its initial timbre, which we'll generate using Frequency Modulation (FM). Unlike simple subtractive synthesis, FM creates rich, complex harmonic content directly at the oscillator stage, giving us a "gritty" starting point before any effects are applied.
FM Synthesis in Metal: Crafting Aggressive Tones - Nail The Mix
This article from Nail The Mix, though focused on metal, provides an excellent explanation for why FM is so effective for creating aggressive sounds.
Please read the introduction, the section "Why Bother with FM Synthesis for Metal Anyway?", and the subsection "Screaming Leads & FX Mayhem". As you read, focus on the concepts of "sheer sonic mayhem potential" and using high modulator levels to create dense, screaming harmonics. This is the foundational principle for our gritty lead.
Now, let's apply this in Serum. If you are using a newer version of Serum (post version 2.0.0), you have access to true FM synthesis, which is a significant step up from the phase modulation available in older versions. The following video clarifies this distinction.
In this video, "Serum 2's new FM capabilities," YouTuber Dadda explains the powerful new FM features. This will help you understand the specific tools we're about to use.
Watch the short introduction from the beginning to understand the difference between older phase distortion and the new true FM. Then, listen to the examples of the new FM sound. Finally, watch the section on ratio-based tuning. This is a classic FM synthesis workflow that gives you precise, repeatable control over the harmonic relationship between your oscillators.
Practical Synthesis:
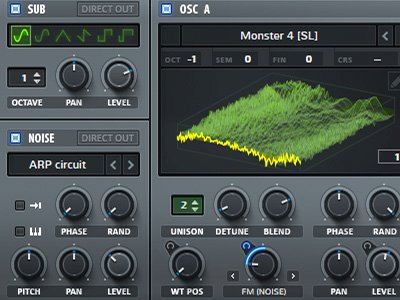
Let's start building in an initialized Serum patch.
- Oscillator A (Carrier): Leave this on the default sawtooth wave for now. This will be the sound you hear.
- Oscillator B (Modulator): Change its wavetable to a simple sine wave. Go to
Analog -> Analog_BD_Sin. Turn the Level of Oscillator B all the way down; we only want to hear its effect on Oscillator A, not its own sound. - Activate FM: On Oscillator A, open the
Warpmode menu and selectFM (From B). - Dial in the Grit: Slowly increase the
FM (From B)knob. You will hear the sawtooth wave transform from a simple buzz into a more complex, harmonically rich, and gritty tone. A value around 30-50% is a good starting point. - (Optional) Use Ratio Tuning: As shown in the video, right-click on Oscillator B's octave display and switch the
ModetoRatio. Now you can set the modulator's frequency as a multiple of the carrier's. Experiment with integer ratios (2.00, 3.00) for more harmonic results and non-integer ratios (e.g., 2.50) for more dissonant, metallic textures.
You now have a core sound that is inherently gritty and full of character, all achieved before touching a single effect.
Step 2: Enhancing Aggression with Distortion and Filtering
With our FM foundation, we can now use distortion to add harmonics and help the lead cut through a mix. As we discussed previously, the goal here is saturation and textural enhancement, not complete destruction.
Following that, we'll use a simple filter to clean up the sound. While you could use creative filters like Comb or Formant filters (as mentioned in the Drumstep - Melodigging resource LINK), for this exercise, a basic high-pass filter will suffice to remove low-frequency mud that could clash with a bassline.
Practical Synthesis:
- Enable the Filter: Turn on the Filter module. Set the type to
Highpass(e.g., MG Low 12, then click the "12" to cycle to HP). - Route the Oscillators: Ensure both OSC A and B are routed to the filter (the 'A' and 'B' lights should be on in the filter module).
- Set Cutoff: Adjust the
Cutoffto around 150-200 Hz. This carves out space for the kick and sub-bass. - Add Distortion: Navigate to the
FXtab and enable theDistortionmodule.- Choose a type like
Tube,Diode 1, orDiode 2. These add warmth and saturation without being overly harsh. - Increase the
Driveknob until you hear the lead gain presence and "bite." Be careful not to overdo it; you want to enhance the existing FM grit, not mask it. - Use the
Mixknob to blend the distorted signal with the dry signal for more precise control.
- Choose a type like
Step 3: Performance Modulation for an Expressive Feel
A static sound is lifeless. The "expressive" quality comes from performance modulation—glide, pitch bends, and vibrato—that mimics a real instrumentalist. This is a crucial step in emulating the style of artists like Fox Stevenson.
A fantastic practical example of creating glide is shown in the following video.
How To: OOKAY Xfer Serum Lead | Acolyte
The video "How To: OOKAY Xfer Serum Lead" by LOUDER provides a clear, step-by-step guide to creating a modern lead. The technique it shows for creating glide is directly applicable to our goal.
Watch the section from voicing and portamento. Pay close attention to how the creator enables Mono voicing and Portamento, and then uses overlapping notes in the piano roll to trigger the slide effect.
Practical Synthesis:
Let's implement these expressive techniques.
-
Glide (Portamento):
- In Serum's bottom-right corner, find the
VOICINGsection. - Enable
Mono. This ensures only one note can play at a time. - Enable
Legato. This tells Serum to only re-trigger the envelopes for new notes that don't overlap with a previous one. - Set the
Portamentotime to a value around 30-50 ms. This is the time it will take to slide between notes. In your DAW's piano roll, draw two notes where the second note starts just before the first one ends. You'll hear the pitch glide smoothly.
- In Serum's bottom-right corner, find the
-
Pitch Bends:
- The pitch bend range is set in the bottom-left of Serum. The default
+/- 2semitones is often too small for dramatic effect. A range of+/- 12(a full octave) is common for expressive DnB leads. - In your DAW's MIDI editor, you can automate the Pitch Bend control. A common technique is to draw a quick upward bend just before a note hits to give it a "scooping" attack, or a slow downward bend at the end of a phrase for a "falling" effect.
- The pitch bend range is set in the bottom-left of Serum. The default
-
Vibrato (Recap):
- As we covered in the last lesson, you can assign an LFO to the
Master Tune(Fine) via the Mod Matrix. For expressive control, map the amount of this modulation to your Mod Wheel, allowing you to introduce vibrato manually on sustained notes.
- As we covered in the last lesson, you can assign an LFO to the
Step 4: Final Polish with Effects
The final step is to use Serum's internal effects to place the lead in a space, control its dynamics, and ensure it has a polished, professional sound. The "OOKAY Lead" video (LINK) provides a great template for a standard FX chain for this type of sound.
Practical Synthesis:
Continue in the FX tab.
- Distortion: Already added.
- Hyper/Dimension: Add the
Hyper/Dimensioneffect. Use theHyperpart sparingly to add a bit of unison-like character. Use theDimensionside to create a subtle stereo spread. A mix of around 20% is a good starting point. This creates width without washing out the sound. - Compressor: Add the
Compressormodule and enableMultibandmode. This is essentially an "OTT" compressor. This effect is crucial for evening out the dynamics and bringing forward all the complex textural details you've created with FM and distortion. Adjust theAmountknob to taste. - Reverb: Add the
Reverbeffect last in the chain. Choose aHallorPlatetype. Keep theSizeandDecayrelatively small, and theMixlevel low (e.g., 15-25%). The goal is to give the lead a sense of space, not to drown it in a cavernous wash that would muddy the mix.
Synthesis Challenge: Putting It All Together
You now have all the components. Here is a summary recipe to build an expressive lead from a new initialized Serum patch. Try to build this yourself, referencing the steps above.
- OSC A: Basic Shape (Saw), Warp Mode
FM (From B)at 40%. - OSC B:
Analog_BD_Sin, Level at 0, Octave at +1. - FILTER:
HP 12, Cutoff at 200 Hz, routed from OSC A & B. - AMP ENV (ENV 1): Attack: 1ms, Decay: ~400ms, Sustain: ~-6dB, Release: ~100ms.
- VOICING:
Mono&Legatoenabled,Portamentoat ~40ms. - FX Rack Order & Settings:
Distortion: TypeDiode 2, Drive 30%, Mix 100%.Hyper/Dimension: Hyper Mix 0%, Dimension Mix 25%.Compressor:Multibandenabled, Amount 55%.Reverb: TypeHall, Size 30%, Mix 20%.
- Performance: In your DAW, create a simple melody with overlapping notes to trigger the glide and automate a
+12semitone pitch bend on one of the notes.
Conclusion
In this lesson, you have successfully synthesized a gritty, expressive DnB lead from the ground up. You've moved beyond simply copying settings and have engaged in an intentional sound design process, making deliberate choices at each stage.
Key Takeaways:
- Grit from the Source: True FM synthesis is a powerful tool for creating complex, aggressive timbres before any processing is applied.
- Distortion as an Enhancer: Controlled distortion adds crucial harmonics and presence that help a lead cut through a dense DnB mix.
- Modulation is Performance: The "expressive" quality of a lead is primarily achieved through performance articulations like glide (portamento) and pitch bends, which bring a static sound to life.
- FX for Polish: A well-ordered effects chain (Distortion -> Stereo -> Compression -> Space) is essential for shaping the final sound and placing it within the context of a track.
You have now completed the core synthesis modules for both wide dancefloor leads and gritty expressive leads. You have a solid toolkit for tackling the most common lead styles in modern Drum and Bass.
In our next module, we will dive into two more specific subgenres: Neurofunk and Liquid. We will start by deconstructing a Neurofunk lead, focusing on its characteristic use of complex modulation, aggressive filtering, and metallic textures to create its signature sci-fi sound.