Recommended resources
The freely available resources this lesson will direct you to.
Hello! Welcome to the third lesson in our course on building a classic JRPG engine.
In our last lesson, we built a conceptual bridge between your expertise in front-end development and the world of game engines. We saw how RPG Maker's data-driven design mirrors patterns like a Redux store, and how its event system can be viewed as a form of component-based architecture. We also contrasted this with the custom engine principles of separating simulation from view.
Today, we transition from analyzing existing systems to creating our own. The goal of this lesson is to design the architecture for our simple game engine. We will lay out the blueprint for the three most fundamental pillars of any game:
- The Game Loop: The engine's relentless heartbeat.
- The Scene Manager: The game's high-level state navigator.
- The Rendering Pipeline: The system that brings the game world to life visually.
This lesson is all about architectural thinking—the "what" and the "why." We'll be working with diagrams and high-level concepts to establish a solid plan before we write a single line of implementation code in the next lesson.
What is a Game Engine, Really?
Before we design our own, it's useful to have a clear definition. An engine isn't necessarily a monolithic beast like Unreal or Unity.
So, you want to make a game engine | lisyarus blog
The article 'So, you want to make a game engine' by lisyarus offers a pragmatic perspective. It helps frame what we're about to build.
Please read the sections 'What is a game engine?' and 'What is expected from a game engine?'. In the first section, read the engine definition and focus on the idea that engines can be small and specialized. Then, take a look at the feature checklist in the second section. We'll be designing the most critical ones from that list today.
As the article points out, a game engine is ultimately a set of tools designed to help make a game. For our classic 2D JRPG, we don't need a complex 3D physics system or advanced material shaders. We need to focus on a core set of features: a game loop, input handling, 2D graphics, audio, and an architecture to tie it all together. Let's design that architecture now.
Pillar 1: The Game Loop - The Engine's Heartbeat
In your front-end work, the browser's event loop is mostly reactive. It waits for an event (like a click or a network response) and then runs code. A game loop is different; it's proactive. It runs continuously, updating the world and redrawing the screen, whether the player is providing input or not.
A naive implementation might look like this: while(true) { update(); render(); }. This leads to a major problem: the game's speed becomes tied to the computer's performance. On a fast machine, the game runs in fast-forward; on a slow one, it crawls. This is unacceptable, especially for a JRPG where timing and pacing are key.
The solution is to decouple the game's simulation speed from the rendering frame rate. This is one of the most important concepts in game engine design.
The video 'Getting The Game Loop Right' by Vittorio Romeo provides an excellent visual explanation of this problem and its standard solution. Seeing it in action makes the concept much clearer than just reading about it.
Please watch these key sections: Basic Game Loop and its Flaws: See a demonstration of game speed being tied to frame rate. Delta Time: Understand the first-pass solution and its own subtle problems, like non-determinism. Fixed Tick Rate Architecture: This is the core architectural pattern we will adopt. Pay close attention to how it separates updates from rendering. Conceptual Implementation: This visualizes the logic we will implement in our next lesson.
The video introduces the robust pattern we'll use: a fixed-step update loop with variable rendering.
- Logic Updates (The Simulation): Game logic, AI, and physics will run at a constant, fixed interval (e.g., 60 times per second). This ensures the game is deterministic—it behaves identically regardless of the hardware it's running on. For example, a poison status effect will always deal its damage at the same real-world rate.
- Rendering (The View): The screen will be redrawn as fast as the hardware allows, using
requestAnimationFrame. This gives players on powerful machines a smoother visual experience without affecting the underlying game speed.
This is a perfect example of the "Simulation vs. View" separation we discussed in the last lesson. The simulation ticks along predictably, while the view just does its best to show the most recent state of that simulation.
Pillar 2: The Scene Manager - The Game's Navigator
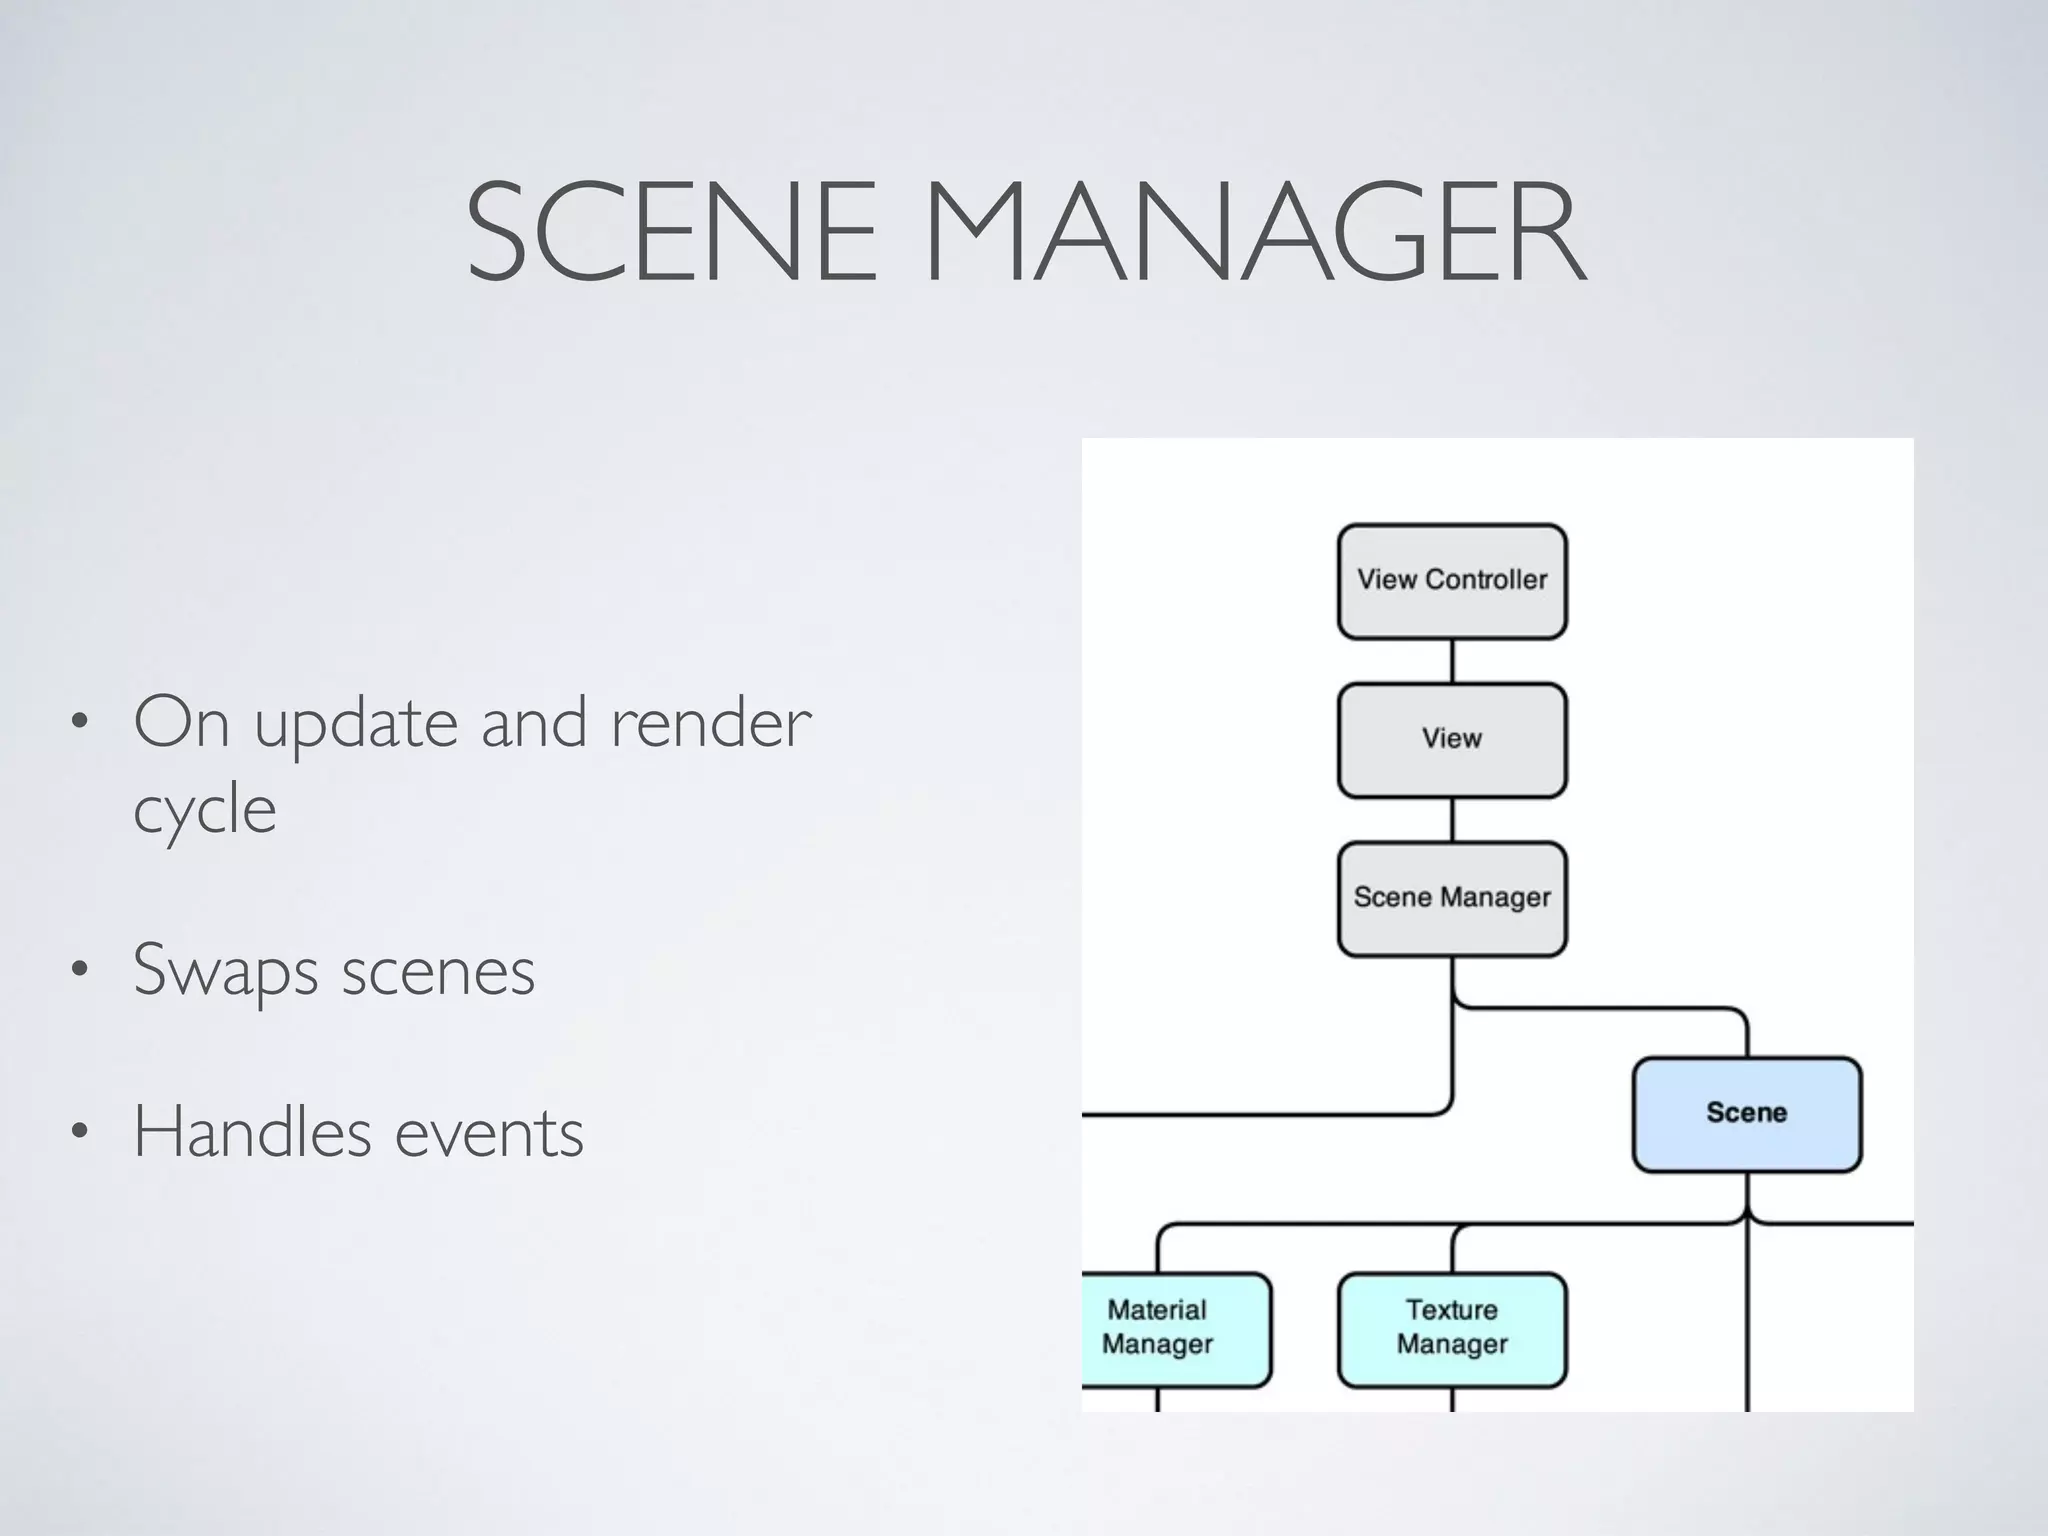
A JRPG isn't a single, monolithic screen. It has a title screen, a world map, towns, a battle screen, a main menu, shops, and so on. We need a system to manage which part of the game is currently active and to handle transitions between them. This system is the Scene Manager.
The best analogy from your background is a router in a single-page application (like React Router or Vue Router). A router looks at the current URL and decides which "page" component to render. Our Scene Manager will look at the current game state and decide which "scene" object is responsible for updating and rendering.
Here is a high-level design for this system:
- A
SceneManagerClass: This object will be owned by the mainEngineclass. Its primary job is to hold a reference to theactiveScene. - A
goTo(newScene)Method: This method on theSceneManagerhandles the transition. It would discard the old scene and initialize the new one. This is where we would later add logic for screen-fading effects. - A
SceneBase Class: This will be an abstract class or interface that defines the contract for all scenes. Any object that wants to be a scene must have two key methods:update(deltaTime): Contains the logic for that scene for a single time step.
render(context): Contains the drawing instructions for that scene.
- Concrete Scenes: We'll create classes for each part of our game that inherit from
Scene, likeTitleScene,MapScene, andBattleScene.
Pillar 3: The Rendering Pipeline - The Game's Artist
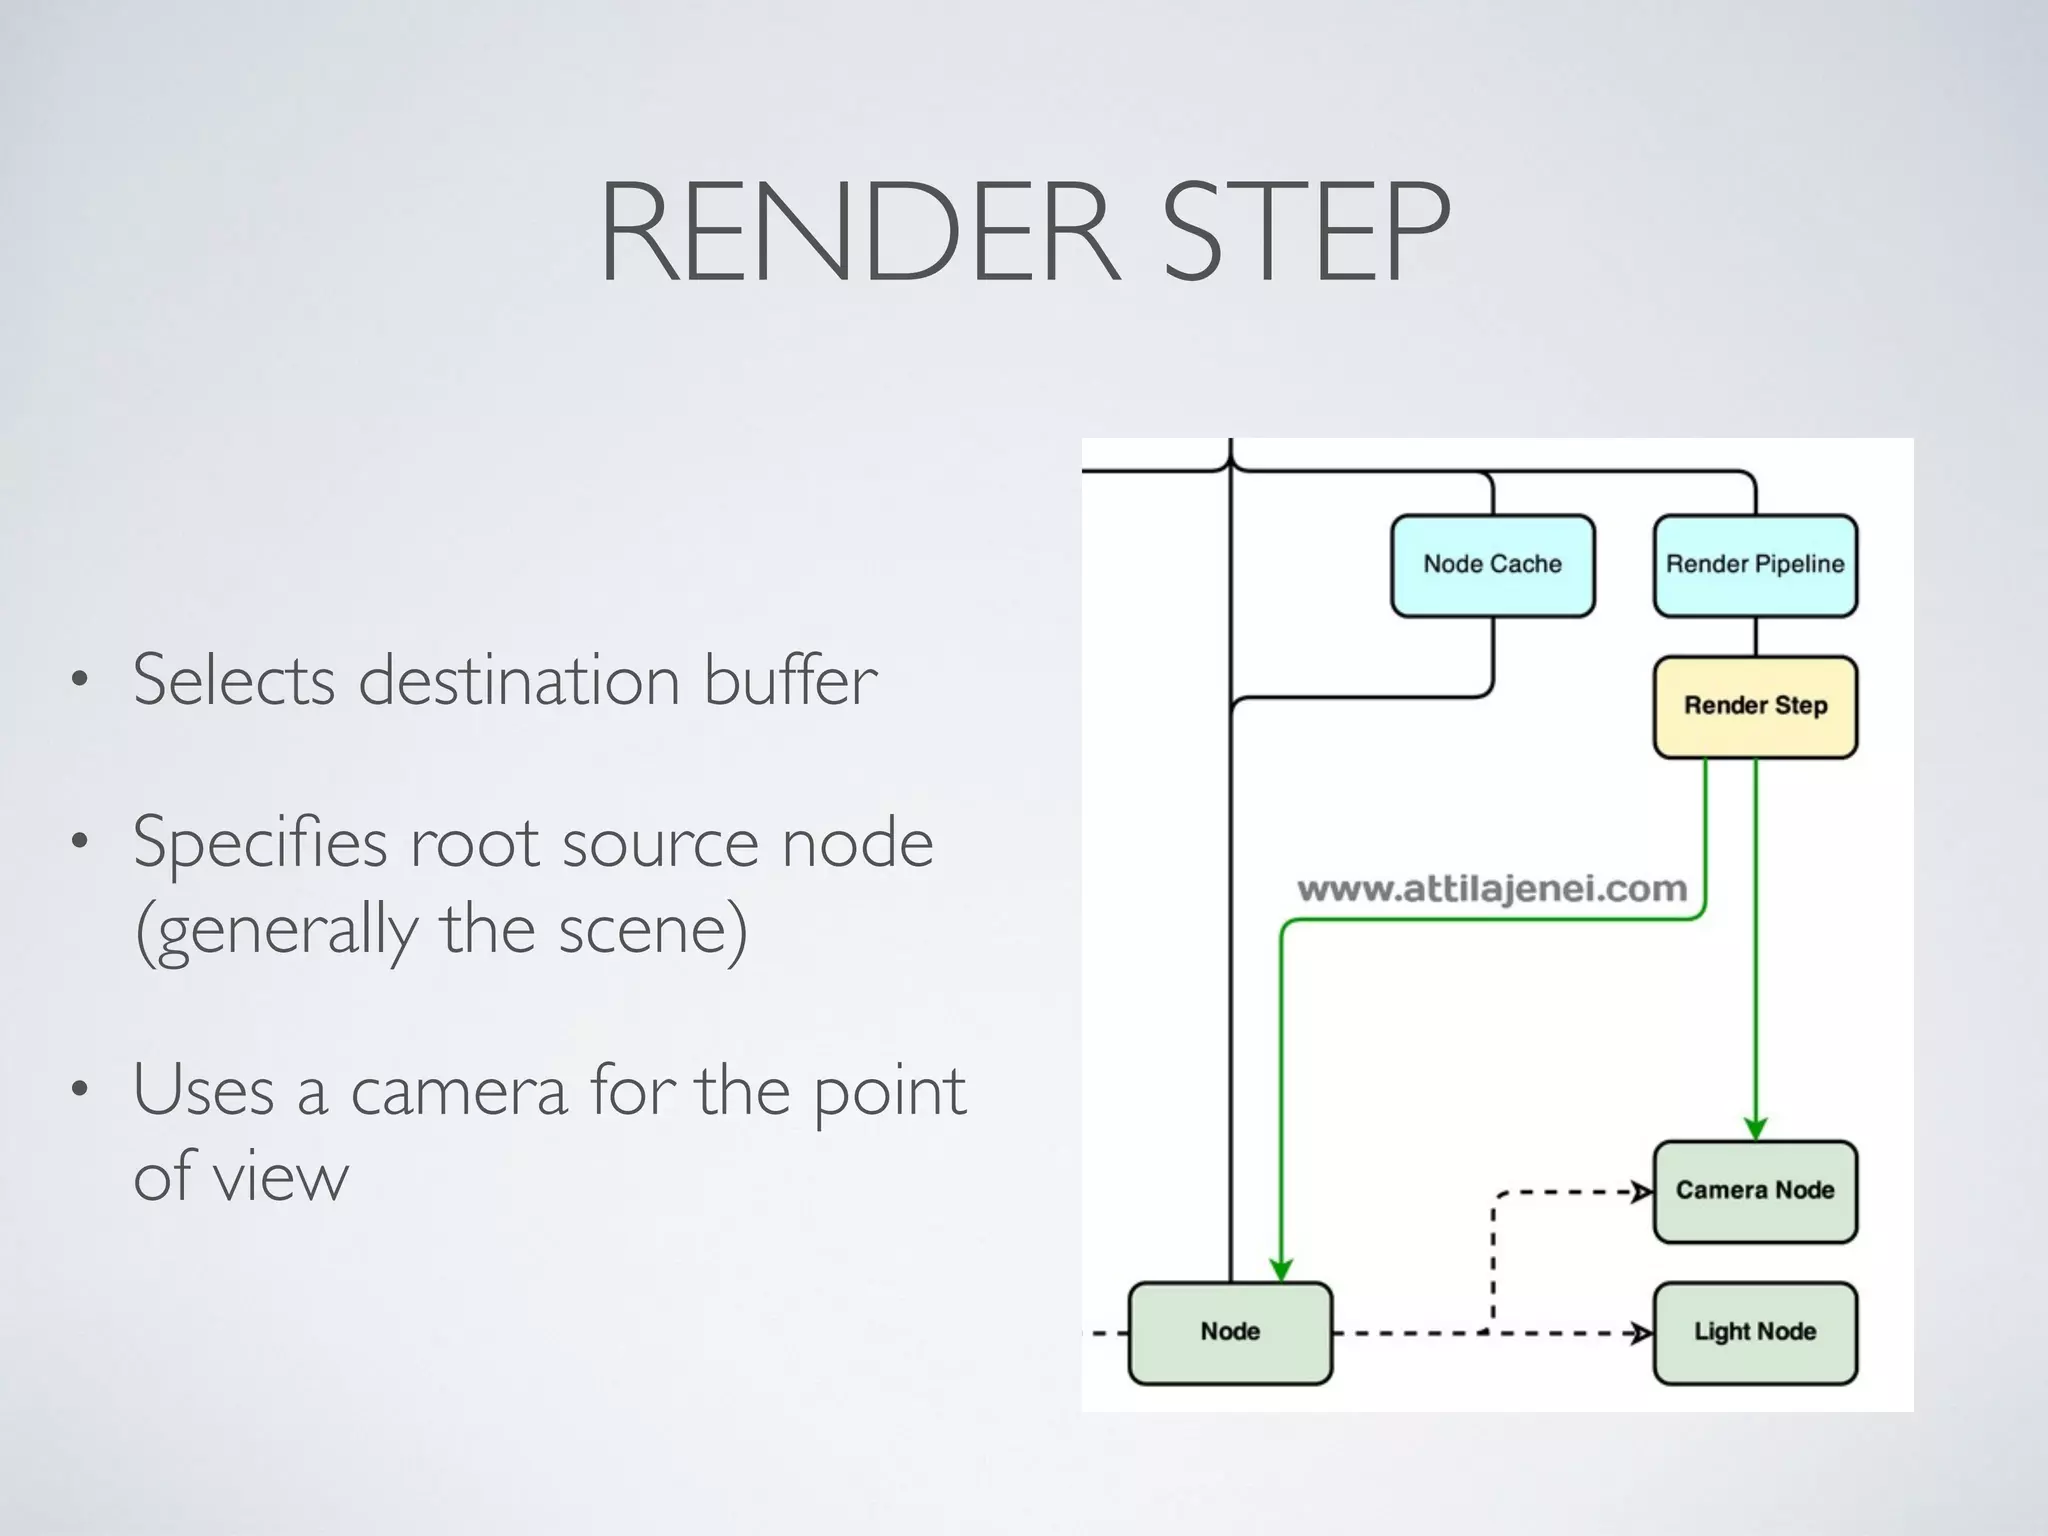
The rendering pipeline is the process of taking the game state and drawing it to the screen. In a web app, you manipulate the DOM, and the browser's complex rendering engine handles the rest. In a canvas-based game, we are in direct, imperative control.
For our 2D JRPG, we can think of the rendering pipeline as a simple, layered process. Within a single frame, for the MapScene, we would execute a series of drawing commands in a specific order to create the illusion of depth:
- Draw Ground Layer: Render the base tiles of the map (grass, dirt paths).
- Draw Object Layer: Render objects that the player can walk behind (chests, signs).
- Draw Character Layer: Render NPCs and the player character. This ensures they are drawn on top of the ground and objects.
- Draw Overhead Layer: Render tiles that should appear above the player (tops of trees, roofs).
- Draw UI Layer: Render any interface elements on top of everything else (dialogue boxes, menus).
Each scene's render() method will be responsible for executing this pipeline for that specific scene. The BattleScene, for instance, will have a different pipeline for drawing backgrounds, enemies, party members, and battle menus.
Putting It All Together: An Architectural Blueprint
Here is how these three pillars fit together in a simplified architectural overview. This pseudocode represents the core of our engine class.
class Engine {
  constructor() {
    // Setup canvas and rendering context
    this.canvas = document.getElementById('game-canvas');
    this.context = this.canvas.getContext('2d');

    // Initialize managers
    this.inputManager = new InputManager();
    this.sceneManager = new SceneManager();

    // Game Loop variables
    this.lastTime = 0;
    this.accumulator = 0;
    this.timeStep = 1000 / 60; // 60 updates per second
  }

  start() {
    // Go to the first scene and start the loop
    this.sceneManager.goTo(new TitleScene());
    this.gameLoop(0);
  }

  gameLoop(currentTime) {
    // --- The Core Game Loop using the fixed-step pattern ---

    // 1. Calculate elapsed time
    let deltaTime = currentTime - this.lastTime;
    this.lastTime = currentTime;
    this.accumulator += deltaTime;

    // 2. Process Input (we'll cover this later)
    this.inputManager.processInput();

    // 3. Update the simulation with a fixed time step
    while (this.accumulator >= this.timeStep) {
      this.sceneManager.getActiveScene().update(this.timeStep);
      this.accumulator -= this.timeStep;
    }

    // 4. Render the current scene
    this.context.clearRect(0, 0, this.canvas.width, this.canvas.height); // Clear screen
    this.sceneManager.getActiveScene().render(this.context);

    // 5. Request the next frame from the browser
    requestAnimationFrame(this.gameLoop.bind(this));
  }
}
This structure provides a robust and scalable foundation. The Engine class orchestrates everything, but the actual game logic and rendering are neatly encapsulated within individual Scene objects, which are managed by the SceneManager.
Test your understanding!
When the player character walks from the world map into a town, a screen fade occurs, and the new town map appears. In our proposed architecture, describe the sequence of events and which components are responsible.
Show answer
- Simulation (
MapScene.update): The game's update logic detects that the player's grid coordinates have moved onto a "map transition" tile. - Scene Manager (
SceneManager.goTo): TheMapScenecallsengine.sceneManager.goTo(new TownScene()). - Transition Logic (
SceneManager): TheSceneManagerbegins its transition logic. Instead of immediately swapping scenes, it would enter a "fading out" state. - Rendering (
Engine.gameLoop): For the next few frames, therendermethod would be called, but theSceneManagerwould instruct it to draw a black rectangle over the screen with increasing opacity. - Scene Swap (
SceneManager): Once the screen is fully black, theSceneManagerfinally swaps the active scene from the oldMapSceneto the newTownScene. - Transition Logic (
SceneManager): TheSceneManagerthen enters a "fading in" state. - Rendering (
Engine.gameLoop): Over the next few frames, the newTownSceneis rendered, but with the black rectangle's opacity now decreasing, revealing the town. Once the fade is complete, the game continues normally.
Conclusion
Today we've moved from analysis to creation by designing the high-level architecture for our JRPG engine. We've established a blueprint based on three critical pillars:
- Game Loop: A fixed-step update, variable-render loop to ensure deterministic game speed and smooth visuals, orchestrated by
requestAnimationFrame. - Scene Manager: A router-like system to manage transitions between different game states (title, map, battle), keeping logic encapsulated.
- Rendering Pipeline: A layered, imperative drawing process that gives us full control over how each scene is presented on the canvas.
This design provides a clean separation of concerns and a solid foundation to build upon. We've laid the architectural groundwork; now it's time to start building.
Preview of the next lesson:
We will take the architectural blueprint we designed today and begin implementing it. Our first practical task will be to create the game loop using requestAnimationFrame, managing state updates and rendering with a proper time step.