Recommended resources
The freely available resources this lesson will direct you to.
Welcome back. In our previous lesson, you successfully integrated the Capgo updater plugin into your application. Your project is now technically equipped to receive Over-the-Air updates, with the plugin configured to automatically check for new versions on app start. The groundwork is laid, and the "listening" part is complete.
This lesson takes the crucial next step: broadcasting. We will move from the client side to the deployment side, focusing on how you, the developer, can create and publish new versions of your web application. You will learn how to use the Capgo CLI to define release channels—a concept analogous to deployment environments like staging and production—and how to publish your web app's build artifacts to these channels. We will also streamline this process by creating bun scripts within your Turborepo, creating a repeatable and efficient workflow for pushing updates.
1. Understanding and Creating Channels
In professional software development, you rarely deploy new code directly to all users. Instead, you use a phased rollout, moving from internal testing to a beta group and finally to production. Capgo facilitates this workflow through a feature called channels. A channel is simply a named track to which you can publish updates. For example, you might have:
staging: For your internal QA team to test new features.beta: For a small group of external beta testers.production: For your general user base. This is the default channel.
By default, the updater plugin we configured in the last lesson listens on the production channel. You can create additional channels using the Capgo CLI. Let's create a staging channel for our testing purposes.
Open your terminal (you can be in any directory for this command, as it's not project-specific) and run:
bunx @capgo/cli channel create staging
You should see a confirmation that the channel has been created. You can verify this by logging into your Capgo web dashboard and navigating to the "Channels" section for your app. This simple command is all it takes to set up a new distribution pipeline for your web updates.
capgo-live-updates | Skills Marketplace · LobeHub
The LobeHub guide on Capgo provides a concise overview of using channels. It's a good reference for the commands we'll be using.
In the "Channels and Staged Rollouts" section, review the commands for creating channels and deploying to them. This reinforces the CLI-centric workflow for managing releases.
2. Publishing Your First Web Bundle
With a staging channel ready, we can now publish an update. The process involves two main steps:
- Build the Web App: Generate the latest production-ready static files (HTML, CSS, JavaScript) for your React SPA.
- Upload the Bundle: Use the Capgo CLI to upload the generated files to a specific channel.
Given your Turborepo setup, you already have a build process for your web application. The capgo upload command needs to be pointed at the directory containing your built web assets, which is the webDir you defined in capacitor.config.ts. The command is smart enough to read your configuration and find the right folder.
Let's walk through a manual deployment to the staging channel.
First, ensure you have a fresh build of your web app. From the root of your monorepo, run your build command. This is likely managed by Turborepo.
# At the root of your Turborepo project
turbo run build --filter=web
Note: web should be replaced with the actual name of your web app package in turbo.json.
Next, navigate to the directory containing your Capacitor project and run the upload command.
# Navigate to your mobile app directory
cd apps/mobile


# Upload the bundle to the 'staging' channel
bunx @capgo/cli upload --channel staging
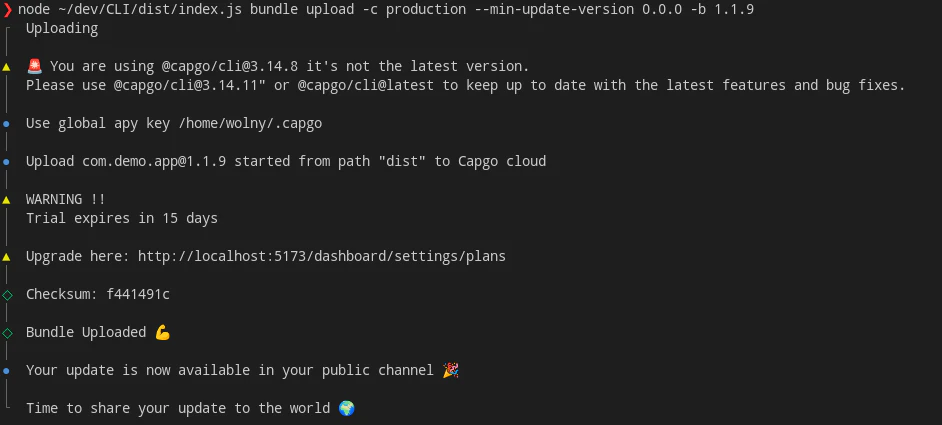
The CLI will package your dist (or equivalent) folder, upload it to Capgo's servers, and assign it to the staging channel. The output will confirm the version number and channel.
3. Automating Deployments with Bun Scripts
Running these commands manually is fine for a one-off, but for a repeatable workflow, scripting is essential. Let's add a script to the package.json of your apps/mobile package to automate this process.
Open apps/mobile/package.json and add the following to the scripts section:
{
  "name": "mobile",
  "version": "1.0.0",
  "scripts": {
    "dev": "...",
    "deploy:staging": "turbo run build --filter=web... && bunx @capgo/cli upload --channel staging",
    "deploy:production": "turbo run build --filter=web... && bunx @capgo/cli upload --channel production"
  }
}
Make sure to replace web... with the correct filter for your web app package.
Now, deploying an update to staging is as simple as running one command from your apps/mobile directory:
bun run deploy:staging
This script first tells Turborepo to build the web app, and upon success, it uses the Capgo CLI to upload the result. This aligns perfectly with a professional CI/CD-style workflow, even when run locally.
4. Verifying the Upload on the Dashboard
After you upload a bundle, you can see and manage it in the Capgo web dashboard. Log in to your Capgo account and navigate to your application. You'll find a "Bundles" section that lists all the web bundles you've uploaded.
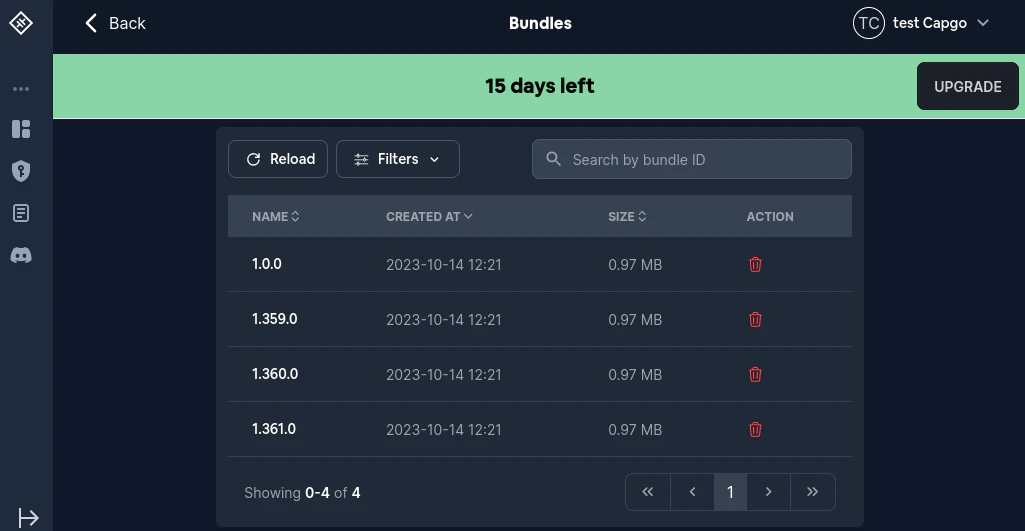
Here you can see the version, the channel it belongs to, its size, and when it was created. This dashboard is your source of truth for what updates are available to your users. If you run your application on a device (or simulator) that is configured to check the staging channel, it will now download and apply this new bundle.
Conclusion
You have now mastered the full loop of publishing an OTA update. You've gone from having a client app that can receive updates to being a developer who can send them in a structured, professional manner.
Let's recap the key achievements of this lesson:
- Channels for Rollouts: You learned how to create and use channels like
stagingandproductionto manage different release tracks. - Publishing Bundles: You used the
bunx @capgo/cli uploadcommand to build your web assets and publish them to a specific channel. - Scripted Workflows: You created a
bunscript in yourpackage.jsonto automate the build-and-upload process, making deployments efficient and repeatable. - Verification: You saw how to confirm your upload was successful by checking the bundles list in the Capgo web dashboard.
Your app is now fully capable of both sending and receiving OTA updates. However, the update process is currently silent and automatic. While efficient, it might not always provide the best user experience. In our next lesson, we will dive into the React side of the equation. You will learn how to implement logic to check for, download, and apply an available update manually, and create a user-facing component to inform the user and let them choose when to restart the app. This gives you fine-grained control over the update experience.