Recommended resources
The freely available resources this lesson will direct you to.
Hello! Last time, you traced how a browser, API, GIS server, and spatial database work together. To build those parts, you’ll need to find your way around project folders without relying entirely on File Explorer. Today you’ll use Windows PowerShell to create a small GIS project workspace, navigate it, and safely copy, move, and delete files.
Everything you create will stay inside one practice folder in your Windows user account. You do not need administrator access or any new software.
Find your location before changing anything
Open PowerShell from the Windows Start menu. The text before the > prompt shows your current location. Type a command and press Enter; PowerShell then displays any output and gives you another prompt.
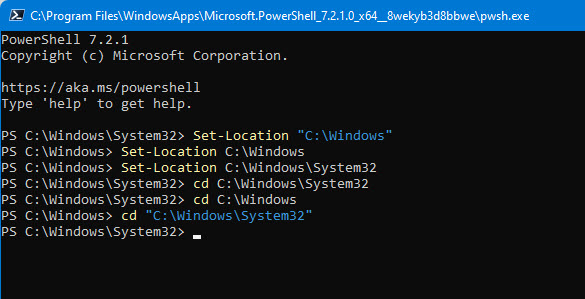
The screenshot shows how Set-Location and its shorter form, cd, change the directory shown in the prompt. It uses Windows system folders as examples; do not use those folders for this lesson’s practice.
A path identifies a file or folder. An absolute path, such as C:\Users\Asha\gis-shell-lab, starts at a drive and identifies a location regardless of where you are now. A relative path, such as .\data\raw, starts at your current location. In PowerShell, . means “here,” and .. means “the parent folder.” The backslash separates folder names on Windows.
Watch the opening of Copy, Move and Delete files with PowerShell from CS Tutorials to see those ideas demonstrated before you try them.
Copy, Move and Delete files with PowerShell
CS Tutorials’ “Copy, Move and Delete files with PowerShell” demonstrates basic navigation, directory creation, listing, and file creation. Use it as a visual introduction; you will use a safer practice location than the one in the video.
Watch changing folders for cd, Set-Location, and moving to a parent folder. Continue with creating and listing to see new folders, dir, and New-Item. Notice how the prompt and directory listing provide different kinds of evidence about where you are and what exists.
Now establish a safe starting point. Run these commands one line at a time:
Set-Location $HOME
Get-Location
Get-ChildItem
$HOME is PowerShell’s name for your user home folder. Set-Location changes your current location; Get-Location reports it; Get-ChildItem lists what is inside it. The shorter commands cd, pwd, and dir perform those three jobs respectively. We’ll mainly use the full names so their purposes remain clear.
Build a small GIS workspace
Create a folder dedicated to this lesson, then enter it:
New-Item -Path gis-shell-lab -ItemType Directory
Set-Location .\gis-shell-lab
Get-Location
If gis-shell-lab already exists because you started the lesson earlier, do not run the New-Item line again. Enter the existing folder instead, or choose a new name such as gis-shell-lab-2 and use that name consistently below.
New-Item creates an item; -Path supplies its location, and -ItemType says whether it is a Directory or a File. You should now see gis-shell-lab at the end of the path reported by Get-Location. Check that before continuing: relative commands will act inside whichever folder is current.
Let’s give the workspace a plausible purpose. Imagine collecting notes about clinic locations for a future web map. Create folders for source data, working notes, and backups:
New-Item -Path data -ItemType Directory
New-Item -Path .\data\raw -ItemType Directory
New-Item -Path notes -ItemType Directory
New-Item -Path backups -ItemType Directory
New-Item -Path archive -ItemType Directory
Get-ChildItem
Create two small text files:
New-Item -Path .\data\raw\clinics.txt -ItemType File -Value "Clinic locations for Pune"
New-Item -Path .\notes\plan.txt -ItemType File -Value "Map clinics in Pune"
Get-ChildItem .\data\raw
Get-ChildItem .\notes
The -Value text gives each file some content. To see the difference between listing a file and reading it, try:
Get-Content .\notes\plan.txt
Now enter a nested folder and return to the workspace:
Set-Location .\data\raw
Get-Location
Set-Location ..\..
Get-Location
From raw, the first .. goes to data and the second returns to gis-shell-lab. If the last reported path does not end in gis-shell-lab, stop and use Set-Location $HOME followed by Set-Location .\gis-shell-lab before proceeding.
Folder names can contain spaces, but their paths need quotes so PowerShell treats the words as one argument. For example, Set-Location ".\field notes" would enter a folder named field notes if that folder existed. You do not need to create it for this workspace.
Copy versus move
A copy leaves the original in place and creates another item at the destination. A move relocates the original. Before issuing either command, ask two questions: What is the source path? and Does the destination name an existing folder or a new file name?
Watch the video’s file-copy and file-move demonstrations now. The move encounters a name collision, which is a useful reminder to inspect the destination rather than forcing an overwrite.
Copy, Move and Delete files with PowerShell
Return to CS Tutorials’ “Copy, Move and Delete files with PowerShell” for the demonstrations of Copy-Item and Move-Item. Focus on what remains at the source after each operation.
Watch copying files, including the example that supplies a new name at the destination. Then watch moving files and note what happens when a file with the intended name already exists. Use the distinct destination names below to avoid that collision.
From inside gis-shell-lab, copy the raw-data note into the notes folder under a new name:
Copy-Item -Path .\data\raw\clinics.txt -Destination .\notes\clinics-copy.txt
Get-ChildItem .\data\raw
Get-ChildItem .\notes
The file should appear in both listings. By contrast, move the project plan from notes into data:
Move-Item -Path .\notes\plan.txt -Destination .\data\plan.txt
Get-ChildItem .\notes
Get-ChildItem .\data
The plan should now appear in data, not notes. These listing checks matter: many successful PowerShell commands produce no output.
Copying a folder and everything inside it requires special care. In Microsoft Learn’s Manipulating Items Directly, read the “Copying items” and “Deleting items” subsections. For now, concentrate on why a folder copy needs -Recurse; use the deletion subsection as preparation for the next chapter.
Manipulating Items Directly - PowerShell | Microsoft Learn
Microsoft Learn explains an easily missed distinction: copying a directory does not necessarily copy its contents. It also describes PowerShell’s behavior when deleting a directory that contains files.
In “Copying items,” begin with the paragraph about copying an item from one location to another and read through the recursive example, stopping before “Deleting items.” Focus on the purpose of -Recurse; our destination is new, so you do not need the example’s -Force. Then read “Deleting items” from its opening explanation through the -Recurse example, stopping before “Executing items.” Notice that a confirmation prompt is a warning to check the path, not a substitute for checking it yourself.
Make a backup of the entire data directory. Because backups already exists, the copy will be placed inside it as backups\data:
Copy-Item -Path .\data -Destination .\backups -Recurse
Get-ChildItem .\backups\data
Get-ChildItem .\backups\data\raw
Without -Recurse, you could end up with a copied folder that lacks its nested files. You can also move a whole directory. Relocate notes into the existing archive folder, then inspect both locations:
Move-Item -Path .\notes -Destination .\archive
Get-ChildItem .\archive\notes
Get-ChildItem
The top-level listing should no longer show notes; you should find it under archive instead.
Delete deliberately
Remove-Item deletes files or folders. Unlike a normal File Explorer deletion, do not assume you can retrieve these items from the Recycle Bin. Always inspect your location and the target path first. Avoid broad wildcard paths such as * while learning.
PowerShell’s -WhatIf option lets you preview a removal without performing it. First preview deletion of the copied note, then remove that specific file:
Get-Location
Get-ChildItem .\archive\notes
Remove-Item -Path .\archive\notes\clinics-copy.txt -WhatIf
Remove-Item -Path .\archive\notes\clinics-copy.txt
Get-ChildItem .\archive\notes
The notes folder is now empty, so remove it too:
Remove-Item -Path .\archive\notes
Get-ChildItem .\archive
A non-empty directory is different: -Recurse includes its contents. To practise safely, remove only the backup copy after checking that you are still in gis-shell-lab and that the original data folder remains:
Get-Location
Get-ChildItem .\backups
Get-ChildItem .\data
Remove-Item -Path .\backups\data -Recurse -WhatIf
Remove-Item -Path .\backups\data -Recurse
Get-ChildItem .\backups
Get-ChildItem .\data
If any path in the preview or listings surprises you, do not run the removal line. Work out where you are with Get-Location first. After the removal, backups should be empty while the original data directory still contains plan.txt and raw.
What to carry forward
You can now use the current location and relative paths to work inside a project: Get-Location and Get-ChildItem tell you where you are and what exists; Set-Location navigates; New-Item creates; Copy-Item duplicates; Move-Item relocates; and Remove-Item deletes. For folder copies, remember -Recurse. For deletion, remember inspect, preview, then act.
Keep gis-shell-lab for now. In the next lesson, you’ll create and run code files in Visual Studio Code; the same folder-navigation skills will help you use its built-in terminal confidently.