Recommended resources
The freely available resources this lesson will direct you to.
Hello! Welcome back to our deep dive into advanced RxJS.
In our last lesson, we mastered the optimistic update pattern, learning how to create a snappy UI by assuming success and gracefully rolling back on failure. This was a powerful demonstration of how RxJS can manage complex asynchronous sequences.
Today, we'll tackle another classic and challenging UI problem: implementing undo and redo functionality. This is a feature that users love but can be notoriously difficult to implement with traditional state management. You'll see how RxJS, with its stream-based approach, makes this task surprisingly declarative and manageable.
This lesson directly addresses the learning outcome: Build undo/redo functionality for state changes using the buffer and scan operators. We will explore how to maintain a history of state changes and navigate through it, a pattern that has clear parallels to version control systems or command histories in applications and games.
1. The Core Operators: scan and buffer
To build our undo/redo logic, we'll rely on two key operators. One is already very familiar to you, and the other is new.
scan: The State History Manager
We've used scan extensively to accumulate state, most recently in our Redux-like store and optimistic update patterns. Here, its role is elevated: instead of just tracking the current state, the accumulator in scan will be responsible for maintaining the entire history of our state.
The accumulator will be an object containing:
- The current state value.
- An
undoStack: an array of past states. - A
redoStack: an array of states we've "undone" and can "redo".
Every action—whether it's a new change, an undo, or a redo—will pass through scan, which will compute the next historical snapshot.
buffer: Grouping Emissions
The buffer operator is our new tool. It collects values from a source Observable and emits them as an array whenever a second Observable, the "notifier," emits.
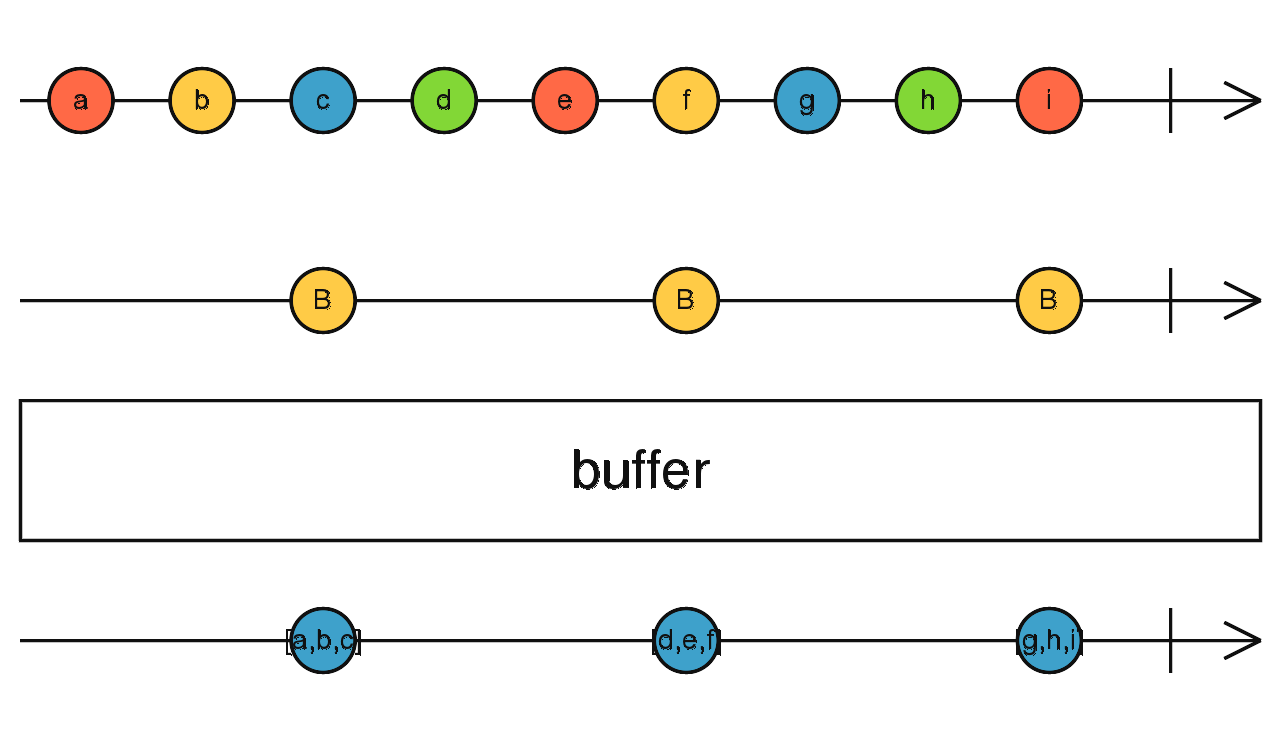
In the context of undo/redo, buffer can be used to group a series of rapid actions into a single "undoable" chunk. For example, you could buffer a series of mousemove events and only commit them to the undo history when the user releases the mouse button. For our purposes today, we'll focus on a pattern where buffer helps manage a queue of commands, which we can then undo.
2. Pattern 1: State-Based Undo/Redo with scan
The most common and robust pattern for undo/redo is to manage a history of state snapshots. Let's design this system first.
Imagine a simple application with a counter. We need three types of actions:
- State Change: Incrementing or decrementing the counter.
- Undo: Reverting to the previous state.
- Redo: Re-applying an undone state.
We can model these as separate streams, merge them, and then use scan to manage the history.
Here is a complete implementation of this pattern.
import { fromEvent, merge, Subject } from 'rxjs';
import { map, scan, startWith, shareReplay, mapTo } from 'rxjs/operators';

// Let's assume we have these buttons in our HTML
const incButton = document.getElementById('increment');
const decButton = document.getElementById('decrement');
const undoButton = document.getElementById('undo');
const redoButton = document.getElementById('redo');
const valueDisplay = document.getElementById('value');

// 1. Define the structure for our history
interface History {
  value: number;
  undoStack: number[];
  redoStack: number[];
}

const initialState: History = {
  value: 0,
  undoStack: [],
  redoStack: [],
};

// 2. Create streams for each user action
const increment$ = fromEvent(incButton, 'click').pipe(mapTo({ type: 'INCREMENT' }));
const decrement$ = fromEvent(decButton, 'click').pipe(mapTo({ type: 'DECREMENT' }));
const undo$ = fromEvent(undoButton, 'click').pipe(mapTo({ type: 'UNDO' }));
const redo$ = fromEvent(redoButton, 'click').pipe(mapTo({ type: 'REDO' }));

// 3. Merge all actions into a single stream
const actions$ = merge(increment$, decrement$, undo$, redo$);

// 4. Use `scan` to manage the state history
const state$ = actions$.pipe(
  startWith(initialState),
  scan((history: History, action: { type: string }) => {
    const { value, undoStack, redoStack } = history;

    switch (action.type) {
      case 'INCREMENT':
        return {
          value: value + 1,
          undoStack: [...undoStack, value], // Push old state to undo stack
          redoStack: [], // A new action clears the redo stack
        };
      case 'DECREMENT':
        return {
          value: value - 1,
          undoStack: [...undoStack, value],
          redoStack: [],
        };
      case 'UNDO': {
        if (undoStack.length === 0) return history; // Nothing to undo
        const previousValue = undoStack[undoStack.length - 1];
        return {
          value: previousValue,
          undoStack: undoStack.slice(0, -1), // Pop from undo stack
          redoStack: [...redoStack, value], // Push current state to redo stack
        };
      }
      case 'REDO': {
        if (redoStack.length === 0) return history; // Nothing to redo
        const nextValue = redoStack[redoStack.length - 1];
        return {
          value: nextValue,
          undoStack: [...undoStack, value], // Push current state to undo stack
          redoStack: redoStack.slice(0, -1), // Pop from redo stack
        };
      }
      default:
        return history;
    }
  }),
  shareReplay(1) // Multicast the state to all subscribers
);

// 5. Subscribe to update the UI
// Update the displayed value
state$.pipe(map(history => history.value)).subscribe(currentValue => {
  valueDisplay.textContent = currentValue.toString();
});

// Enable/disable buttons based on stack availability
state$.subscribe(({ undoStack, redoStack }) => {
  (undoButton as HTMLButtonElement).disabled = undoStack.length === 0;
  (redoButton as HTMLButtonElement).disabled = redoStack.length === 0;
});
This example elegantly handles the entire undo/redo logic within a single, declarative scan operator. Notice how any new action (INCREMENT or DECREMENT) clears the redoStack. This is standard behavior in most applications—once you make a new change, you can no longer "redo" past actions.
3. Pattern 2: Command-Based Undo with buffer and scan
An alternative approach is to manage a history of commands instead of state snapshots. This can be more memory-efficient if your state is large and actions are small, incremental changes.
This is where buffer can come into play. You might buffer a series of commands and then process them. A great example of managing a command queue for undo functionality is discussed in a Stack Overflow thread.
Simulating a command queue and undo stack with RxJS
Let's analyze a clever, purely functional solution for undoing commands from a Stack Overflow answer. This example uses merge and scan in a slightly different way to manage a queue of commands that can be undone.
Please read the accepted answer's edited section, starting with 'Edit: Using only Rx without a mutable array.' Focus on how scan is used. The accumulator acc holds { undoCommand: undefined, q: [] }. Notice how it distinguishes between a regular command and an 'undo' string to either add to the queue (q) or pop from it.
Let's break down the pattern from that resource:
merge(invoked_commands, undo): Two streams are combined. One emits the actual commands to be executed (e.g.,"Command_1","Command_2"), and the other emits a special"undo"string when the undo button is clicked.scan({ undoCommand: undefined, q: [] }, ...): Thescanoperator maintains the history.- The accumulator
accholds the command to be undone (undoCommand) and the queue of past commands (q). - If the incoming
valueis a regular command, it's prepended to the queue:q: [value].concat(acc.q). - If the
valueis"undo", the first command from the queue is moved to theundoCommandproperty, and the rest of the queue is preserved:{ undoCommand: acc.q[0], q: acc.q.slice(1) }.
- The accumulator
.pluck("undoCommand").filter(...): Afterscan, the stream emits the entire accumulator object on every action. Thepluckandfilteroperators are used to ensure that the stream only emits a value when an actual undo needs to happen.
This command-based pattern is powerful, though as the author notes, a bit more convoluted than the state-based approach. The key difference is that it emits the command to be undone, and your application logic must then know how to reverse that specific command. Our first state-based pattern is more direct, as it simply provides the exact previous state to revert to.
4. Encapsulating Logic in a Custom Operator
As you can see, the logic for state history can get verbose. For reusability, we can encapsulate this logic into a custom operator. This is a common practice in advanced RxJS development.
A custom operator is simply a function that takes an Observable as input and returns a new Observable.
The following article explains how to create custom operators. We'll focus on a specific example it provides: a rememberHistory operator that does something very similar to our first undo/redo pattern.
Please read section '4.) Remember History'. Analyze the rememberHistory operator. Notice how it uses scan to accumulate a historyChain of the last N values. This is a simplified version of our undo stack, packaged neatly into a reusable operator.
The rememberHistory operator from the article is a great starting point. It uses scan to keep a running list of the last N emissions. You could extend this concept to create a fully-featured withUndoRedo() custom operator that encapsulates the logic from our first pattern, making it trivial to add this functionality to any state stream in your application.
Conclusion
Today we've added a sophisticated and highly desired feature—undo/redo—to our state management toolkit. You've seen how RxJS provides the building blocks to implement this declaratively, avoiding the tangled mess of callbacks and manual state-pushing that a traditional implementation would require.
Key Takeaways:
scanis the cornerstone of undo/redo logic, acting as the engine that manages the history of states or commands.- The most robust pattern involves storing state snapshots in an accumulator object containing the
value,undoStack, andredoStack. - A new user action should typically clear the
redoStack, establishing a new history timeline. buffercan be used to group commands, which can then be managed by ascan-based undo queue. This is a command-oriented pattern, as opposed to a state-oriented one.- For reusability, this complex logic can be encapsulated within a custom RxJS operator.
Preview of the Next Lesson:
We have now built several powerful state management patterns from scratch using core RxJS operators. Our next step is to bridge this knowledge to the real-world React ecosystem. In the next lesson, we will begin a new module, "Integrating RxJS with Zustand," by learning how to Create and manage a basic Zustand store, covering atomic state updates, actions, and selectors. This will set the stage for combining the power of RxJS streams with a popular, modern state management library.