

Hello! Welcome back.
In our last lesson, you successfully converted your manuscript into a navigable EPUB file, ready for digital marketplaces. That was a huge step toward reaching readers on devices like Kindle and smartphones.
Today, we shift our focus from the digital screen to the printed page. While ebooks are popular, many readers still prefer the feel of a physical book. Your goal for this lesson is to learn how to design a print-ready PDF manuscript with correct margins, page numbering, and gutter settings. This is the digital blueprint that a print-on-demand service like Amazon KDP uses to create a physical paperback book.
We will explore the key differences between formatting for print and for ebooks, define critical terms like trim size and gutter, and walk through the process using free and accessible tools.
From Reflowable to Fixed: Ebooks vs. Print
The EPUB file you created is "reflowable," meaning the text can adapt to different screen sizes and user settings. A print-ready PDF, however, is a fixed-layout format. Each page is a precise, unchangeable blueprint. What you see in the PDF is exactly what will be printed.
This requires a new level of precision. We need to define:
- Trim Size: The final physical dimensions of your book (e.g., 6" x 9").
- Margins: The empty space around the text.
- Gutter: A crucial extra margin on the inside of each page to ensure no text is lost in the binding.
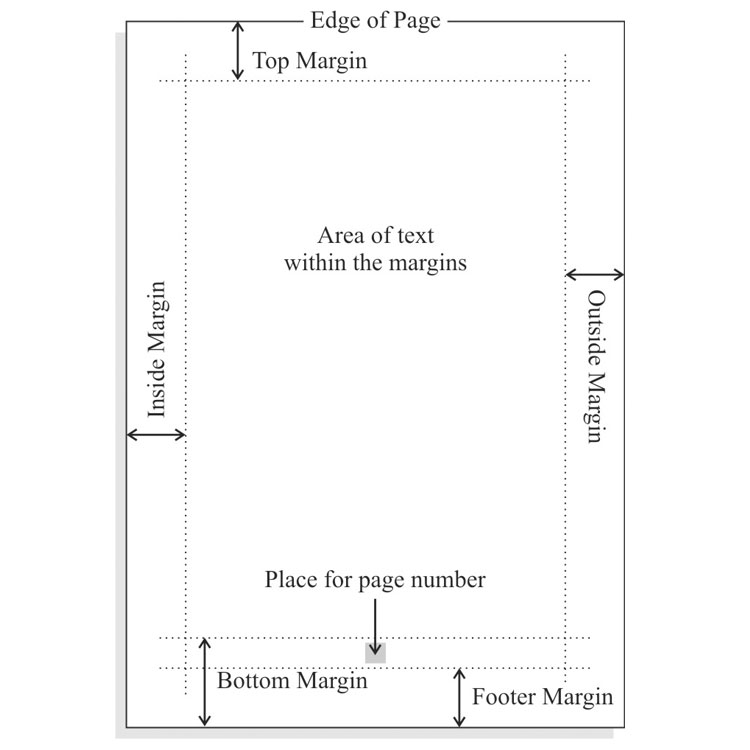
The All-Important Gutter Margin
When a book is bound, a small part of the inner edge of each page is pulled into the spine. Without a proper "gutter" margin, your words would curve into the binding, making them difficult or impossible to read.

The required size of the gutter depends on your book's total page count—the thicker the book, the larger the gutter needs to be.
Your Toolkit for Creating a Print-Ready PDF
You already have a well-structured manuscript in a .docx file. Now, we need a tool to apply these print-specific settings.
While you can use Google Docs, it has a significant limitation: it does not have a native "gutter" or "mirror margin" setting. This makes it difficult to create a professional-grade print file without complex, imperfect workarounds.
Therefore, we'll focus on two superior, and still free, approaches.
-
The Manual, High-Control Path (Recommended): Use a full-featured word processor like LibreOffice Writer (a free, open-source desktop suite) or the free online version of Microsoft Word. These tools give you complete control over print layout settings, including mirror margins and gutters.
-
The Professional DTP Path (Advanced): For highly visual books like comics or complex non-fiction, designers use Desktop Publishing (DTP) software. Scribus is a powerful, free, open-source DTP application. Given your IT background, this might be a tool you explore later, but for most text-based books, a word processor is more efficient.
For this lesson, we will focus on the manual path using the official Amazon KDP guide as our framework. The principles are the same whether you use LibreOffice or MS Word.
Step 1: Setting Trim Size, Margins, and Gutter
The Amazon KDP help center provides the definitive specifications for formatting your manuscript. Let's start with the foundational settings: page size and margins.
Build Your Book - Format a Paperback Manuscript (Word for Windows)
The official Amazon KDP guide, 'Build Your Book - Format a Paperback Manuscript (Word for Windows),' is our primary reference. We'll start by understanding how to set up the page size and margins.
Read the section titled 'Setting trim size and margins'. Pay close attention to: The definitions of Trim Size, Bleed, and Margins. The chart that shows required 'Inside (gutter) margins' based on page count. The instructions for selecting 'Mirror margins'. This is the key setting that creates a gutter.
Key Workflow:
- Choose Your Trim Size: A common size for paperbacks is 6" x 9". Open your document in LibreOffice or Word and go to
Format > Page Style(LibreOffice) orLayout > Size(Word) to set your custom page dimensions. - Estimate Your Page Count: After setting the trim size, your total page count will change. Make a note of it.
- Set Mirror Margins: Go to the margin settings. Instead of standard margins, select the option for "Mirror margins" or "Mirrored" page layout. This gives you settings for an Inside and Outside margin, rather than Left and Right.
- Enter Your Margin Values: Using the chart from the KDP guide, find your page count range and enter the corresponding value for the Inside margin. This is your gutter. A safe value for the Top, Bottom, and Outside margins is often 0.5" or higher, but you can follow KDP's minimums.
Test your understanding!
Your manuscript is about 400 pages long after setting the trim size to 6" x 9". According to the KDP margin chart you just reviewed, what is the minimum required inside (gutter) margin for your book?
Show answer
For a book with 301 to 500 pages, the KDP guide recommends an inside (gutter) margin of 0.625 inches (15.9 mm).
Step 2: Adding Page Numbers and Headers
Professional books have page numbers and often include running headers (e.g., the book title on one page and the author's name on the opposite).
The following video demonstrates these concepts in Google Docs, but the principles of inserting page numbers into the footer and centering them are universal.
Amazon KDP: How to format your paperback book 6x9 using Google Docs (2024)
This clip from 'Amazon KDP: How to format your paperback book' shows the basic process of adding and formatting page numbers.
Watch from 01:47 to 02:26. Focus on how to insert page numbers into the footer and how to center them. Note the option to not show the number on the first page, which is a common convention for chapter title pages.
To implement this in LibreOffice or Word:
- Insert Footer: Go to
Insert > Header and Footer > Footer. - Insert Page Number: With your cursor in the footer, go to
Insert > Page Number(or a similar field). - Format: Center the page number. You can also use the header/footer options to prevent the page number from appearing on the first page of a section (useful for chapter-opening pages).
- (Optional) Add Headers: You can insert a header and use the "Different Odd & Even Pages" option to place your book title on odd pages and your author name on even pages for a professional touch. The KDP guide (resource LINK) covers this in its advanced steps.
Step 3: Exporting Your Print-Ready PDF
This is the final, critical step. You cannot simply "Save as PDF." You need to export using specific settings to ensure it's compliant with professional printers. This process embeds fonts and preserves image quality.
Build Your Book - Format a Paperback Manuscript (Word for Windows)
Let's return to the KDP guide to learn the correct export procedure. This ensures your file won't be rejected for technical reasons.
Read the final section, 'Proofing and exporting to PDF'. Focus on the instructions for: Embedding fonts in the file. Setting image quality to not compress images and a high PPI (e.g., 330 ppi). Exporting with the ISO 19005-1 compliant (PDF/A) option checked. This is the key to creating a print-ready file.
In most programs (including LibreOffice and Word), you will find these options under File > Export As > Export as PDF.... Look for an "Archive (PDF/A)" checkbox or similar options related to standards, fonts, and image compression. Always choose to export as PDF/A or PDF/X.
An Alternative: Using a Template
If the manual setup seems daunting, you can use a pre-formatted template. This is a great shortcut.
New Free Book Formatting Template Tool
The Kindlepreneur website offers a free tool that generates a Microsoft Word template with all the correct settings already applied. This video explains what it does.
Watch from 00:46 to 02:05. The video explains that the template includes the correct trim size, professional margins and gutters, and properly formatted page numbers. You would simply copy your text from your master file and paste it into the appropriate sections of the template.
You can download a template for your desired trim size, open it in LibreOffice or Word Online, paste your content, and then use the PDF/A export method described above. This can save you significant setup time.
Conclusion
You have now learned how to transform your manuscript into a fixed-layout blueprint ready for printing. This is a fundamentally different skill from creating an ebook, and it's essential for offering your readers a physical copy of your work.
Key Takeaways:
- A print-ready PDF is a fixed-layout file where dimensions, margins, and placement are precise.
- The gutter is a critical inside margin that prevents text from being lost in the book's spine. Its size is determined by your total page count.
- Use a full-featured word processor like LibreOffice or MS Word that supports "Mirror Margins" to properly set up a gutter.
- When exporting, you must use a print-compliant standard like PDF/A or PDF/X and ensure fonts are embedded.
Preview of the Next Lesson:
So far, we've focused on text-heavy books. But what about books where images are the star? In the next lesson, we will build on these concepts to lay out a picture book or children's book, ensuring proper placement of text and images. We will tackle concepts like full-bleed images, which you were briefly introduced to today.