Hello! Welcome back to our journey in building a high-performance telemetry engine.
In our last lesson, you successfully wrote the C++ boilerplate to create and manage a native window using GLFW. You now have an application that opens a blank window and closes gracefully. While we have an OpenGL context, our program doesn't yet know how to communicate with the graphics driver to issue rendering commands. The window is a canvas, but we don't have any brushes or paint.
Today, we'll fix that. Our goal is to initialize the graphics context using an API loader, specifically GLAD. This crucial step will dynamically load modern OpenGL functions at runtime, making them available for our C++ code to call. By the end of this lesson, you will be able to control the graphics pipeline, starting with our very first OpenGL command: clearing the window to a specific color.
Why Do We Need an OpenGL Loader?
This is a fundamental concept in graphics programming that ties into your interest in systems engineering. OpenGL is not a typical library you link against; it is a specification. The actual implementation of this specification is provided by your GPU manufacturer (NVIDIA, AMD, Intel) in the form of a graphics driver.
When you compile your C++ code, the compiler and linker don't know the memory addresses of modern OpenGL functions like glGenBuffers or glDrawArrays. These functions exist inside the graphics driver, and their locations must be queried at runtime.
You could do this manually for every single function your application needs, but the code is tedious, error-prone, and platform-specific (using wglGetProcAddress on Windows, glXGetProcAddress on Linux, etc.). This is where a loader library comes in.
GLAD (GL/GLES/EGL/GLX/WGL Loader-Generator) is a tool that automates this entire process. It generates C code that, when run, finds and stores the addresses of all the OpenGL functions for us in function pointers. Our job is simply to generate this code and call a single initialization function.
The following resource provides an excellent summary of this concept.
Creating a window - The GLAD section
Read this section from learnopengl.com to understand why OpenGL requires a loader library like GLAD. It clearly explains the runtime nature of OpenGL function loading.
Read the section titled 'GLAD'. Focus on understanding why function locations are not known at compile-time and the role GLAD plays in solving this problem.
Generating and Integrating GLAD Files
Our first step is to generate the custom loader files for our project using the GLAD web service.
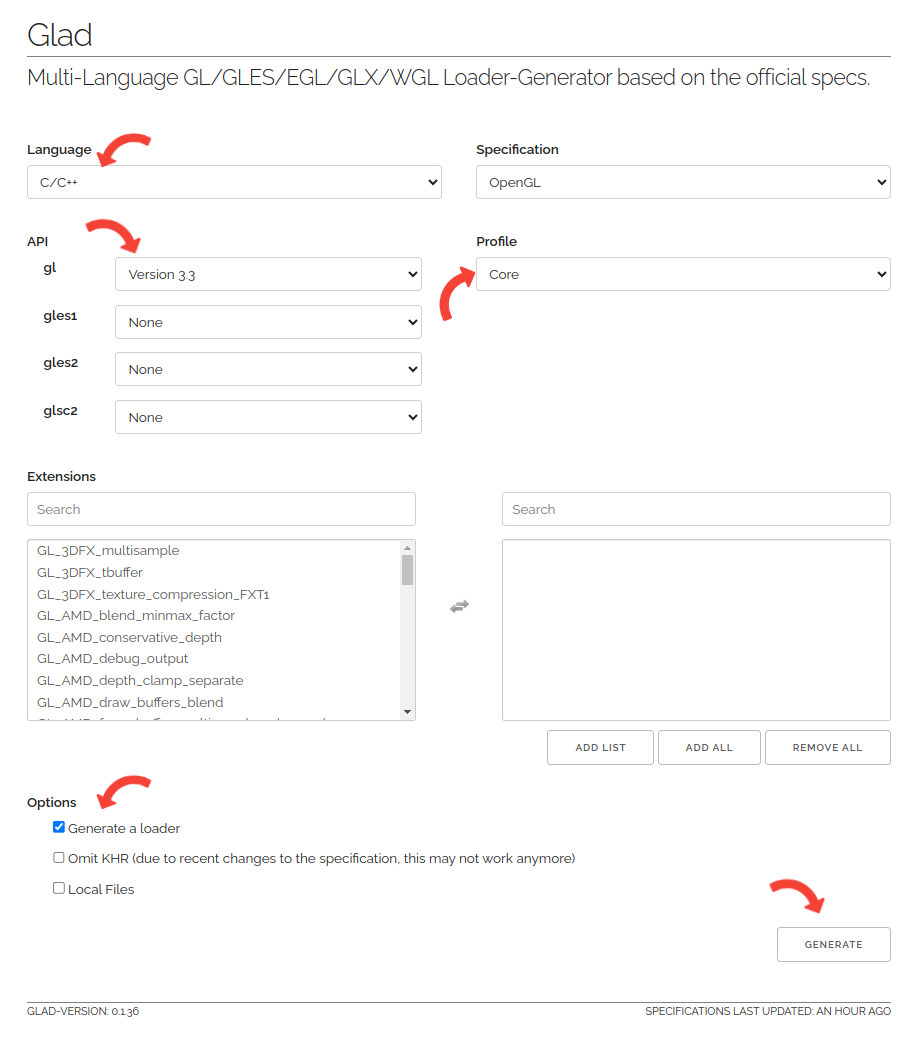
1. Configure and Generate
Go to the GLAD web service. You will need to configure it with the same settings we used for our GLFW window context.
- Language:
C/C++ - Specification:
OpenGL - API
gl:Version 3.3(or higher, but 3.3 matches what we set in our window hints) - Profile:
Core - Options: Ensure
Generate a loaderis checked.
Click Generate. This will produce a .zip file containing your personalized loader.
2. Add Files to Your Project
Download and unzip the file. You will find two main directories: include and src.
-
Copy the
includedirectory: Your unzipped folder contains anincludedirectory with two subdirectories,gladandKHR. Copy this entireincludedirectory into your project's root folder, alongside yourmain.cpp. Your project structure should now look something like this:YourProject/ ├── CMakeLists.txt ├── main.cpp └── include/ ├── KHR/ │ └── khrplatform.h └── glad/ └── glad.h -
Copy the
srcfile: Your unzipped folder also has asrcdirectory containingglad.c. Create a newsrcdirectory in your project's root and copyglad.cinto it.YourProject/ ├── ... └── src/ └── glad.c
3. Update CMake
Now, we must tell CMake to compile glad.c and make the include directory available to our main application.
Open your CMakeLists.txt and make two changes:
- Add
src/glad.cto youradd_executablecommand. - Add
includeto the list of include directories usingtarget_include_directories.
Your CMakeLists.txt should look like this:
cmake_minimum_required(VERSION 3.15)
project(TelemetryEngine)

set(CMAKE_CXX_STANDARD 17)
set(CMAKE_CXX_STANDARD_REQUIRED ON)

# Fetch GLFW
include(FetchContent)
FetchContent_Declare(
  glfw
  GIT_REPOSITORY https://github.com/glfw/glfw.git
  GIT_TAG        3.3.8
)
FetchContent_MakeAvailable(glfw)

# Our executable
add_executable(
    TelemetryEngine
    main.cpp
    src/glad.c  # <-- ADD THIS LINE
)

# Link against GLFW
target_link_libraries(TelemetryEngine PRIVATE glfw)

# Tell our target where to find headers
target_include_directories(
    TelemetryEngine
    PRIVATE
    ${CMAKE_CURRENT_SOURCE_DIR}/include  # <-- ADD THIS LINE
)
After updating your CMakeLists.txt, re-run CMake to regenerate your build files. Your project is now set up to compile and link GLAD.
Initializing GLAD in Your Code
With the files in place, we can now write the C++ code to initialize GLAD. This involves two steps: including the header and calling the loader function.
The official GLFW documentation provides a clear, concise example of how to do this.
GLFW Context Guide - Loading with a loader library
The GLFW documentation has a dedicated section on using extension loaders. It shows the exact code needed to initialize GLAD using a GLFW function.
Read the section 'Loading extension with a loader library'. Pay close attention to the code block showing the call to gladLoadGLLoader and glfwGetProcAddress.
Let's apply this to our main.cpp.
- Include the GLAD header. Crucially, it must be included before the GLFW header.
- After creating the window and making the context current with
glfwMakeContextCurrent(window), callgladLoadGLLoader.
// 1. Include GLAD before GLFW
#include <glad/glad.h>
#include <GLFW/glfw3.h>

// ... inside main(), after glfwMakeContextCurrent(window)

// 2. Initialize GLAD
if (!gladLoadGLLoader((GLADloadproc)glfwGetProcAddress)) {
    std::cerr << "Failed to initialize GLAD" << std::endl;
    glfwTerminate();
    return -1;
}
Let's break down that critical line:
glfwGetProcAddress: This function, provided by GLFW, retrieves the address of an OpenGL function for the current context. It's the OS-agnostic bridge we need.(GLADloadproc): This is a C-style cast.gladLoadGLLoaderexpects a function pointer of a specific type (GLADloadproc), so we castglfwGetProcAddressto match it.gladLoadGLLoader: This is the GLAD function that iterates through all the OpenGL function names, callsglfwGetProcAddressfor each one, and stores the results.
We wrap this call in an if statement to check its return value. If it returns 0 (false), initialization failed, and we should terminate the application.
A Note on Header Conflicts
To prevent potential conflicts where GLFW might include its own, older OpenGL headers, it's best practice to tell GLFW not to do so. We let GLAD handle all OpenGL header inclusion. The Cherno's video demonstrates a clean way to do this using a preprocessor definition.
Modern OpenGL (Glad) | Game Engine series
This clip from The Cherno's series demonstrates the exact GLAD initialization call and also explains a common header conflict issue and how to solve it.
Watch from 11:06 to 15:09. The first part (11:06 - 13:08) shows the gladLoadGLLoader call. The second part (13:08 - 15:09) explains the header conflict and how defining GLFW_INCLUDE_NONE in your build system solves it. We will add this to our CMake file.
To implement this, add the following line to your CMakeLists.txt:
# Add this after target_link_libraries
target_compile_definitions(TelemetryEngine PRIVATE GLFW_INCLUDE_NONE)
This ensures glad.h is the sole authority for including OpenGL headers.
Verification: Your First OpenGL Command
With GLAD initialized, we can finally call modern OpenGL functions! Let's verify our setup by clearing the window to a new color.
Inside your render loop (while loop), add two new function calls:
glClearColor(R, G, B, A): This sets the color that the screen will be cleared to. The values are floats from0.0to1.0.glClear(GL_COLOR_BUFFER_BIT): This command actually performs the clear operation, using the color set byglClearColor.
// Inside the render loop
while (!glfwWindowShouldClose(window)) {
    // Input
    if (glfwGetKey(window, GLFW_KEY_ESCAPE) == GLFW_PRESS) {
        glfwSetWindowShouldClose(window, true);
    }

    // --- Rendering ---
    glClearColor(0.1f, 0.1f, 0.15f, 1.0f); // A dark slate blue
    glClear(GL_COLOR_BUFFER_BIT);

    // Swap buffers and poll for IO events
    glfwSwapBuffers(window);
    glfwPollEvents();
}
Here is your complete main.cpp. Compile and run it. If everything is set up correctly, you should see your window appear with a dark blue background instead of the default black.
#include <iostream>

// GLAD must be included before GLFW
#include <glad/glad.h>
#include <GLFW/glfw3.h>

int main() {
    // Initialize GLFW
    if (!glfwInit()) {
        std::cerr << "Failed to initialize GLFW" << std::endl;
        return -1;
    }

    // Set window hints for OpenGL 3.3 Core Profile
    glfwWindowHint(GLFW_CONTEXT_VERSION_MAJOR, 3);
    glfwWindowHint(GLFW_CONTEXT_VERSION_MINOR, 3);
    glfwWindowHint(GLFW_OPENGL_PROFILE, GLFW_OPENGL_CORE_PROFILE);
#ifdef __APPLE__
    glfwWindowHint(GLFW_OPENGL_FORWARD_COMPAT, GL_TRUE);
#endif

    // Create the window
    GLFWwindow* window = glfwCreateWindow(1280, 720, "Telemetry Engine", NULL, NULL);
    if (window == nullptr) {
        std::cerr << "Failed to create GLFW window" << std::endl;
        glfwTerminate();
        return -1;
    }

    // Make the window's context current
    glfwMakeContextCurrent(window);

    // Initialize GLAD
    if (!gladLoadGLLoader((GLADloadproc)glfwGetProcAddress)) {
        std::cerr << "Failed to initialize GLAD" << std::endl;
        glfwTerminate();
        return -1;
    }

    // The Render Loop
    while (!glfwWindowShouldClose(window)) {
        // Input
        if (glfwGetKey(window, GLFW_KEY_ESCAPE) == GLFW_PRESS) {
            glfwSetWindowShouldClose(window, true);
        }

        // Rendering commands
        glClearColor(0.1f, 0.1f, 0.15f, 1.0f);
        glClear(GL_COLOR_BUFFER_BIT);

        // Swap buffers and poll for IO events
        glfwSwapBuffers(window);
        glfwPollEvents();
    }

    // Cleanup
    glfwDestroyWindow(window);
    glfwTerminate();

    return 0;
}
Test your understanding!
What would happen if you moved the gladLoadGLLoader call to before glfwMakeContextCurrent? Explain why.
Show answer
The application would fail to initialize GLAD, and the error message "Failed to initialize GLAD" would be printed to the console before the program exits.
This is because glfwGetProcAddress requires an active OpenGL context to query function pointers from. If glfwMakeContextCurrent has not been called yet, there is no active context for the current thread, so glfwGetProcAddress cannot find the functions, and GLAD initialization fails.
Conclusion
Excellent work! You have now bridged the gap between your C++ application and the GPU driver. This is a critical milestone that unblocks all future graphics work.
Key Takeaways:
- OpenGL is a specification; a loader library like GLAD is needed to query function addresses from the graphics driver at runtime.
- The GLAD web service generates the necessary C source and header files for a specific OpenGL version and profile.
- GLAD is initialized by calling
gladLoadGLLoaderand passing itglfwGetProcAddress. - This initialization must happen after an OpenGL context is made current with
glfwMakeContextCurrent. - Including
<glad/glad.h>before<GLFW/glfw3.h>and definingGLFW_INCLUDE_NONEprevents header conflicts.
What's Next?
We now have all the foundational pieces in place: a build system, a window, and a fully loaded OpenGL context. We are finally ready to introduce the star of our UI: ImGui. In the next lesson, we will integrate the ImGui library with our window and graphics context, getting us one step closer to rendering our first widgets.