Hello! Welcome to the final lesson of your course on deconstruction and perspective drawing.
Throughout this journey, you've developed a powerful set of skills. You started by mastering lines and basic forms, then moved on to building complex objects like buildings and vehicles in perspective. Most recently, you've applied the analytical Loomis method to deconstruct the human head. Today, we bring everything together in a capstone exercise.
The learning outcome for this lesson is to: Create a simple scene integrating two elements (e.g., a person and a vehicle) while maintaining consistent perspective and scale.
This is where deconstruction leads to synthesis. The challenge is no longer just about drawing a single object correctly, but about making multiple, different objects look like they logically exist in the same 3D space.
1. The Foundation: A Unified Perspective System
The first and most important rule for creating a believable scene is that every object must obey the same perspective system. This means all elements share a single horizon line (your eye level) and a consistent set of vanishing points.
The key to managing complexity is to establish a reference object, often called a "key figure." This object, typically a person, sets the scale for everything else in the scene. Once you place this key figure, you can use its size to measure and place all other elements.
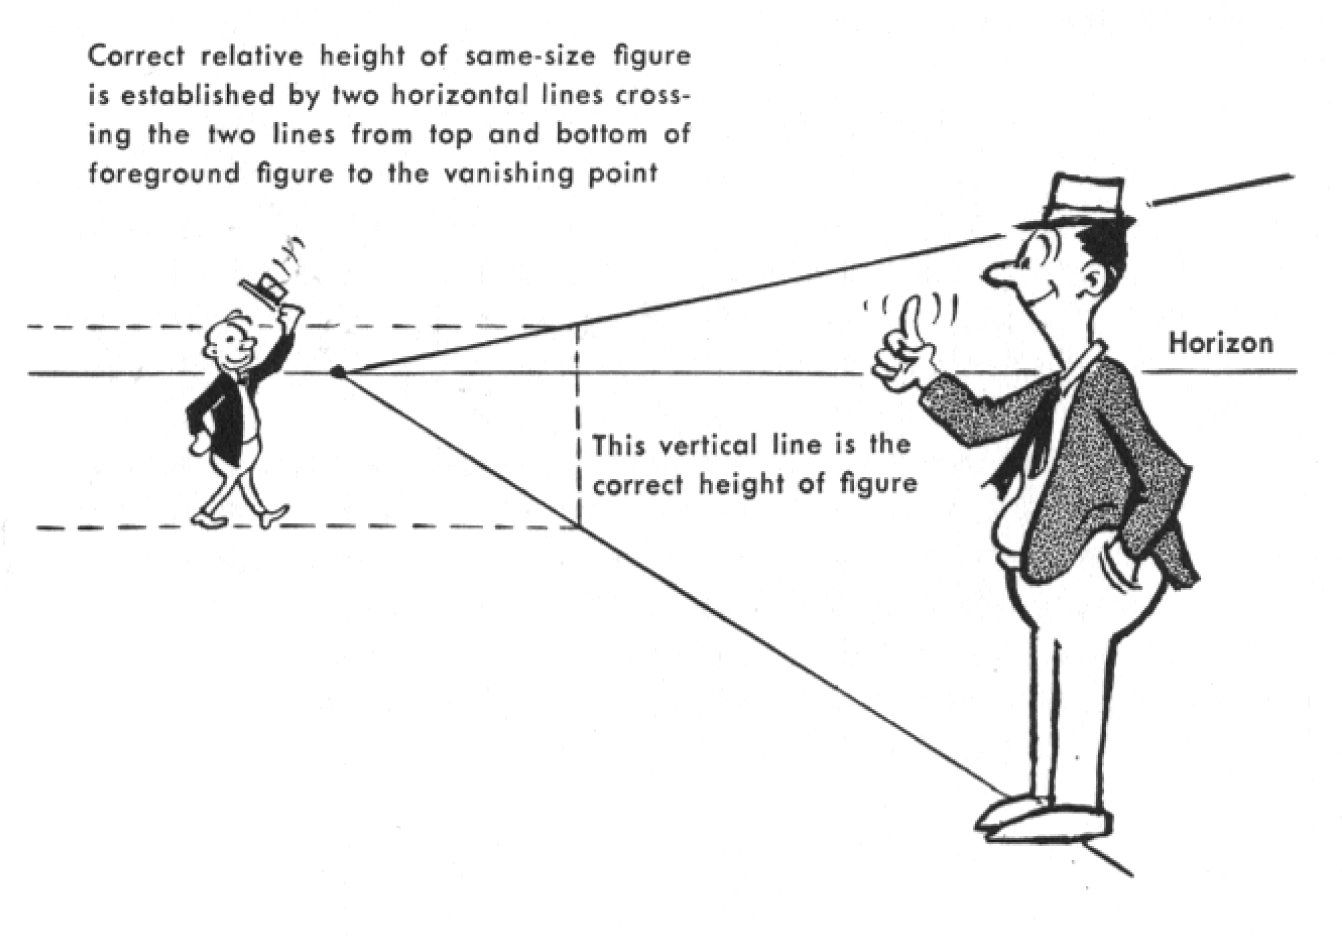
The most fundamental way to do this is by projecting an object's size into the distance using construction lines.
To build on this, let's review the principles of placing multiple objects in space.
Tips on How to Draw People in Perspective Part 1 | Multiple Figures
Let's watch a concise explanation from Alphonso Dunn on the core principles of placing multiple objects in a scene. He introduces the idea of using a reference unit and thinking about foreground, middle ground, and background planes.
Watch from 01:08 to 06:51. Focus on how he uses a simple 'three heads high' figure as a consistent unit of measurement and how the size of this unit changes as it moves into different 'planes' of the drawing (foreground, middle ground, background).
2. Techniques for Scaling and Placing Objects
With the core principle established, let's look at two practical techniques for placing objects in your scene.
Method 1: Transferring Scale with Vanishing Points
This is the more formal construction method. Once you place your key figure, you can move it or duplicate it anywhere on the same ground plane while maintaining correct scale.
- To move an object further away or closer, use guidelines that converge to a vanishing point on the horizon.
- To move an object sideways (without changing its distance from the viewer), simply slide it horizontally, keeping its height the same.
This next video demonstrates these transfers in detail.
Tips on How to Draw People in Perspective Part 1 | Multiple Figures
Alphonso Dunn provides an excellent demonstration of these techniques. He shows how to take one reference figure and move it anywhere in the scene—closer, further, left, right, up, or down—while maintaining correct scale.
Watch the section from 08:20 to 14:30. You don't need to memorize every single step, but focus on the core ideas: using lines to the vanishing point to move an object back, and using horizontal lines to move it sideways.
Method 2: "Hanging" Objects on the Horizon Line
This is a more intuitive and often faster method, especially useful for figures. The key idea is that the horizon line represents the viewer's eye level everywhere in the scene.
If your scene is viewed from the height of a standing adult, the horizon line will intersect all other standing adults of similar height at roughly the same point on their bodies (e.g., their eyes or neck). This gives you an immediate visual check for whether your figures are scaled correctly relative to one another.
This technique is explained very clearly in the following article.
Drawing Figures In Perspective
The article 'Drawing Figures In Perspective' from How to Draw Comics Academy has a great section that explains this 'hanging' technique. It's a very practical shortcut for placing figures.
Read the two sections titled 'Hanging Figures on the Horizon: Part 1' and 'Part 2'. Pay attention to the beach volleyball scene illustration and how the horizon line intersects different figures depending on their height and posture (standing vs. sitting).
Test your understanding!
You're drawing a street scene with a horizon line in the middle of the frame. You draw two people standing on the sidewalk at different distances from the viewer. If they are the same height in real life, where should the horizon line pass through both of them?
Show answer
The horizon line should pass through both figures at the same point on their bodies (for example, across their eyes or shoulders). The figure further away will appear smaller overall, but their eyes will still align with the horizon line, just like the closer figure.
3. Integrating Different Types of Objects
Now for the main event: combining objects of different types, like a person and a car. The logic is the same. Use your key figure to establish scale.
- Place your key figure (e.g., a person).
- Observe the relative scale in your references. For instance, is the car's roof at the person's shoulder height? Is the car about three "body lengths" long?
- Block in the second object (the car) as a simple box, using the person as your measuring stick. Make sure this new box follows the same perspective grid as your figure and environment.
This short clip demonstrates exactly this process of using figures to scale other elements in a street scene.
How to draw roads, buildings, cars, and people with single vanishing point perspective
Let's see how to apply this to a scene with different types of objects. Joe Cartwright's video on drawing street scenes shows how to use a figure to establish the scale for buildings and cars.
First, watch from 06:52 to 08:03 to see how he places figures relative to the eye level. Then, watch from 10:14 to 12:07, where he blocks in cars as simple boxes, making sure their height relates correctly to the figures and the horizon.
Final Exercise: Create Your Integrated Scene (25 minutes)
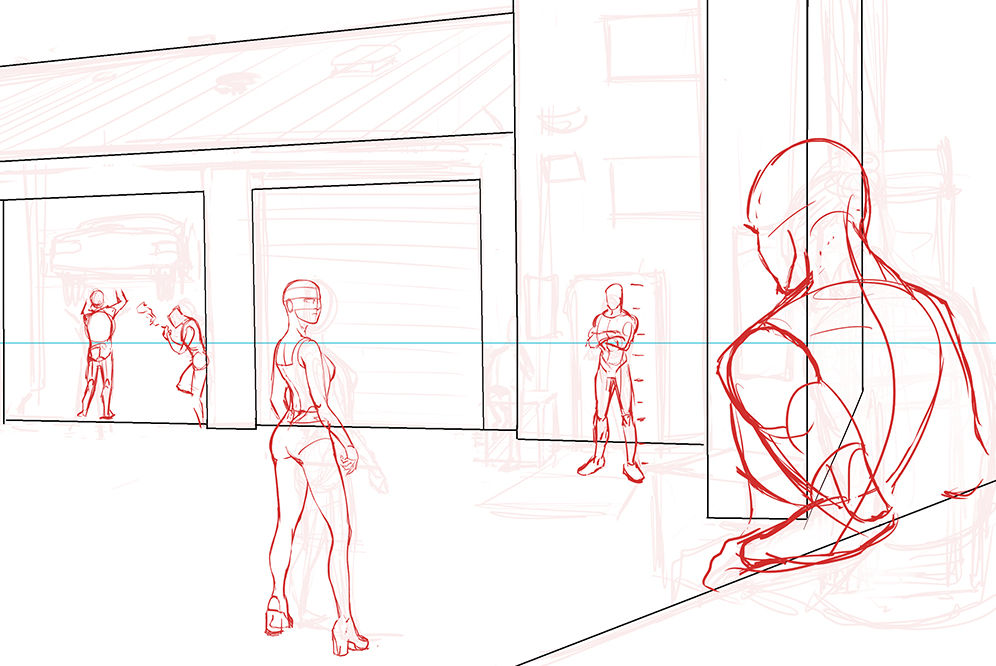
It's time to apply everything you've learned. Your task is to create a simple wireframe construction drawing that integrates at least two major elements you have studied (e.g., a person and a vehicle, a person and a building, a vehicle in front of a building).
Follow this systematic process:
-
Set the Stage:
- Decide on your elements and find some simple reference images for them.
- Establish your scene's perspective. A simple one or two-point perspective setup is perfect. Draw your horizon line.
-
Place Your Key Figure:
- Lightly sketch in your main environment, like a ground plane and a back wall.
- Draw your "key figure" (e.g., a person) using the construction methods you've learned (simple mannequin or Loomis head on a body). The size and position of this figure will define the scale for the entire scene.
-
Place the Second Element:
- Use your key figure as a measuring stick to determine the size of your second object (e.g., a car).
- Block in this second object as a simple primitive form (a box for a car, a large rectangle for a wall). Ensure its perspective lines converge to the same vanishing points.
-
Refine the Construction:
- Once the main forms are placed and scaled correctly, you can add more construction details. Subdivide the box of the car to find the wheels and windows. Refine the human figure's pose. Add a door or window to the background wall.
- Your goal is a clean wireframe construction drawing. Keep all your guidelines visible to show how the elements relate to each other in 3D space.
Conclusion and Course Wrap-Up
Congratulations on completing the final lesson, and the entire course! You've successfully navigated the path from drawing a single line to constructing a complete, multi-element scene in perspective.
Key Takeaways from Today:
- All objects in a scene must share a unified perspective system (one horizon line and a consistent set of vanishing points).
- Use a "key figure" or reference object to establish the scale for all other elements.
- The "hanging on the horizon" technique is a quick and effective way to scale figures relative to each other.
- The process of creating a scene is systematic: set up the perspective, place the key figure, scale and add other objects, and then refine the construction.
You began this course with the goal of learning to deconstruct any reference into simple shapes on a 2D plane. You have built that skill from the ground up, developing a "way of seeing" that allows you to understand the 3D structure underlying the world around you. This structural thinking is the foundation of drawing, and you now have a solid framework to build upon.
Keep practicing, keep observing, and keep drawing. The principles you've learned are universal and will serve you in drawing any subject you choose. Well done.