Hello! Welcome to the second lesson in our course.
In our first lesson, we focused on the physical mechanics of drawing, training your arm to create confident straight lines and smooth ellipses. You learned to use your whole arm, to "ghost" your movements, and to build up marks with intention. Now, we'll put those raw skills to use.
Today's learning outcome is to construct basic 2D geometric shapes (squares, rectangles, triangles) with accurate proportions. These shapes are the essential alphabet of drawing. Every complex object you want to deconstruct—a building, a car, even a human head—can be simplified into an arrangement of these basic forms. Mastering their construction with accuracy is the critical next step toward building convincing wireframes on a 2D plane.
Understanding Proportions
Before we start drawing, let's clarify what "accurate proportions" means. It's not about measuring things with a ruler; it's about capturing the relationship between different parts of an object. Is this side twice as long as that side? Is this angle 90 degrees? Is that line halfway down the shape?
Your brain is actually great at spotting when proportions are wrong, but it can be surprisingly difficult to get them right from the start. The key is to stop trying to draw the whole shape at once and instead focus on finding simple, verifiable relationships.
Drawing 101: How to Draw Proportions
To get a solid grasp of this concept, let's read an article from artist and author Monika Zagrobelna. It does an excellent job of explaining what proportions are and how to start seeing them in a reference.
Please read the first two main sections of the article: Start at the beginning with 'What Are Proportions?' Continue through the section 'How to See Proportions'. Focus on the core idea: breaking a complex shape down by looking for simple, easy-to-copy relationships like equal lengths (1:1), halves, thirds, and common angles (90°, 45°).
The main takeaway is to think like a detective. Instead of being overwhelmed by a complex shape, look for simple clues: squares, equal divisions, and right angles. These will be your anchors for building the rest of the drawing accurately.
Constructing Squares and Rectangles
Squares and rectangles are the bedrock of man-made objects. From buildings and windows to phones and books, they are everywhere. Your skill in drawing confident, parallel straight lines from the last lesson is about to be put to the test.
HOW TO DRAW - Basic Shapes UNLOCK EVERYTHING!
Let's start with a quick, energetic look at why these basic shapes are so important. This video highlights their role as the foundation for more complex art.
Watch the short segment from 02:27 to 03:06. The presenter discusses how squares and rectangles form the backbone of architecture and everyday objects.
Now for the "how." A reliable method for constructing a square is to build it from parallel lines.

To practice this, try the following:
- Draw a horizontal line using a single, confident stroke.
- Use your pencil to measure its length (hold the pencil out, align the tip with one end, and pinch your thumb at the other end).
- Use that measurement to mark the length of a second parallel line below it.
- Connect the endpoints. Does it look like a perfect square? If not, identify which lines or angles are off and try again.
Your background in programming may give you an appreciation for this kind of procedural construction. You're not just guessing; you're following an algorithm to arrive at the desired result.
Test your understanding!
You've drawn a four-sided shape that you intended to be a square. You suspect its proportions are off. Besides just looking at it, what's a simple construction you can add to your drawing to definitively check if the sides are equal and the angles are 90 degrees? (Hint: Think about the properties of a square's diagonals).
Show answer
Draw two diagonal lines connecting the opposite corners (the "X-method"). In a perfect square, the diagonals will be of equal length and will intersect at the exact center of the shape. If one diagonal is longer than the other, you've likely drawn a rectangle or a trapezoid.
Constructing Triangles
Triangles are just as fundamental, appearing as structural elements, roofs, and simplified curves. The main challenge is often maintaining symmetry.
Drawing Simple Shapes: Your Guide to Circles, Triangles ...
This article provides a straightforward method for checking the symmetry of a triangle.
Read the section titled 'Drawing Triangles'. Pay close attention to the 'The Symmetry Check Method'. This involves drawing a perpendicular line from the top point (apex) to the base to ensure the two halves are equal.
Try drawing a few triangles using this method:
- Draw the base.
- Mark the center of the base.
- Draw a light, vertical guideline straight up from the center.
- Choose a point on that guideline for your apex.
- Connect the apex to the ends of the base. This ensures you have a perfectly symmetrical (isosceles) triangle.
Practice Drills: Building Accuracy
Knowing the methods is one thing; building the hand-eye coordination to execute them is another. The following exercises are designed to train your proportional judgment.
Drill 1: Flattening Planes
This is a fantastic exercise for practicing your shapes while also beginning to think about how they exist in 3D space—a perfect bridge to our upcoming lessons.
25 Essential Drawing Exercises: Unlock your Imagination
This video demonstrates an exercise called 'Flattening Planes.' It involves drawing a series of squares or circles that appear to rotate in space.
Watch the segment from 01:16 to 01:53. The goal is to draw a sequence of shapes, starting from a flat line (the shape seen edge-on), opening up to a full square, and then flattening back to a line. Try this with squares first. It will test your ability to control proportions as the shape changes.
Spend some time filling a page with these rotating squares. Notice how you have to constantly judge the changing proportions. This is exactly the kind of active-seeing you need to develop.
Drill 2: Shape Copying
Now for a direct test of your proportion-copying skills. This exercise is like a visual game of "Simon Says."
Drawing 101: How to Draw Proportions
Remember the first article we read? It comes with a set of practical exercises to train your proportional eye. This is your main practice for the lesson.
Scroll down to the 'Exercises' section at the end of the article. Download the exercise sheet (it's a link right above the image). Open it in a simple drawing program or print it out. Follow the instructions: Look at a shape, then hide it and try to draw it from memory with the correct proportions. Check your attempt against the original, note the errors, and try again. Work your way through a few of the shapes.
This exercise is incredibly effective because it forces you into a tight loop of observing, drawing, and self-correcting.
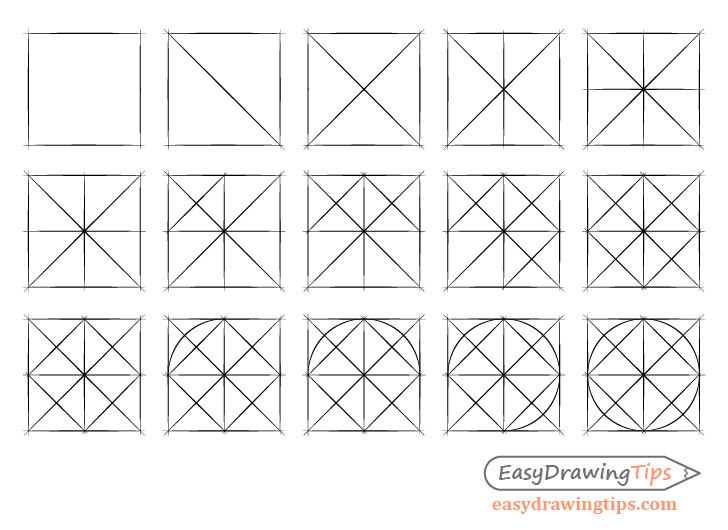
For an additional, more advanced challenge, you can try the exercise shown in the image below. It combines the line and ellipse skills from the last lesson with the proportional division we've discussed today.
Conclusion
Excellent work. You've moved from making simple marks to using them to construct the fundamental building blocks of the drawing world.
Here are your key takeaways from this lesson:
- Proportion is about relationships: Focus on how parts of a shape relate to each other (e.g., same length, half the length).
- Build shapes systematically: Use construction lines, like parallel lines for squares and symmetry lines for triangles, to ensure accuracy.
- Practice with purpose: Drills like "Flattening Planes" and shape copying actively train your eye to see and replicate proportions correctly.
- Sketch lightly: All construction should be done with light lines, allowing you to refine and correct as you go, only darkening the final lines.
In our next lesson, we will take these flat, 2D shapes and give them form and volume. You will learn to construct 3D primitive forms: cubes, cylinders, spheres, and cones. This is where your goal of creating "wireframe 3D models on a 2D plane" truly begins to take shape.