Hello! Welcome back to our module on manipulating forms in 3D space.
In the last lesson, we introduced the fundamental concepts of rotation—pitch, yaw, and roll. You learned an intuitive method for practicing these rotations using a "long lens" or parallel projection, and we established a crucial rule of perspective: rotating an object causes its vanishing points to move.
Today, we're going to build on that foundation and move from an intuitive feel to a more systematic approach. Our goal is to apply pitch (tilt), yaw (turn), and roll to rotate a box in perspective. You'll learn how to control these rotations by manipulating your perspective setup, a key skill that you specifically wanted to master. This will give you a powerful method for drawing an object from any angle you choose.
Let's start with a quick visual recap of the three rotations.
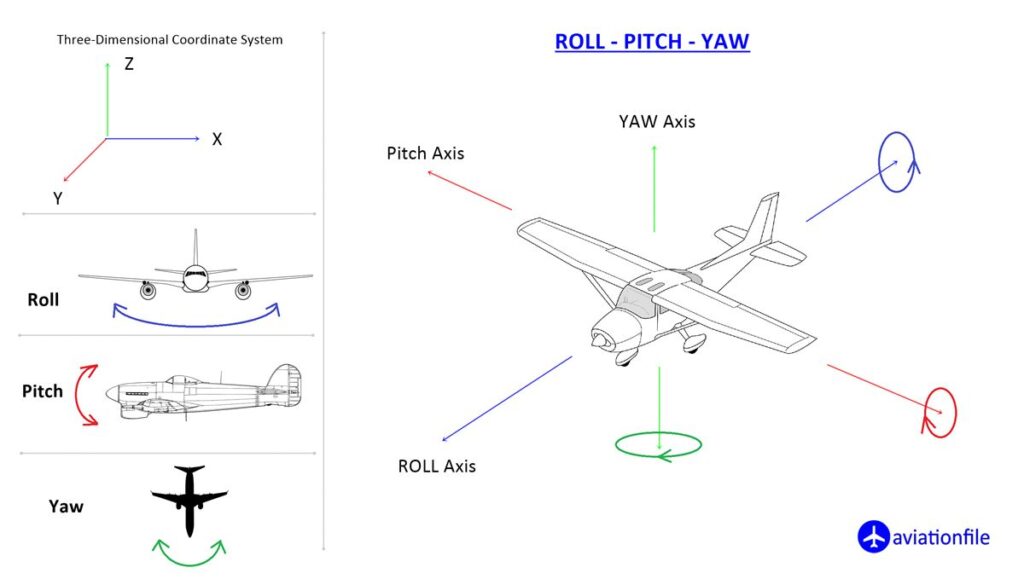
1. How Rotations Create Perspective
In your graphics programming experience, you know that rotations are defined by transforms around axes. In drawing, these rotations are what create the different types of perspective we see. A simple shift in an object's orientation relative to the viewer can change a scene from one-point to three-point perspective.
Let's read a short but very insightful explanation of this relationship.
The following text from the article 'Chapter 3. Perspective' perfectly explains how pitch, yaw, and roll relate to 1, 2, and 3-point perspective. This provides the 'why' behind the drawing techniques we'll cover.
Please read the first paragraph of the section that begins with 'Okay, it has finally come to this...'. It uses the analogy of an airplane pilot to define roll, pitch, and yaw and directly connects these movements to shifts between perspective systems.
To summarize the key idea from that text:
- A box facing us directly is in 1-point perspective.
- Applying any single rotation (a turn, a tilt, or a roll) will generally move the box into 2-point perspective relative to you.
- Applying any two rotations (like turning and tilting it) will move the box into 3-point perspective.
Understanding this is the first step to gaining control. When you want to draw a rotated object, you are essentially deciding which perspective system to place it in.
2. Controlling Yaw (Turn) in Perspective
Yaw is the most common rotation we draw—a car turning, a head shaking "no." It involves rotation around the vertical (Y) axis. In our last lesson, you saw the "Wheel of Fortune" analogy. Let's formalize that.
When you apply Yaw to an object in 2-point perspective, its two vanishing points slide along the horizon line.
Let's watch a brief segment that visualizes this concept perfectly.
How to Rotate a Box in Perspective
This clip from the video 'How to Rotate a Box in Perspective' by dr. Draw demonstrates how vanishing points move along the horizon line during a rotation.
Watch from 03:22 to 04:30. Focus on the 'Wheel of Fortune' analogy and how the vanishing points for the rotated box (Box B) are in different locations on the horizon line than the original box (Box A).
Practice Exercise 1: Drawing Yaw (15 mins)
Let's put this into practice.
- On a sheet of paper, draw a horizon line.
- Place two vanishing points (VP1, VP2) on it and draw a simple box in 2-point perspective.
- Now, imagine you want to show that box turning slightly to the right. To do this, create a new pair of vanishing points. Slide VP1 a bit to the right (let's call it VP1') and slide VP2 a bit to the right (VP2'). The distance between them should stay roughly the same for now.
- Using these new points (VP1' and VP2'), draw a second box next to the first one.
You should see that the second box appears rotated relative to the first. It's not just a box further down the road; its orientation in space has changed. This is because its lines converge to different points.
Test your understanding!
If you draw two boxes that both use the exact same two vanishing points on the horizon line, are they rotated relative to each other?
Show answer
No. They are aligned to the same grid. They might be in different locations (one might be closer, one farther), but they have the same orientation in space. To show rotation (yaw), you must use different vanishing points.
3. Controlling Pitch (Tilt) and Roll
What about the other rotations? We can use a similar logic by understanding which way the vanishing points move. The video you just watched contained a crucial clue: the axis of rotation is always perpendicular to the line on which the vanishing points move.
Pitch (Tilt): Rotation around the Horizontal Axis
- Axis of Rotation: Horizontal (side-to-side, or X-axis).
- VP Movement: The vanishing points must move along a line perpendicular to this, which is a vertical line.
- How to Draw it: When you tilt a box up or down, you are introducing a third vanishing point (VP3) on a vertical line, either above or below your object. This moves the box into 3-point perspective.
- Tilting Up (Pitch Up): Your viewpoint is low, so the vertical lines converge downwards to a VP3 below the horizon. This is a "worm's eye" view.
- Tilting Down (Pitch Down): Your viewpoint is high, so the vertical lines converge upwards to a VP3 above the horizon. This is a "bird's eye" view.
You've already done this! In the last module, when you drew in 3-point perspective, you were essentially drawing objects with pitch.
Roll: Rotation around the Depth Axis
- Axis of Rotation: Depth (front-to-back, or Z-axis).
- VP Movement: The line the VPs move on must be perpendicular to the depth axis. Imagine a plane slicing through your field of vision, like a pane of glass. When you roll an object, its VPs move along a tilted line on that plane.
- How to Draw it: The simplest way to achieve a roll is to tilt your entire perspective setup.
- Draw your horizon line at an angle.
- Place your two vanishing points on this tilted line.
- Draw the box's "verticals" perpendicular to your tilted horizon line.
The entire drawing will have a canted, dynamic angle, indicating a roll.
4. Putting It All Together
You now have a systematic method for all three rotations:
- Yaw (Turn): Slide VPs along the horizontal line.
- Pitch (Tilt): Add a third VP on a vertical line.
- Roll: Tilt the entire horizon line and its VPs.
Look at the image below. This is a great example of combining Yaw and Pitch. Each column (A, B, C, D) represents an increasing amount of Yaw. Each row (1, 2, 3, 4) represents an increasing amount of Pitch.

Practice Exercise 2: The Three Rotations (20 mins)
This is your main exercise for the lesson.
- Start by drawing a simple, "neutral" box in 2-point perspective in the middle of your page.
- Draw a Yaw: To one side of the neutral box, draw another box that is yawed (turned). Do this by shifting your VPs along the horizon line.
- Draw a Pitch: Above or below the neutral box, draw another box that is pitched (tilted). Do this by keeping your horizontal VPs but adding a third VP above or below the box to make the verticals converge.
- Draw a Roll: To the other side, draw a box that is rolled. Do this by tilting your horizon line and constructing the box within that tilted system.
Focus on applying the specific method for each rotation. Your page should end up with four boxes: the original, one turned, one tilted, and one rolled.
Conclusion
Congratulations! You've just learned the systematic "how-to" for rotating an object in perspective. Instead of relying purely on intuition, you now have a concrete set of rules for manipulating vanishing points to achieve a desired rotation.
Key Takeaways:
- Rotations in drawing are controlled by systematically moving the vanishing points.
- Yaw (turn) is achieved by sliding the two VPs along the horizon line.
- Pitch (tilt) is achieved by introducing a third VP on a vertical axis, effectively creating a 3-point perspective view.
- Roll is achieved by tilting the entire perspective grid—the horizon line and its vanishing points.
- Combining these rotations is what allows you to construct a form from any viewpoint imaginable.
Next Lesson:
Now that you have firm control over rotating a single form, we're ready for the next step: building complex objects. In the next lesson, we will learn how to construct compound forms by attaching, intersecting, and subtracting primitive shapes in perspective. This is where your deconstruction skills will truly begin to take shape, as we learn to build up complex structures from simple, rotated boxes and cylinders.