Hello! Welcome to your first lesson in the "Learn Kotlin Syntax" course.
Given your extensive experience as a Java Backend Engineer, you'll find that many concepts in Kotlin feel familiar, especially within the IntelliJ IDEA environment you already know well. This course is designed to bridge your existing expertise to Kotlin, focusing on its unique syntax and idiomatic practices.
Today, we'll start with the fundamentals. The goal for this lesson is to set up a Kotlin project in IntelliJ IDEA and run a 'Hello, World!' program. By the end of this session, you will understand the basic project structure and the role of the main function, which serves as the entry point for a Kotlin application.
Let's get started.
1. Creating Your First Kotlin Project
Your first step is to create a new Kotlin project. While the process is similar to creating a Java project in IntelliJ, there are a few Kotlin-specific options to be aware of.
To guide you through this, I recommend watching the following short video from the official IntelliJ IDEA channel. It provides a clear, visual walkthrough of the entire process, from project creation to running the code.
Creating Your First Kotlin App
This video, 'Creating Your First Kotlin App', will walk you through setting up a new project, writing the code, and running it. It's a concise and practical guide.
Please watch the first minute (00:11 to 01:05) which covers creating the project and selecting a JDK. Pay attention to the choices made in the 'New Project' dialog.
As you set up your own project, here are the key settings to configure in the "New Project" dialog:
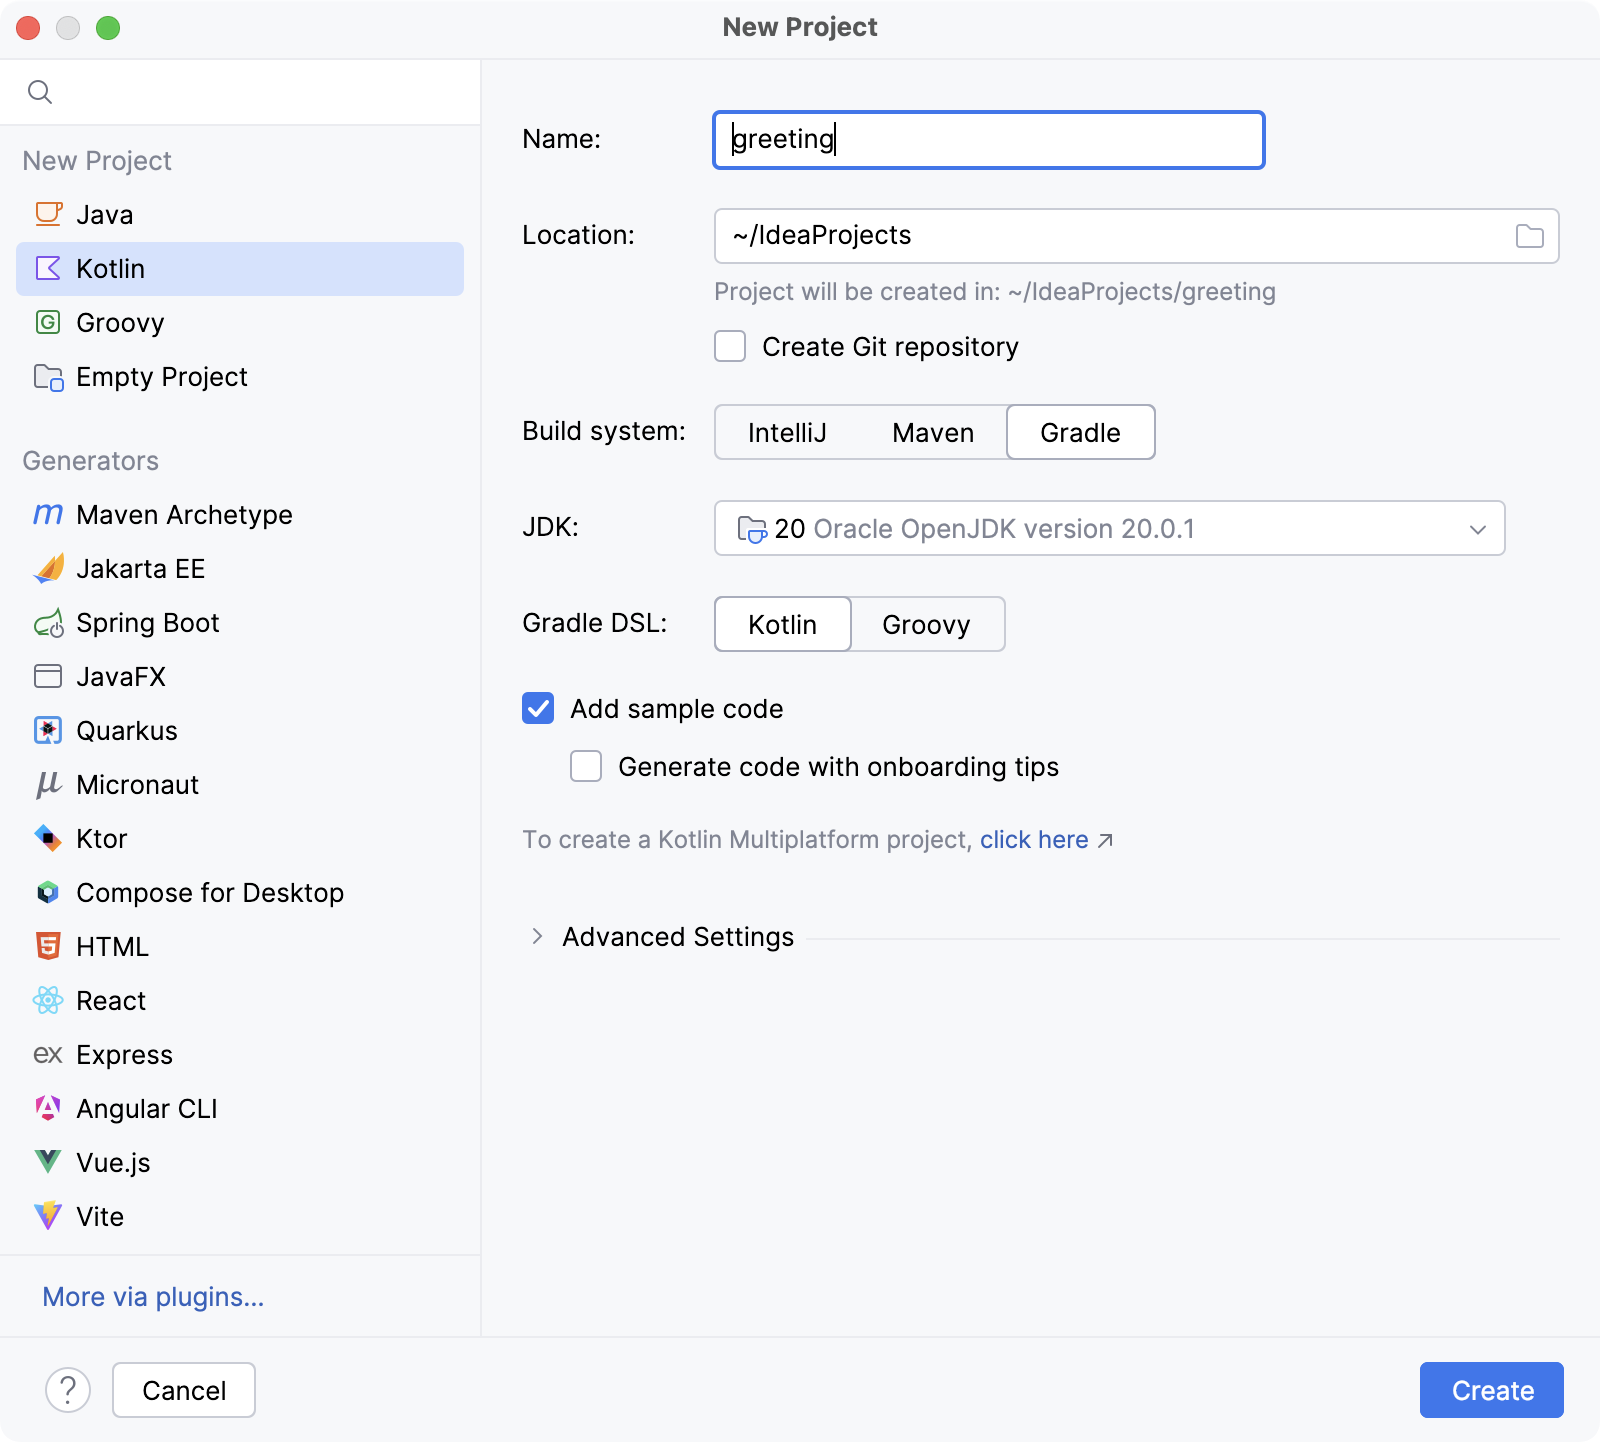
- Name and Location: Give your project a name, for example,
KotlinHelloWorld. - Language: Select
Kotlin. - Build System: You'll see options like IntelliJ, Gradle, and Maven.
- You are already familiar with Maven from your Java work. In the Kotlin ecosystem, Gradle is the more common build tool, and we will use it in later modules when we build Spring Boot applications.
- For this first simple application, select IntelliJ. It's the simplest option and doesn't require configuring any build scripts.
- JDK: Select a JDK version 11 or higher. You can use an existing one or have IntelliJ download a new one for you.
- Sample Code: Check the box for Add sample code. This will automatically generate a simple "Hello, World!" file for you, which is perfect for our goal.
Go ahead and create the project now, following the steps from the video and the guide above.
2. Understanding the Project Structure and main Function
Once IntelliJ has finished setting up, you'll see the project structure in the Project tool window. It should look something like this:
KotlinHelloWorld
├── .idea
└── src
    └── main
        └── kotlin
            └── Main.kt
This structure should feel intuitive. The src/main/kotlin directory is the default location for Kotlin source files, directly analogous to src/main/java in a standard Maven project.
Open the Main.kt file. The .kt extension is used for Kotlin source files. Inside, you'll find the following code, or something very similar:
fun main() {
    println("Hello, World!")
}
This is the entry point of your application. Let's break down how it compares to the Java main method you're used to:
Java (public static void main(String[] args)) |
Kotlin (fun main()) |
|---|---|
| Must be inside a class. | Can be a top-level function; no class is required. |
Declared with the static keyword. |
Top-level functions are accessible in a way that doesn't require a static keyword. |
void indicates no return value. |
The return type Unit (similar to void) is inferred and can be omitted. |
| Semicolons are mandatory at the end of statements. | Semicolons are optional and usually omitted. |
Command-line arguments are passed via String[] args. |
The args: Array<String> parameter is optional if you don't need it. |
The most significant difference is that Kotlin's main can exist outside of a class. This reduces boilerplate for simple applications and scripts.
3. Running Your "Hello, World!" Program
Now, let's run the application. This part will be very familiar.
Creating Your First Kotlin App
Let's return to the video to see how to write and execute the code.
Watch from 01:35 to 03:25. This part demonstrates how to add the println statement (which should already be there if you added sample code) and how to run the application using the gutter icon.
As the video shows, you can run your application by:
- Clicking the green "Run" icon in the gutter next to the
fun main()line. - Selecting "Run 'MainKt'".
IntelliJ will compile and run your code, and you'll see the output in the Run tool window at the bottom of the screen:
Hello, World!

Process finished with exit code 0
Congratulations, you've just run your first Kotlin program!
4. Hands-On Practice
To solidify what you've learned, let's do it once more, but this time without the sample code.
- Create a new Kotlin project in IntelliJ IDEA named
KotlinIntro. - Choose the IntelliJ build system and your preferred JDK.
- Do not check the "Add sample code" box this time.
- After the project is created, right-click the
src/main/kotlindirectory and select New -> Kotlin Class/File. - Choose File and name it
App.kt. - Inside
App.kt, typemainand press Enter. IntelliJ's live template will generate themainfunction for you:fun main() { } - Inside the
mainfunction, add a line to print a custom message:println("Welcome to Kotlin!") - Run the
App.ktfile and verify that your message appears in the Run window.
This exercise confirms you can create, write, and run a basic Kotlin application from scratch.
Conclusion
In this lesson, we accomplished our goal of setting up and running a "Hello, World!" application in Kotlin. You are now familiar with the initial steps of Kotlin development in IntelliJ.
Key Takeaways:
- Creating a Kotlin project in IntelliJ is straightforward, with choices for build systems like IntelliJ, Gradle, and Maven.
- Kotlin source code resides in
src/main/kotlin, similar to Java's structure. - The entry point is a
mainfunction, which can be a top-level function, making it simpler than Java'smainmethod. - You can run a Kotlin application directly from the editor using the gutter icon.
Next Lesson Preview:
Now that you have a working environment, we'll dive into the core syntax. In the next lesson, you will learn how to declare read-only variables using val and mutable variables using var, and see how Kotlin's powerful type inference helps write more concise code.