Welcome to the final lesson of our first module on foundational design principles. So far, we've built a solid toolkit for designing clear and focused software components. We started with coupling and cohesion, then moved through the first four SOLID principles:
- Single Responsibility Principle (SRP): Giving each component one reason to change.
- Open/Closed Principle (OCP): Designing components that are open for extension but closed for modification.
- Liskov Substitution Principle (LSP): Ensuring subtypes are behaviorally substitutable for their base types.
- Interface Segregation Principle (ISP): Creating fine-grained, client-specific interfaces.
Now, we will explore the Dependency Inversion Principle (DIP), the "D" in SOLID. This principle acts as the glue that binds the others together, showing us how to structure our application so that high-level business logic is shielded from the churn of low-level implementation details. By the end of this lesson, you will be able to apply DIP to build remarkably flexible and maintainable systems, a core skill for architecting professional-grade software.
The Problem: When Policy Depends on Details
In a typical, "organically" grown application, the dependency flow is intuitive but problematic. High-level modules, which contain the core logic and business policies, often directly call and depend on low-level modules, which handle implementation details like database access, network communication, or specific third-party library interactions.
This direct dependency creates a rigid architecture. As you know from your experience with computer vision projects, the "details" change often. A new, more accurate detection model is released, a data source format is updated, or you decide to switch from a local file-based cache to a Redis cache. When your high-level policy code is directly coupled to these details, every change in a low-level module risks breaking the high-level one, forcing modifications throughout the system.
The following video discusses this problem in the context of a blogging application, but the core issue is universal.
Dependency Inversion: What, Why & How? | By Example
This video from the "About Clean Code" channel clearly illustrates the negative consequences of violating DIP.
Watch the segment from 02:25 to 03:58. The narrator explains how, in a tightly coupled design, a decision to change a "detail" like the data storage technology or the UI rendering technology creates a severe impact on the high-level, business-critical modules.
This is the exact problem DIP aims to solve. The principle inverts this traditional dependency flow, protecting your core logic from the volatility of implementation details.
Understanding the Dependency Inversion Principle
The Dependency Inversion Principle is formally defined by two key statements.
Dependency Inversion Principle - Omniverse
This article provides a concise definition of DIP and clarifies the roles of high-level and low-level modules.
Read the definition section to understand the two core rules of DIP. Then, read the section "Low Level and High Level Modules" for a clear distinction between the two.
To summarize, DIP states:
- High-level modules should not depend on low-level modules. Both should depend on abstractions.
- Abstractions should not depend on details. Details (concrete implementations) should depend on abstractions.
The key idea is that the high-level module owns the interface. It defines a contract—an abstraction—that specifies what it needs. The low-level module then implements this contract. This "inverts" the dependency: instead of the high-level module depending on the low-level one, the low-level detail now depends on the abstraction defined by the high-level module.

Applying DIP in Python with Abstraction and Injection
Let's see how this works in practice. The process involves two main techniques: defining abstractions and using dependency injection. The ArjanCodes channel has an excellent video that walks through this refactoring step-by-step.
Dependency Inversion: Write BETTER PYTHON CODE Part 2
This video provides a clear, practical demonstration of applying DIP in Python to decouple a power switch from a light bulb.
The Starting Point (02:01 - 02:58): First, observe the initial code. The ElectricPowerSwitch (high-level module) is directly coupled to the LightBulb (low-level module). Creating the Abstraction (02:58 - 04:42): An abstract base class Switchable is created using Python's abc module. This class defines the contract (the turn_on and turn_off methods) that any switchable device must follow. This abstraction is owned by the high-level logic's domain. Implementing the Abstraction (04:42 - 05:54): The LightBulb class is modified to inherit from Switchable, making it a concrete implementation of the abstraction. Inverting the Dependency (05:54 - 07:02): This is the crucial step. The ElectricPowerSwitch is refactored to depend on the Switchable abstraction, not the concrete LightBulb. The concrete object is now "injected" into the switch's constructor. The Payoff (07:02 - 07:57): The flexibility of the new design is demonstrated. The same ElectricPowerSwitch can now control a Fan object—or any other object that implements the Switchable interface—without any modification to the switch itself.
DIP and Dependency Injection (DI)
You'll often hear the terms DIP and DI used together. It's important to distinguish them:
- Dependency Inversion Principle (DIP) is the high-level design principle that high-level modules should depend on abstractions, not concretions.
- Dependency Injection (DI) is a concrete programming pattern that helps implement DIP. It's the act of providing a component with its dependencies from an external source (e.g., via a constructor, a method, or a property) rather than having the component create them itself.
A Computer Vision Example
Let's apply this to a domain closer to your work. Imagine a dataset-handling class for an image processing pipeline.
Dependency Inversion Principle - Omniverse
This article refactors a Python image processing example to adhere to DIP, which should be very relevant to your work.
The Violation: First, examine the code in the section "A Violation of Dependency Inversion Principle". Notice how the high-level CustomDataset module directly instantiates and depends on the low-level ImageClassificationTransforms class. This is tight coupling. If you wanted to use ImageSegmentationTransforms, you would have to modify the CustomDataset class. The Solution: Next, read the section "Correcting the Violation". The code is refactored by: Creating a Transforms abstract base class that defines the required interface. Making ImageClassificationTransforms and ImageSegmentationTransforms implement this interface. Modifying CustomDataset to accept a Transforms object in its constructor (this is dependency injection). DIP vs. DI: Finally, read the brief section "Dependency Inversion Principle and Dependency Injection" to solidify your understanding of the relationship between the two concepts.
The refactored CustomDataset is now completely decoupled from any specific set of transforms. Its policy is to apply transformations, but the detail of which transformations to apply is injected from the outside. This makes the system flexible and extensible. You could introduce ObjectDetectionTransforms or DataAugmentationTransforms and use them with CustomDataset without ever touching its source code.
Applying DIP in an Industrial Vision System
Let's consider the architecture for a textile defect detection system.
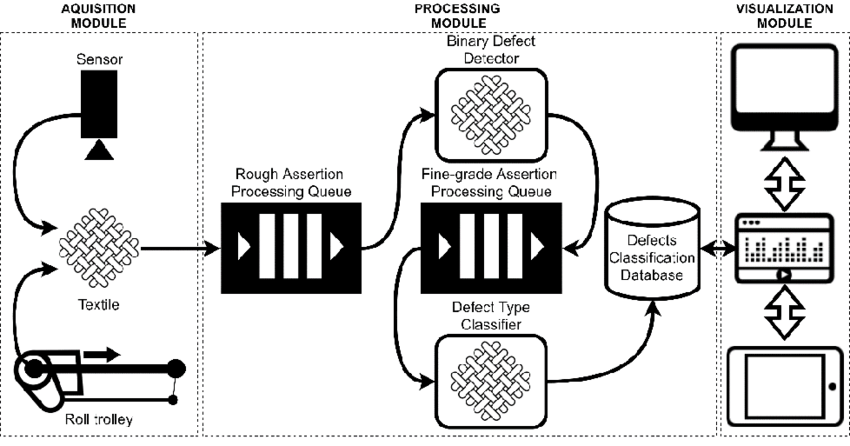
The "Processing Module" is our high-level policy component. Its job is to orchestrate the detection and classification of defects. It uses two lower-level components: a Binary Defect Detector and a Defect Type Classifier.
Without DIP, the code might look like this:
# Low-level details
class BinaryDefectDetector:
    def detect(self, image) -> bool:
        print("Using standard binary detector...")


        # Complex detection logic here
        return True

class DefectTypeClassifier:
    def classify(self, image) -> str:
        print("Using standard pattern classifier...")


        # Complex classification logic here
        return "slub_defect"


# High-level policy
class ProcessingController:
    def __init__(self):


        # Direct dependency on concrete classes!
        self.detector = BinaryDefectDetector()
        self.classifier = DefectTypeClassifier()

    def process_image(self, image):
        print(f"Processing image {image}...")
        if self.detector.detect(image):
            defect_type = self.classifier.classify(image)
            print(f"Defect found: {defect_type}. Storing in database.")
        else:
            print("No defect found.")


# The application's entry point
controller = ProcessingController()
controller.process_image("textile_sample_123.png")
This code is rigid. To test a new ExperimentalNeuralDetector, you would have to modify the ProcessingController's __init__ method.
Applying DIP, we first define the abstractions from the perspective of the ProcessingController:
from typing import Protocol


# Abstractions (owned by the high-level module's domain)
class IDetector(Protocol):
    def detect(self, image) -> bool: ...

class IClassifier(Protocol):
    def classify(self, image) -> str: ...
Here we use typing.Protocol for a more "duck-typed" approach to interfaces, which is common in modern Python.
The ProcessingController is then refactored to depend on these abstractions, with the concrete implementations being injected.
# High-level policy now depends on abstractions
class ProcessingController:
    def __init__(self, detector: IDetector, classifier: IClassifier):
        self.detector = detector
        self.classifier = classifier

    def process_image(self, image):
        print(f"Processing image {image}...")
        if self.detector.detect(image):
            defect_type = self.classifier.classify(image)
            print(f"Defect found: {defect_type}. Storing in database.")
        else:
            print("No defect found.")


# Low-level details now implement the abstractions
class BinaryDefectDetector: # Implicitly implements IDetector
    def detect(self, image) -> bool:
        print("Using standard binary detector...")
        return True

class DefectTypeClassifier: # Implicitly implements IClassifier
    def classify(self, image) -> str:
        print("Using standard pattern classifier...")
        return "slub_defect"

class ExperimentalNeuralDetector: # A new, swappable detail
    def detect(self, image) -> bool:
        print("Using EXPERIMENTAL neural network detector...")
        return True


# The "Composition Root" - where dependencies are assembled
# We can easily swap implementations here!
# standard_detector = BinaryDefectDetector()
experimental_detector = ExperimentalNeuralDetector()
standard_classifier = DefectTypeClassifier()

controller = ProcessingController(detector=experimental_detector, classifier=standard_classifier)
controller.process_image("textile_sample_123.png")
Now, the ProcessingController is stable. We can introduce new detectors or classifiers and compose them at the application's entry point (the "composition root") without ever changing the controller itself.
DIP in Rust with Traits
The Dependency Inversion Principle translates very naturally to Rust, where traits are the primary mechanism for abstraction.
- Abstraction: An abstraction is defined as a
trait. - Dependency Injection: Dependencies implementing a trait can be injected either statically using generics (
impl Trait) or dynamically using trait objects (Box<dyn Trait>).
Let's model the same processing controller in Rust:
// A dummy type for demonstration
struct Image;

// Abstractions (Traits)
trait Detector {
    fn detect(&self, image: &Image) -> bool;
}

trait Classifier {
    fn classify(&self, image: &Image) -> String;
}

// High-level policy using dynamic dispatch via trait objects
struct ProcessingController {
    detector: Box<dyn Detector>,
    classifier: Box<dyn Classifier>,
}

impl ProcessingController {
    fn new(detector: Box<dyn Detector>, classifier: Box<dyn Classifier>) -> Self {
        ProcessingController { detector, classifier }
    }

    fn process_image(&self, image: &Image) {
        println!("Processing image...");
        if self.detector.detect(image) {
            let defect_type = self.classifier.classify(image);
            println!("Defect found: {}. Storing in database.", defect_type);
        } else {
            println!("No defect found.");
        }
    }
}

// Low-level details (concrete implementations)
struct BinaryDefectDetector;
impl Detector for BinaryDefectDetector {
    fn detect(&self, _image: &Image) -> bool {
        println!("Using standard binary detector...");
        true
    }
}

struct DefectTypeClassifier;
impl Classifier for DefectTypeClassifier {
    fn classify(&self, _image: &Image) -> String {
        println!("Using standard pattern classifier...");
        "slub_defect".to_string()
    }
}

fn main() {
    // Composition Root in Rust
    let detector = Box::new(BinaryDefectDetector);
    let classifier = Box::new(DefectTypeClassifier);
    let controller = ProcessingController::new(detector, classifier);

    controller.process_image(&Image);
}
The structure is identical to the Python version. The ProcessingController depends on the Detector and Classifier traits, not on any concrete struct. This allows the assembly of dependencies to happen in main, completely decoupling the high-level logic from the low-level implementations.
Conclusion
The Dependency Inversion Principle is arguably the most critical of the SOLID principles for achieving a truly flexible and maintainable architecture. It fundamentally changes how you structure dependencies, creating a boundary that protects your core business logic from the constant change inherent in implementation details.
Key Takeaways:
- Invert the Dependency: High-level modules should not depend on low-level modules. Instead, low-level modules should depend on abstractions defined and owned by the high-level modules.
- Abstractions are Key: The core of DIP is the abstraction (an ABC/Protocol in Python, a trait in Rust) that serves as the contract between the high-level policy and the low-level detail.
- Dependency Injection is the Mechanism: You implement DIP by injecting dependencies into your components rather than having them create their own.
- The Result: A loosely coupled system where implementation details (like databases, UI frameworks, or specific CV models) can be swapped out with minimal impact on the core application logic.
This lesson concludes our module on foundational design principles. You now have a complete understanding of the SOLID principles, which guide the design of individual components and their relationships. In the next module, Dependency Management and Injection, we will build on this foundation. We will explore how to manage these dependencies at a larger scale, analyze a project's dependency graph, identify and resolve problematic patterns like circular dependencies, and look at more formal dependency injection techniques.