Hello! Welcome to the final lesson in our SwiftUI Animation Essentials module.
In previous lessons, we've covered a lot of ground, from implicit and explicit animations to custom transitions and seamless geometry effects with matchedGeometryEffect. All these techniques focused on animating the built-in properties of views—their size, position, color, and so on.
Today, we're going to take a significant step further and explore one of the most powerful concepts in the SwiftUI animation system. You will learn how to create a data-driven animation by making a custom type conform to the Animatable protocol. This unlocks the ability to teach SwiftUI how to animate your own data structures, moving beyond simple visual properties to animating the very data that drives your UI.
This is a key skill for creating advanced, bespoke visualisations like animated chart data, custom progress indicators, or any UI that needs to smoothly transition based on complex, custom data models.
1. The Problem: When withAnimation Isn't Enough
Let's start with a scenario. Imagine you've created a custom Shape and you want to animate one of its properties. You might intuitively wrap the state change that modifies this property in a withAnimation block, expecting a smooth transition. However, as you'll see, it doesn't work out of the box.
To see this problem in action, watch the beginning of this video from Paul Hudson.
(OLD) Animating simple shapes with animatableData – Drawing SwiftUI Tutorial 8/10
This video, titled 'Animating simple shapes with animatableData', clearly demonstrates why simply changing a custom property within an animation block doesn't produce an animation.
Watch from the start until 03:17. The video first builds a custom Trapezoid shape with an insetAmount property. Pay close attention to what happens when you tap the shape to change this value inside withAnimation. The presenter then explains exactly why the shape jumps instead of animating.
As the video explains, SwiftUI knows how to animate properties like opacity or scale because their underlying data types (Double, CGFloat, CGSize) are known to be "animatable." It can generate the intermediate values between the start and end states. For a custom property on a custom shape, it has no such knowledge. It sees the start state, it sees the end state, and it just jumps.
To fix this, we need to explicitly tell SwiftUI what to animate and how to interpolate it. This is where the Animatable protocol comes in.
2. The Animatable and VectorArithmetic Protocols
At the heart of SwiftUI's animation system are two key protocols: Animatable and VectorArithmetic.
Animatable: A protocol that types can conform to, indicating they have data that can be animated. Its single requirement is a computed property calledanimatableData.VectorArithmetic: A protocol for types that can function as N-dimensional vectors. This means they support addition, subtraction, and scalar multiplication. This is the mathematical foundation that allows SwiftUI to interpolate values. Any type used foranimatableDatamust conform toVectorArithmetic.
Let's get a more formal definition from an Apple engineer.
WWDC23: Explore SwiftUI animation | Apple
This WWDC23 talk, 'Explore SwiftUI animation', provides a concise and authoritative explanation of the Animatable protocol and its relationship with VectorArithmetic.
Watch from 06:33 to 07:45. This segment explains that animatableData must be a 'vector' and clarifies that a vector is essentially a fixed-length list of numbers (CGFloat, CGPoint, etc.) that supports basic vector math.
So, the process is:
- A state change occurs inside a
withAnimationblock. - SwiftUI checks if the view or shape conforms to
Animatable. - If it does, SwiftUI gets the start and end values of its
animatableData. - Because this data conforms to
VectorArithmetic, SwiftUI can calculate all the intermediate values over the animation's duration. - For each intermediate value, SwiftUI sets the
animatableDataproperty, triggering a redraw of the view. This sequence of redraws creates the smooth animation.
3. Conforming a Shape to Animatable
Now let's apply this theory to fix our Trapezoid example. Shape already conforms to Animatable, but its default animatableData is of type EmptyAnimatableData, which does nothing. We need to override it.
Since our insetAmount is a CGFloat, which already conforms to VectorArithmetic, the implementation is straightforward. We just need to expose insetAmount through the animatableData computed property.
struct Trapezoid: Shape {
    var insetAmount: CGFloat

    // The key to the animation!
    var animatableData: CGFloat {
        get { insetAmount }
        set { insetAmount = newValue }
    }

    func path(in rect: CGRect) -> Path {
        var path = Path()
        // ... drawing code that uses insetAmount ...
        path.move(to: CGPoint(x: 0, y: rect.maxY))
        path.addLine(to: CGPoint(x: insetAmount, y: rect.minY))
        path.addLine(to: CGPoint(x: rect.maxX - insetAmount, y: rect.minY))
        path.addLine(to: CGPoint(x: rect.maxX, y: rect.maxY))
        path.addLine(to: CGPoint(x: 0, y: rect.maxY))
        return path
    }
}
With this change, when insetAmount is animated from 10 to 90, SwiftUI will:
- Read the start value (10) and end value (90) from
animatableData. - Generate intermediate values (e.g., 11, 12, ... 90).
- Repeatedly call the
setonanimatableDatawith these values, which updates ourinsetAmount. - Call
path(in:)for each update, redrawing the shape and creating the animation.
Let's see this in practice.
(OLD) Animating simple shapes with animatableData – Drawing SwiftUI Tutorial 8/10
Continuing with the same video from Paul Hudson, watch how adding the animatableData property makes the Trapezoid animate smoothly.
Watch from 03:17 to 05:03. This section shows the exact code and explains how SwiftUI now uses this property to drive the animation frame by frame.
The SwiftUI-Lab article "Advanced SwiftUI Animations" provides another great example, animating the number of sides of a polygon.
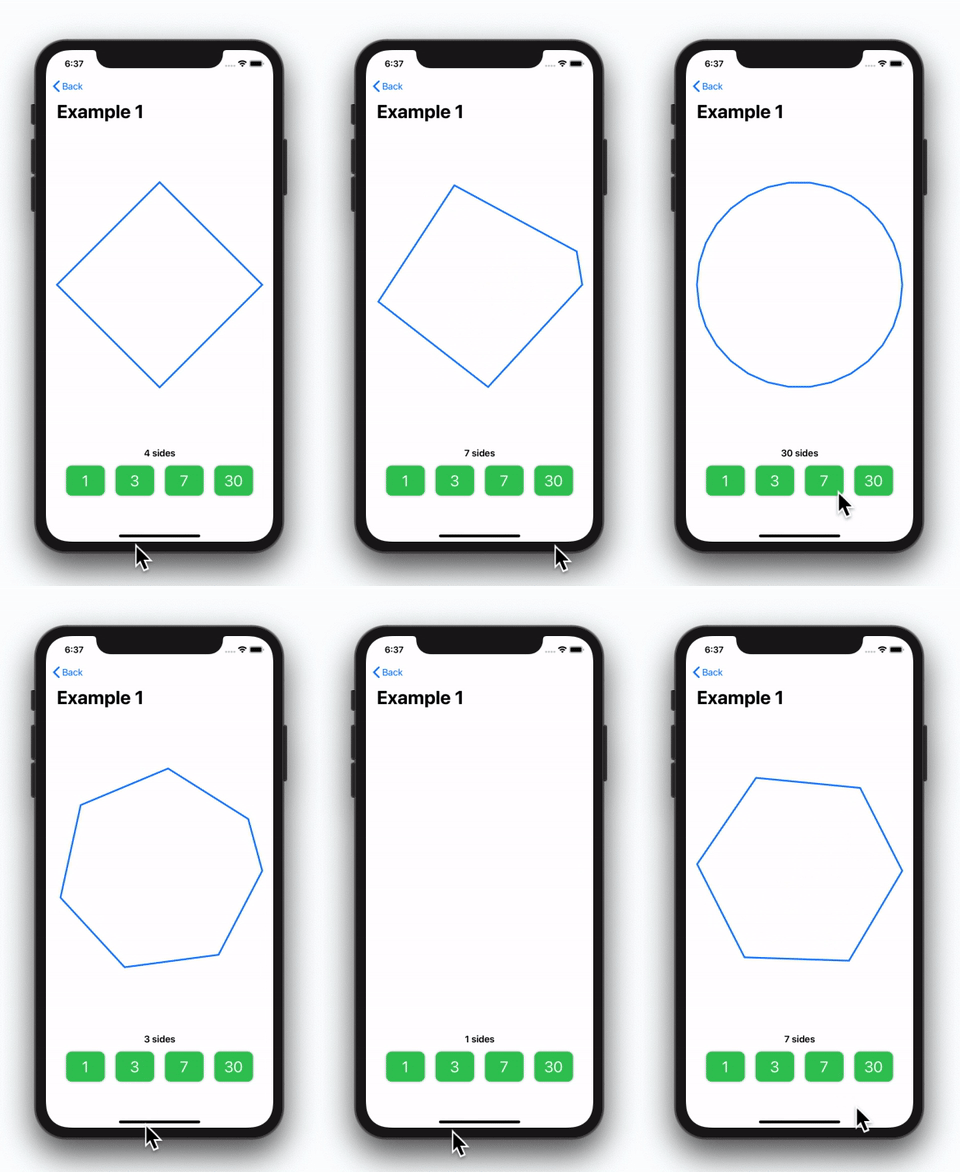
4. Animating Custom Data Types with VectorArithmetic
So far, we've only animated a single CGFloat. What if we want to animate a more complex, custom data type?
- Multiple Properties: To animate two properties, you can use
AnimatablePair<First, Second>, whereFirstandSecondare types conforming toVectorArithmetic. You can even nestAnimatablePairto handle more than two properties. - Fully Custom Types: For the ultimate flexibility, you can make your own
structconform toVectorArithmetic. This is how you create truly data-driven animations.
To conform a type to VectorArithmetic, you need to implement several requirements that define how your type behaves in vector operations:
static var zero: Self: A static property representing the "zero" or "identity" state of your type.static func + (Self, Self) -> Self: Defines addition.static func - (Self, Self) -> Self: Defines subtraction.mutating func scale(by: Double): Defines how to multiply your type by a scalar (aDouble).var magnitudeSquared: Double: The squared length of the vector. Used by the animation system for calculations.
The following reading provides an excellent, in-depth walkthrough of creating a custom ClockTime struct and making it conform to VectorArithmetic to drive a clock animation.
Advanced SwiftUI Animations - Part 1: Paths
This article, 'Advanced SwiftUI Animations - Part 1: Paths', is the most comprehensive resource for this topic. We'll focus on the section where it makes a custom ClockTime type animatable.
Read the section titled 'Making Your Own Type Animatable (with VectorArithmetic)'. Study how the ClockTime struct is defined and then how it's made to conform to VectorArithmetic. The key insight is that it performs all the math operations by converting the time to a single Double (total seconds), and then converts it back.
This ClockTime example is a perfect illustration of the power of this technique. By conforming ClockTime to VectorArithmetic, you teach SwiftUI the physics of how time "moves." When you animate from ClockTime(9, 51, 15) to ClockTime(9, 55, 00), SwiftUI can now generate all the intermediate ClockTime values, allowing the clock hands to move smoothly and correctly to their new positions.
This isn't limited to Shapes. Any View can conform to Animatable. Doing so gives you fine-grained control over layout or drawing, but it comes with a performance consideration: the view's body will be re-evaluated on every single frame of the animation, which can be expensive. It's a powerful tool, but use it when built-in modifiers can't achieve your desired effect.
Conclusion
You've now reached the deepest level of the SwiftUI animation framework. By understanding and using the Animatable and VectorArithmetic protocols, you can move beyond animating simple view properties and start creating animations driven directly by your app's custom data models.
Key Takeaways:
- SwiftUI can only animate properties whose data types it knows how to interpolate.
- To make a custom property animatable, the view or shape must conform to the
Animatableprotocol. - The
animatableDatacomputed property bridges your custom property to the animation system. - The type of
animatableDatamust conform toVectorArithmetic, which provides the mathematical rules for interpolation (addition, scaling). - For simple types, you can use
CGFloatorDouble. For multiple properties, useAnimatablePair. - For complex custom types (e.g., a data point in a chart), you can conform the type itself to
VectorArithmetic, giving SwiftUI the "recipe" to animate it.
Preview of the Next Module:
This lesson concludes our deep dive into animations. We've covered the essentials for building professional, fluid UIs in SwiftUI. Now, we are going to pivot to another pillar of professional iOS development: testing. In the next module, we will start from the ground up, learning how to write effective, isolated unit tests for your business logic using the Arrange-Act-Assert pattern.