Welcome to your first lesson in the "Master Prompt API Engineering" course! We're starting with the essential groundwork that every professional developer needs. Over the next few lessons, we'll build up your Python skills, preparing you to construct robust applications that interact with large language models.
Today, we'll focus on a fundamental practice in modern software development: setting up a project with a virtual environment. This might seem like a purely technical setup step, but understanding it is crucial for building reliable and maintainable applications—a key goal you've set. We will cover why virtual environments are necessary, what they are, and how to create and manage one for your projects. This first step will ensure all the code we write throughout this course is organized, isolated, and reproducible.
Why Do We Need a Separate "Workshop" for Each Project?
Imagine you're working on two different projects. Project A is an older system that requires a specific, older version of a library. Project B is brand new and uses the latest, most advanced version of that same library. If you install these libraries on your computer globally, you'll run into a problem: you can't have two different versions of the same library installed in the same place at the same time. Installing the new version for Project B would break Project A, and vice-versa.
This is a common issue known as a dependency conflict. A Python virtual environment solves this problem by creating an isolated, self-contained "workshop" for each of your projects. Each environment has its own Python interpreter and its own set of installed libraries, completely separate from other projects and your main system.
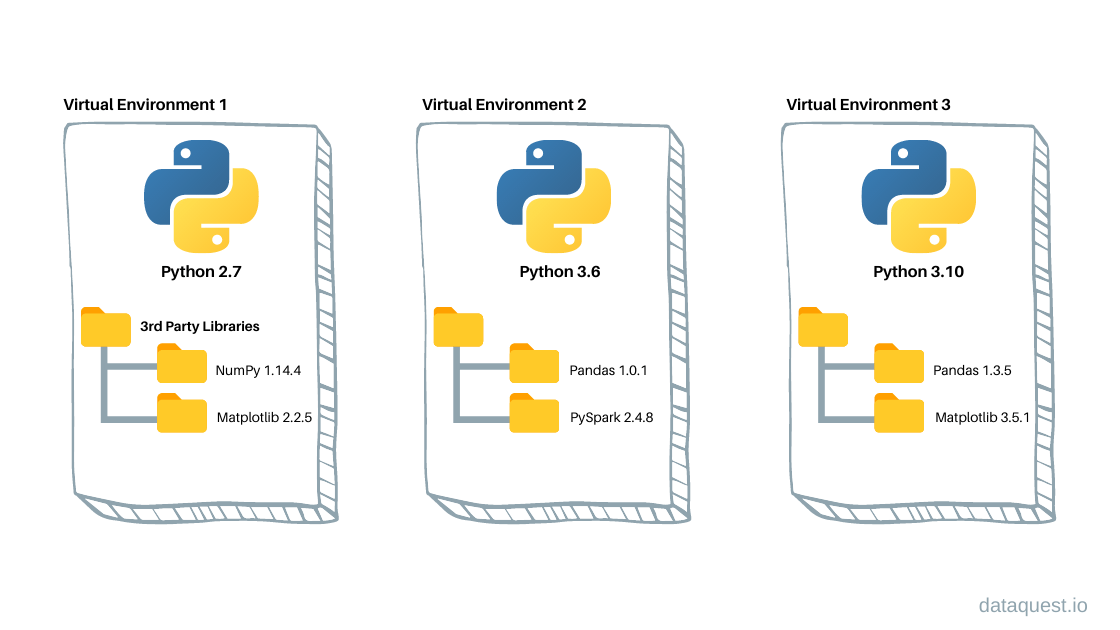
Using virtual environments is a non-negotiable best practice in professional Python development. It ensures that:
- Projects are self-contained: Dependencies for one project won't affect another.
- Your system stays clean: You avoid cluttering your computer's global Python installation with project-specific packages.
- Collaboration is seamless: You can easily share your project with others, who can then perfectly recreate the necessary environment to run your code.
For a thorough explanation of these benefits, let's turn to a well-regarded resource in the Python community.
Python Virtual Environments: A Primer
This article from Real Python provides an excellent overview of why virtual environments are so critical. It uses clear examples to illustrate the problems they solve.
Please read the section titled Why You Need Virtual Environments?. Pay close attention to the example about the two Django projects, as it's a perfect illustration of the dependency conflict problem we just discussed.
Creating and Using Your First Virtual Environment
Now that you understand the "why," let's walk through the "how." We'll use Python's built-in venv module, which is the standard and recommended tool for this task. The process involves three main steps: creating, activating, and deactivating the environment.
For a visual walkthrough of these steps, the following video provides a clear and concise demonstration.
Python Virtual Environment and pip for Beginners
This video by Dave Gray is aimed at beginners and covers the essential commands for creating and activating a virtual environment.
Watch the segment from creating and activating the environment. The presenter clearly shows the commands and the change in the terminal prompt that indicates the environment is active.
Let's break down those steps with the specific commands you'll use. For our course, we'll assume you're using a command-line terminal like PowerShell on Windows.
1. Create the Virtual Environment
First, open your terminal. Navigate to the folder where you want your project to live. Once there, run the following command:
python -m venv venv
Let's dissect this command:
python: This invokes your Python interpreter.-m venv: This tells Python to run the library module namedvenvas a script.venv: This is the name we're giving to the directory that will contain our virtual environment. It's a common convention to name itvenv, which makes it easily recognizable.
After running this command, you'll see a new folder named venv in your project directory. This folder contains a copy of the Python interpreter and a structure for its own libraries.

2. Activate the Virtual Environment
Creating the environment isn't enough; you need to "turn it on" or activate it for your current terminal session. Activating the environment tells your terminal to use the Python interpreter and packages from inside the venv folder, not the global ones.
On Windows, use this command:
.\venv\Scripts\activate
Once activated, you'll notice your terminal prompt changes. It will now be prefixed with (venv), like this:
(venv) C:\path\to\your\project>
This prefix is your confirmation that the virtual environment is active. Any Python or pip commands you run now will be specific to this environment.
3. Deactivate the Virtual Environment
When you're finished working on your project, you can deactivate the environment. This returns your terminal to using your system's global Python installation. The command is simple:
deactivate
After running this, the (venv) prefix will disappear from your terminal prompt. Remember, you'll need to reactivate the environment every time you open a new terminal to work on your project.
To solidify your understanding of this entire workflow, please read the practical guide from the Real Python article.
Python Virtual Environments: A Primer
This section provides the same commands we've just covered, with versions for Windows, macOS, and Linux, and includes brief explanations for each step.
Focus on the subsections Create It and Activate It. Then, skip down and read the Deactivate It subsection. This will reinforce the core commands.
Managing Your Project for Reproducibility
A core tenet of professional software development is reproducibility. Someone else (or you, on a different computer) should be able to take your code and run it without issue. Virtual environments are key to this, but it involves more than just the venv folder itself.
The venv folder is disposable and should NOT be shared. It can be large, and it contains files specific to your operating system. Instead, we share a simple text file that lists all the external libraries your project needs. The standard convention for this file is requirements.txt.
Here’s the workflow:
- With your virtual environment activated, you install packages using
pip(which we'll cover in detail in the next lesson). - To generate a list of all packages installed in your active environment, you run this command:
pip freeze > requirements.txt - This creates a
requirements.txtfile in your project folder. This small text file is what you share with others and commit to version control systems like Git. - Anyone else can then create their own fresh virtual environment, activate it, and run the following command to install the exact same packages:
pip install -r requirements.txt
This workflow ensures that everyone working on the project has an identical set of dependencies, which is crucial for avoiding "it works on my machine" problems.
The final piece of this puzzle is telling your version control system (like Git) to ignore the venv folder. This is done using a file called .gitignore.
The following video segment quickly demonstrates how to create both the requirements.txt and .gitignore files.
Python Virtual Environment and pip for Beginners
This part of the video puts the final pieces of the project setup puzzle together, demonstrating best practices for sharing your project's dependencies without sharing the environment itself.
Watch from creating requirements.txt to see how the file is generated. Then, continue watching as the presenter creates a .gitignore file to exclude the venv folder.
By adding a line with venv/ to your .gitignore file, you ensure that this large, machine-specific directory is never accidentally committed to your project's history.
Conclusion
In this foundational lesson, you've learned one of the most important practices in Python development. We've established not just how to set up a virtual environment, but why it's an essential step for creating clean, isolated, and reproducible projects.
Here are the key takeaways:
- Virtual environments create an isolated space for each project's dependencies, preventing conflicts.
- The core commands are
python -m venv venvto create,.\venv\Scripts\activateto activate, anddeactivateto exit the environment. - The
venvfolder itself is disposable and should never be committed to version control. - Project dependencies are managed and shared using a
requirements.txtfile, generated withpip freeze > requirements.txt. - You should always add
venv/to your.gitignorefile to exclude the virtual environment directory from version control.
You have now set the stage for your project. In our next lesson, we will dive into using pip, Python's package installer, to install, manage, and use the external libraries that will power our API applications.