Good to see you again. In the previous lesson, you handled missing plant data safely with optional binding and nil coalescing. That lets your app decide what to do when a value may be absent.
This lesson introduces closures: pieces of behavior that can be passed to another function or API. SwiftUI relies on them constantly—when a user taps a button, when a stack builds its content, or when a collection creates one view for each item. By the end, you will be able to read and write the closure expressions most common in Swift and SwiftUI.
A closure is behavior used as a value
A function has code that can be run later. A closure has the same essential purpose, but a closure expression is usually written directly where it is needed, without giving that behavior a separate function name.
For example, this closure has no inputs and no return value:
let logIdentificationStart: () -> Void = {
    print("Starting plant identification")
}
The type () -> Void means:
()before the arrow: the closure takes no parameters.Voidafter the arrow: the closure produces no return value.
You can run it like a function:
logIdentificationStart()
Although storing a closure in a constant is useful for seeing its structure, most iOS code passes a closure immediately to an API. The API specifies a contract: what inputs it will supply and what output it expects.
For example, filter needs a closure that examines one array element and returns true or false. Given an array of confidence scores:
let confidenceScores = [0.92, 0.48, 0.81, 0.63]
let threshold = 0.75
a fully explicit closure could be written as:
let acceptedScores = confidenceScores.filter { (score: Double) -> Bool in
    return score >= threshold
}
Read the closure from left to right:
score: Doubledeclares the input thatfiltergives this closure.-> Boolsays the closure returns a Boolean.inseparates the parameter and return-type declaration from the closure body.score >= thresholdis the logic that decides whether this score remains.
The result is:
[0.92, 0.81]
The closure also refers to threshold, even though threshold was declared outside the braces. This is called capturing a value from the surrounding context. It is exactly what makes closures useful for app-specific behavior: an API can run your closure later while the closure still has access to the values it needs.
Let context remove unnecessary syntax
The full form is valuable because it reveals the structure, but Swift usually already knows the required closure type.
In this case, confidenceScores is an array of Double, and filter requires a closure that returns a Bool. Swift can infer the types, so the usual version is:
let acceptedScores = confidenceScores.filter { score in
    score >= threshold
}
Because the closure body contains one expression, Swift also provides an implicit return. You do not need to write return.
This is a good default style: the parameter has a meaningful name, the predicate is easy to read, and the closure remains short.
Study the Swift language guide’s discussion of closure expressions and its gradual move from the full syntax to inferred types and shorthand arguments.
Read the Swift language guide to establish the precise relationship between a closure’s parameter types, return type, and the surrounding API that receives it.
In the “Closure Expressions,” “The Sorted Method,” “Closure Expression Syntax,” “Inferring Type From Context,” “Implicit Returns from Single-Expression Closures,” and “Shorthand Argument Names” subsections, begin with the closure-expression introduction. Follow the successive sorted(by:) versions rather than trying to memorize every compact form. Focus on the question: what function type does sorted(by:) require, and which pieces can Swift infer from that requirement?
Shorthand arguments: $$0$, $$1$, and readability
Swift gives inline closures automatic shorthand names for their parameters:
$$0$is the first argument.$$1$is the second argument.$$2$would be the third, and so on.
So the filtering example can become:
let acceptedScores = confidenceScores.filter {
    $0 >= threshold
}
For a short, obvious condition, this is reasonable. But when an input represents a meaningful thing—such as a plant, candidate, image, or result—a name is often clearer:
let acceptedScores = confidenceScores.filter { score in
    score >= threshold
}
The two versions do the same work. Prefer the named parameter when it makes the code easier to understand without mentally decoding $$0$.
A sort closure commonly has two inputs. Suppose you have plants from an earlier lesson:
let plants = [
    Plant(
        commonName: "Snake plant",
        scientificName: "Dracaena trifasciata",
        lightRequirement: "Indirect light",
        wateringIntervalDays: 14
    ),
    Plant(
        commonName: "Swiss cheese plant",
        scientificName: "Monstera deliciosa",
        lightRequirement: "Bright, indirect light",
        wateringIntervalDays: 7
    )
]
You can sort by common name with descriptive parameter names:
let alphabeticalPlants = plants.sorted { first, second in
    first.commonName < second.commonName
}
Or, more compactly:
let alphabeticalPlants = plants.sorted {
    $0.commonName < $1.commonName
}
Here, sorted asks:
“Should the first plant come before the second plant?”
Your closure answers true when it should.
A useful rule:
- Use a named parameter for multi-line logic or domain-rich values.
- Use
$$0$and$$1$only when the closure is short enough that the meaning remains immediate. - Do not mix the two styles in one closure. If you write
score in, usescore, not$$0$.
Trailing closures: the syntax SwiftUI uses everywhere
A closure passed as the final argument of a function can move outside the parentheses. This is called a trailing closure.
These calls are equivalent:
let acceptedScores = confidenceScores.filter({
    $0 >= threshold
})
let acceptedScores = confidenceScores.filter {
    $0 >= threshold
}
The second version is the conventional Swift style. It places the behavior visually beneath the API that uses it, which is particularly helpful when the closure is several lines long.
Watch Sean Allen’s explanation for a visual walkthrough of function types, shorthand arguments, and the trailing-closure syntax you will encounter in virtually every SwiftUI view.
In “Swift Closures Explained,” Sean Allen connects closure signatures to ordinary functions, then shows why SwiftUI’s braces are usually trailing closures.
Watch the foundation for the idea of a closure as movable behavior and for the meaning of a type such as (Student) -> Bool. Then watch compact Swift syntax, focusing on when $0 replaces a named parameter and why VStack { ... } is an example of trailing-closure syntax.
A trailing closure with an input still uses in:
let displayNames = plants.map { plant in
    plant.commonName
}
Read plant in as:
For each
plantsupplied to this closure, produce the code afterin.
A closure with no inputs does not need in:
{
    print("No input is supplied to this closure.")
}
That distinction makes SwiftUI code much easier to parse:
VStack {
    Text("Plant Identifier")
}
The VStack initializer receives a closure that creates its content. SwiftUI runs that closure to obtain the views inside the stack. There is no input parameter, so there is no in.
Closures in SwiftUI: actions and view content
Consider this ordinary SwiftUI button:
Button("Identify Plant") {
    print("Identification requested")
}
The closure after Button("Identify Plant") is an action closure. It has type () -> Void:
- It receives no input from the button.
- It does not return a value.
- SwiftUI runs it when the user taps the button.
At this stage, print is enough to verify that your action ran. Later, after you learn @State, the action closure will update state and SwiftUI will redraw the interface accordingly.
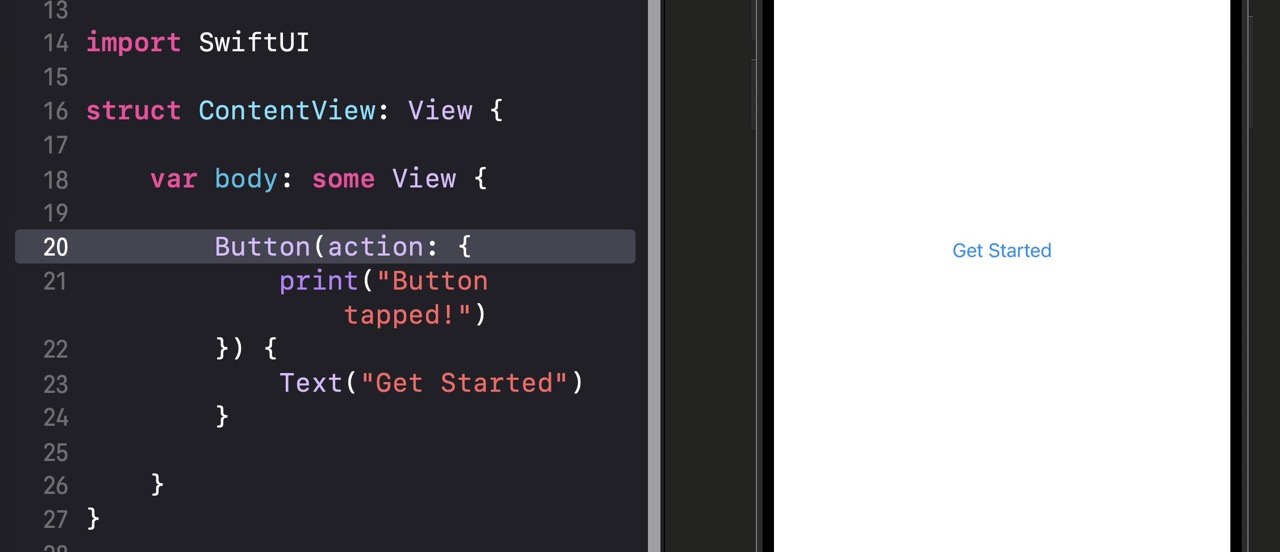
The code in the Button closure anatomy image uses an expanded initializer form:
Button(action: {
    print("Button tapped!")
}) {
    Text("Get Started")
}
This button has two closures:
action:receives a closure that performs imperative work when tapped.- The final brace supplies the button’s label closure—a closure that creates the visual content.
Swift offers a clearer modern spelling using multiple trailing closures:
Button {
    print("Identification requested")
} label: {
    Label("Identify Plant", systemImage: "leaf")
}
Notice the different purposes:
| Closure | Expected type, conceptually | What it does |
|---|---|---|
| Button action | () -> Void |
Performs an effect, such as changing state or starting a request. |
| Button label | () -> some View |
Describes the button’s visible content. |
ForEach content |
(Element) -> some View |
Creates one view for each supplied element. |
The label closure is declarative: it says what should appear. The action closure is imperative: it says what should happen in response to an event.
Build a small closure-driven plant screen
Replace ContentView.swift with the following code. This deliberately avoids @State, which belongs to the next module. Its purpose is to make three closure patterns visible in one small screen:
ForEachreceives a closure with anameparameter.Buttonreceives a no-input action closure.filterreceives a closure that capturesconfidenceThreshold.
import SwiftUI

struct ContentView: View {
    private let candidateNames = [
        "Swiss cheese plant",
        "Snake plant",
        "Golden pothos"
    ]

    private let confidenceThreshold = 0.75

    var body: some View {
        VStack(alignment: .leading, spacing: 16) {
            Text("Possible Matches")
                .font(.title2.bold())

            ForEach(candidateNames, id: \.self) { name in
                Text(name)
            }

            Button {
                let scores = [0.92, 0.48, 0.81, 0.63]

                let acceptedScores = scores.filter { score in
                    score >= confidenceThreshold
                }

                print("Accepted scores: \(acceptedScores)")
            } label: {
                Label("Check Confidence", systemImage: "checkmark.circle")
            }
            .buttonStyle(.borderedProminent)
        }
        .padding()
    }
}

#Preview {
    ContentView()
}
Build and run the app with Command-R. Tap Check Confidence, then open Xcode’s debug console if it is hidden: choose View > Debug Area > Activate Console. You should see:
Accepted scores: [0.92, 0.81]
Trace what happens on the tap:
- SwiftUI invokes the Button action closure.
- The closure creates the local
scoresarray. filterinvokes its own closure once per score.- That inner closure captures and compares against
confidenceThreshold. filterreturns only the scores for which the closure producedtrue.- The Button action prints the result.
This nesting is normal. A closure can call an API that itself receives another closure. Indentation is your main guide: the outer Button action starts after Button {; the filter closure starts after scores.filter { score in.
The ForEach line deserves equal attention:
ForEach(candidateNames, id: \.self) { name in
    Text(name)
}
ForEach supplies each string from candidateNames to the closure as name. The closure returns a Text view for that particular name. In a later module, you will use this exact pattern to render dynamic collections of saved plant identifications.
Apple’s “Create dynamic content” tutorial provides a useful next look at these same patterns in a functioning SwiftUI interface.
Create dynamic content — Develop in Swift Tutorials | Apple Developer Documentation
Use Apple’s tutorial to see closure parameters in ForEach, no-input action closures in onSubmit and Button, and the two-closure form of a custom-labeled button.
In “Create a list,” locate the ForEach(names, id: \.description) { name in ... } example and focus on how name in declares the value passed into its content closure. In “Use a text field to enter names,” read the .onSubmit { ... } examples as no-input action closures. Then, in “Pick a random element from an array” and “Use a custom button label,” examine the Button action closure and the Button { ... } label: { ... } form. Do not worry yet about mastering @State or bindings; those are the next module’s focus.
Closure-reading checklist
When a closure initially looks dense, identify its contract before reading its body.
For each closure, ask:
-
Which API receives it?
filter,sorted,Button,ForEach, andVStackall expect different behavior. -
What inputs does that API provide?
Buttonaction: none.ForEach: one element at a time.sorted: two elements to compare.
-
What does the closure need to return?
filterandsortedexpectBool.ForEachand a Button label create views.- A Button action returns
Void.
-
Does it capture a value from outside?
In the example, the filter closure usesconfidenceThresholdfrom the surrounding view. -
Is the shortest syntax still readable?
Choosescore inover$$0$whenever the name clarifies the code.
Avoid making every closure as short as possible. Concise Swift is valuable, but readable Swift is more valuable—especially in the view, networking, and machine-learning code your plant identifier will eventually contain.
Takeaways
A closure is executable behavior that can be stored or passed to an API. Its type describes its input and output, such as:
(Double) -> Bool
or:
() -> Void
Closure expressions use braces. The full syntax can declare parameters and a return type before in, but Swift usually infers those details from context:
scores.filter { score in
    score >= confidenceThreshold
}
Trailing closures move a final closure outside parentheses. This is why SwiftUI naturally reads as nested blocks:
VStack {
    Button {
        print("Tapped")
    } label: {
        Text("Identify")
    }
}
You have now met the basic language mechanism behind SwiftUI content, user actions, collection transformations, and many future asynchronous APIs. Next, you will use protocol conformance and extensions to add reusable behavior to your plant-related types without duplicating code.