Welcome to the course. Over the next eight weeks, you will build toward a plant-identifier app while learning patterns that transfer to many kinds of iOS apps: data modeling, SwiftUI interfaces, navigation, device features, machine learning, networking, persistence, testing, and distribution.
This first module establishes the practical Swift/Xcode foundation. Today’s goal is deliberately concrete: create a clean SwiftUI iOS project, understand the few project settings that matter immediately, and build and run it in an iPhone simulator. By the end, you will have the same basic development loop used throughout the course: edit → build → run → observe → stop.
By the end of this lesson, you should be able to:
- Create an iOS App project in Xcode using SwiftUI and Swift.
- Explain the roles of a product name, organization identifier, bundle identifier, scheme, and run destination.
- Select an iPhone simulator and launch the starter app.
- Distinguish the simulator from a SwiftUI preview.
- Stop and rerun the app confidently.
The development environment: what Xcode gives you
An iOS project is more than a folder of Swift files. It contains source code, interface resources, build settings, a target describing the app you produce, and metadata that identifies the app to iOS.
Xcode is Apple’s integrated development environment (IDE). It brings these pieces together:
- You write Swift and SwiftUI code in its editor.
- It compiles that code into an app bundle.
- It manages app settings and resources.
- It runs the app in a simulator or on a connected iPhone.
- It provides debugger tools when something goes wrong.
For this course, we will use a SwiftUI-first approach. SwiftUI is Apple’s declarative UI framework: you describe what the interface should contain, and the system determines how to render and update it. You will work with UIKit later only where iOS device APIs still require it, such as wrapping the camera picker.
Before creating a project, it helps to separate a few related names:
| Term | Meaning | Example for this course |
|---|---|---|
| Product name | Human-readable project/app name | PlantIdentifier |
| Organization identifier | Reverse-domain-style prefix representing you or your organization | com.example.yourname |
| Bundle identifier | Unique identifier formed from the two values | com.example.yourname.PlantIdentifier |
| Target | A buildable product in the project | The iOS app itself |
| Scheme | Instructions Xcode uses to build and run a target | PlantIdentifier |
| Run destination | Where Xcode launches the built app | An iPhone simulator |
For simulator practice, com.example.yourname is fine as an organization identifier. Before App Store distribution, it must be replaced with an identifier you control. The bundle identifier matters later for device signing, capabilities, TestFlight, and the App Store—so it is worth treating as real project metadata rather than meaningless setup text.
Read Apple’s concise reference now. It describes the configuration information, creation flow, and the main Xcode window you are about to use.
Creating an Xcode project for an app - Apple Developer
Read Apple Developer’s guide to connect the project-creation choices with the Xcode areas used to build and run an app.
First, in “Prepare configuration information,” read the configuration guidance. Focus on how the product name and organization identifier combine into the bundle identifier. Next, read the full “Create a project” section. It begins with the creation sequence. Notice that available options vary with the platform and template you select. Finally, in “Manage files in the main window,” read the toolbar paragraph from building and running. Locate the navigator, editor, toolbar, and debug area in your own Xcode window as you read.
Create the PlantIdentifier project
Open Xcode. If its welcome window is visible, choose Create a new Xcode project. If you already have a project open, use File > New > Project instead.
In the template chooser:
- Select the iOS platform.
- Under Application, select App.
- Click Next.
The App template is the ordinary starting point for a SwiftUI iPhone app. Do not choose a game, document app, augmented reality template, or Multiplatform template for this project; those start with additional assumptions and files that are not relevant yet.
On the project-options screen, use these choices:
| Setting | Choice |
|---|---|
| Product Name | PlantIdentifier |
| Team | Leave as None or unselected for simulator work |
| Organization Identifier | com.example.yourname — replace yourname with a simple lowercase identifier |
| Interface | SwiftUI, if Xcode presents this choice |
| Language | Swift, if Xcode presents this choice |
| Storage | None, if Xcode asks |
| Other optional features | Leave at their defaults for now |
Xcode versions differ slightly. Some versions no longer show separate “Interface” or “Life Cycle” pop-up menus because the selected iOS App template is already configured for SwiftUI. The important outcome is that your new project contains SwiftUI source files and uses Swift.
Choose a stable location on your Mac, such as:
Developer/Projects/PlantIdentifier
Avoid treating this project as a disposable desktop file. It will become the capstone app, and a predictable location makes backup, Git version control, and later asset management simpler. Whether you enable Xcode’s “Create Git repository” option does not affect today’s build-and-run task; leaving the default is fine.
Click Create. On the first launch, Xcode may index files and prepare the project for a short time. Let that complete before judging whether anything is wrong.
A typical SwiftUI project will contain:
PlantIdentifierApp.swift— the app entry point. It tells SwiftUI which initial scene to show.ContentView.swift— the initial screen supplied by the template.- Assets or
Assets.xcassets— a catalog for app icons, colors, and images. - Tests files or folders, depending on the options and Xcode version you used.
You do not need to understand the Swift syntax in these files yet. At this stage, simply confirm that ContentView.swift exists and that it contains a SwiftUI view with the familiar starter text, often “Hello, world!”
A quick visual walkthrough
This short video shows the same creation and launch flow. Its screen layout may differ from your installed Xcode version, but the essential decisions—iOS App, SwiftUI, Swift, an iPhone simulator, and the Run button—remain the same.
How to Make an App - Lesson 1 (Xcode 16 Updated)
Use CodeWithChris’s “How to Make an App – Lesson 1 (Xcode 16 Updated)” as a brief visual walkthrough of installation, project creation, and simulator execution.
If Xcode is not already installed, watch the installation note; Xcode is large, and its first launch may install additional components. Then watch project creation. Follow the iOS App template, product details, SwiftUI, and Swift choices, but save your project in a durable project folder rather than treating it as a throwaway demo. After your project opens, skip ahead to simulator launch. Focus on selecting an iPhone simulator, using Run, and understanding why the simulator is more than a static interface preview.
Select a run destination and launch the app
Look at the Xcode toolbar near the top of the window. You should find:
- A scheme—normally named
PlantIdentifier. - A run-destination menu beside it.
- A triangular Run button.
- A square Stop button, which becomes active while the app is running.
The scheme identifies what should be built; the run destination identifies where it should run. For now, leave the PlantIdentifier scheme selected and open the run-destination menu.
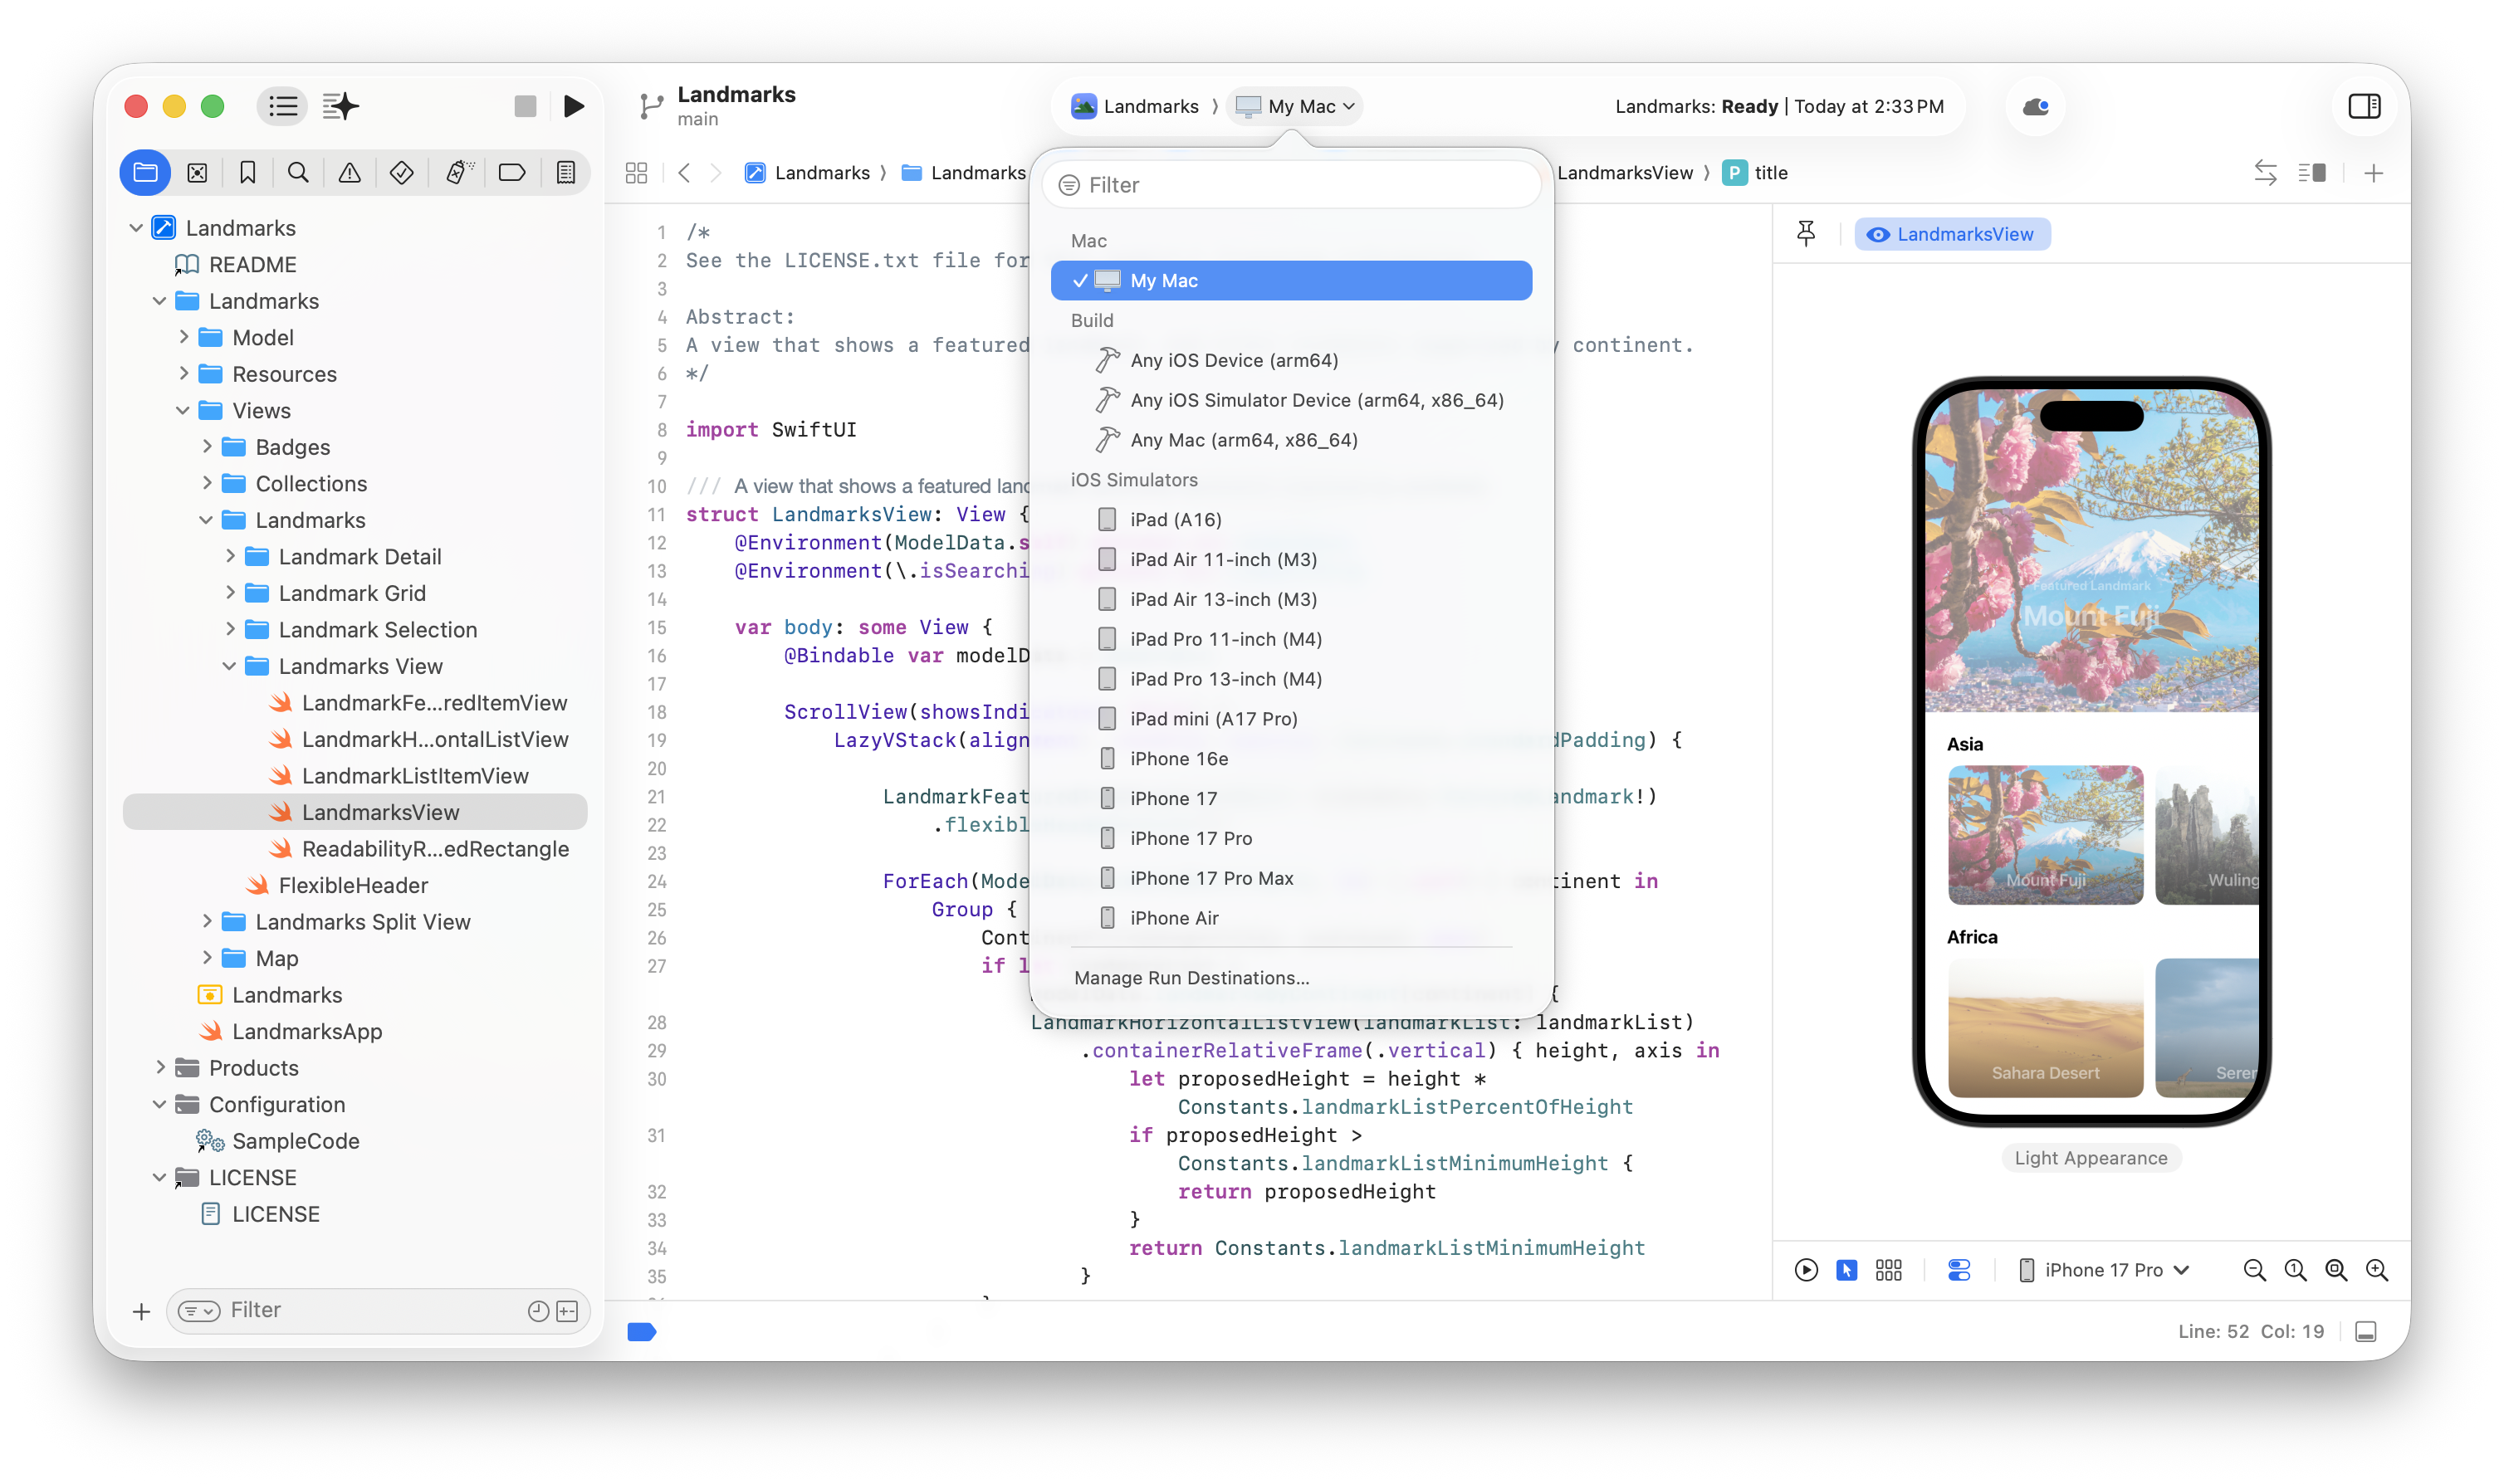
Choose a currently available iPhone simulator, ideally a recent model with the newest installed iOS runtime. The exact choices depend on your Xcode version and downloaded simulator runtimes. It does not matter whether you select an iPhone Pro, Plus, or standard model for this first run; any available iPhone simulator is appropriate.
Now click the Run button, or choose Product > Run.
Xcode performs two distinct actions:
- Build: compiles Swift source code and packages the app.
- Run: installs the resulting app into the selected simulator, launches it, and attaches the debugger.
The first run is usually slower because Xcode may need to boot the simulator, prepare build artifacts, and compile framework code. Subsequent runs are normally much faster.
When the build succeeds, a simulated iPhone window opens—Apple may label this environment Simulator or show it through Device Hub, depending on your Xcode version. You should see the starter app, typically with its default “Hello, world!” content.
Interact with it as you would an iPhone: click or drag with the mouse to simulate touches. This is a real running app process, not merely a picture.
Simulator versus SwiftUI Preview
The right-side canvas in Xcode may also show a SwiftUI preview. It is useful, but it serves a different purpose.
| SwiftUI Preview | iOS Simulator |
|---|---|
| Fast visual feedback while editing a view | A running app installed in a simulated iOS environment |
| Can render individual views and sample states | Exercises app launch, lifecycle, navigation, and interactions |
| May fail independently of whether the full app builds | Represents the build-and-run workflow |
| Helpful during interface construction | Essential for testing normal app behavior |
A simulator is still not a physical iPhone. It cannot fully reproduce device performance, camera behavior, permissions, sensors, or hardware-specific features. That distinction will matter once the plant identifier captures photos and performs Core ML inference. For today, it is the correct and fastest place to work.
Confirm the development loop
Before closing Xcode, complete this small working routine:
- With the app running, click Stop in Xcode’s toolbar.
- Verify that the app is no longer executing in the simulator.
- Click Run again and confirm it relaunches.
Optionally, open ContentView.swift and change only the text inside the starter Text(...) view from Hello, world! to Plant Identifier, then run again. You are not expected to understand the view syntax yet. This is simply evidence that the simulator is executing your project’s current source, rather than showing a fixed sample screen.
A successful first run means all of the following are true:
- Your project was created with the iOS App template.
- The project uses SwiftUI and Swift.
- The
PlantIdentifierscheme is selected. - An iPhone simulator is selected as the destination.
- Xcode reports a successful build.
- The simulator displays your app.
- You can stop and launch it again.
If the first run does not work
Do not randomly change project settings or delete files. First identify which stage failed.
- No iPhone simulators appear in the run-destination menu: Xcode may not have the required iOS platform/runtime installed. In Xcode’s settings, look for Components and install an available iOS simulator runtime. The destination menu may also show a Get option.
- The Run button is unavailable: wait for indexing to finish, then check that the
PlantIdentifierapp scheme—not a test target or another destination—is selected. - A build fails: open the Issue navigator with Command-5 and read the first error. We will learn a systematic compiler/debugger workflow in the next lesson.
- The simulator does not visibly open: check whether its window is behind Xcode or shown in the Dock. A successful build status in Xcode is the first clue; the activity area in the toolbar reports progress and failures.
- The preview fails but the simulator works: keep using the simulator as the test of whether the app builds and runs. Preview-specific issues are not necessarily app failures.
You now have a SwiftUI iOS project and have run it through Xcode’s standard build-and-run pipeline. The important habits are already in place: preserve a sensible project structure, understand which destination you are running on, and verify a change in an actual running app rather than only in a preview.
Next, you will learn to diagnose a simple Swift bug using compiler messages, breakpoints, and the debug console—the tools that turn an opaque build failure into a specific, fixable problem.