Hello and welcome to your first lesson in the "Mastering Godot" course!
This lesson is your first step into the Godot Engine. We will focus on getting you comfortable with the editor's interface. By the end of our 60 minutes, you will be able to confidently navigate the various docks, viewports, and workspaces that make up your new development environment.
This aligns perfectly with your preference for a "theory-first" approach. Before we start building the complex mechanics of a Metroidvania, we need to understand our tools. This lesson is all about mapping out the workshop where you'll be building your game, ensuring you know what every tool is and where to find it.
1. The Gateway: Godot's Project Manager
When you first launch Godot, you're not in the main editor yet. You're greeted by the Project Manager. This is your hub for creating new projects, opening existing ones, or even downloading demo projects from the community.
To get a practical look at creating your first project, I recommend watching this short segment from a video by Brett Makes Games. It provides a clear, step-by-step walkthrough.
Godot 4 Editor Explained & 2D Workflow Basics
This video, 'Godot 4 Editor Explained & 2D Workflow Basics', starts right at the Project Manager. Watch the beginning to see how to create a new project and select a renderer.
Watch from the beginning until timestamp 02:13. Pay close attention to the 'Renderer' selection part. For the 2D pixel-art Metroidvania you aim to build, the 'Compatibility' renderer is often the best choice as it ensures your game runs on the widest range of hardware, which is great for indie games.
As you saw, the key steps are:
- New Project: Give your project a name and choose a location.
- Create Folder: It's best practice to create a dedicated folder for each new project.
- Renderer: You have three choices. For your goals, Compatibility is a solid starting point. It's optimized for 2D and has the broadest hardware support.
2. A Tour of the Godot Editor
Once you create and open a project, you'll land in the main editor. It can look a bit overwhelming at first, but we can break it down into a few logical areas.
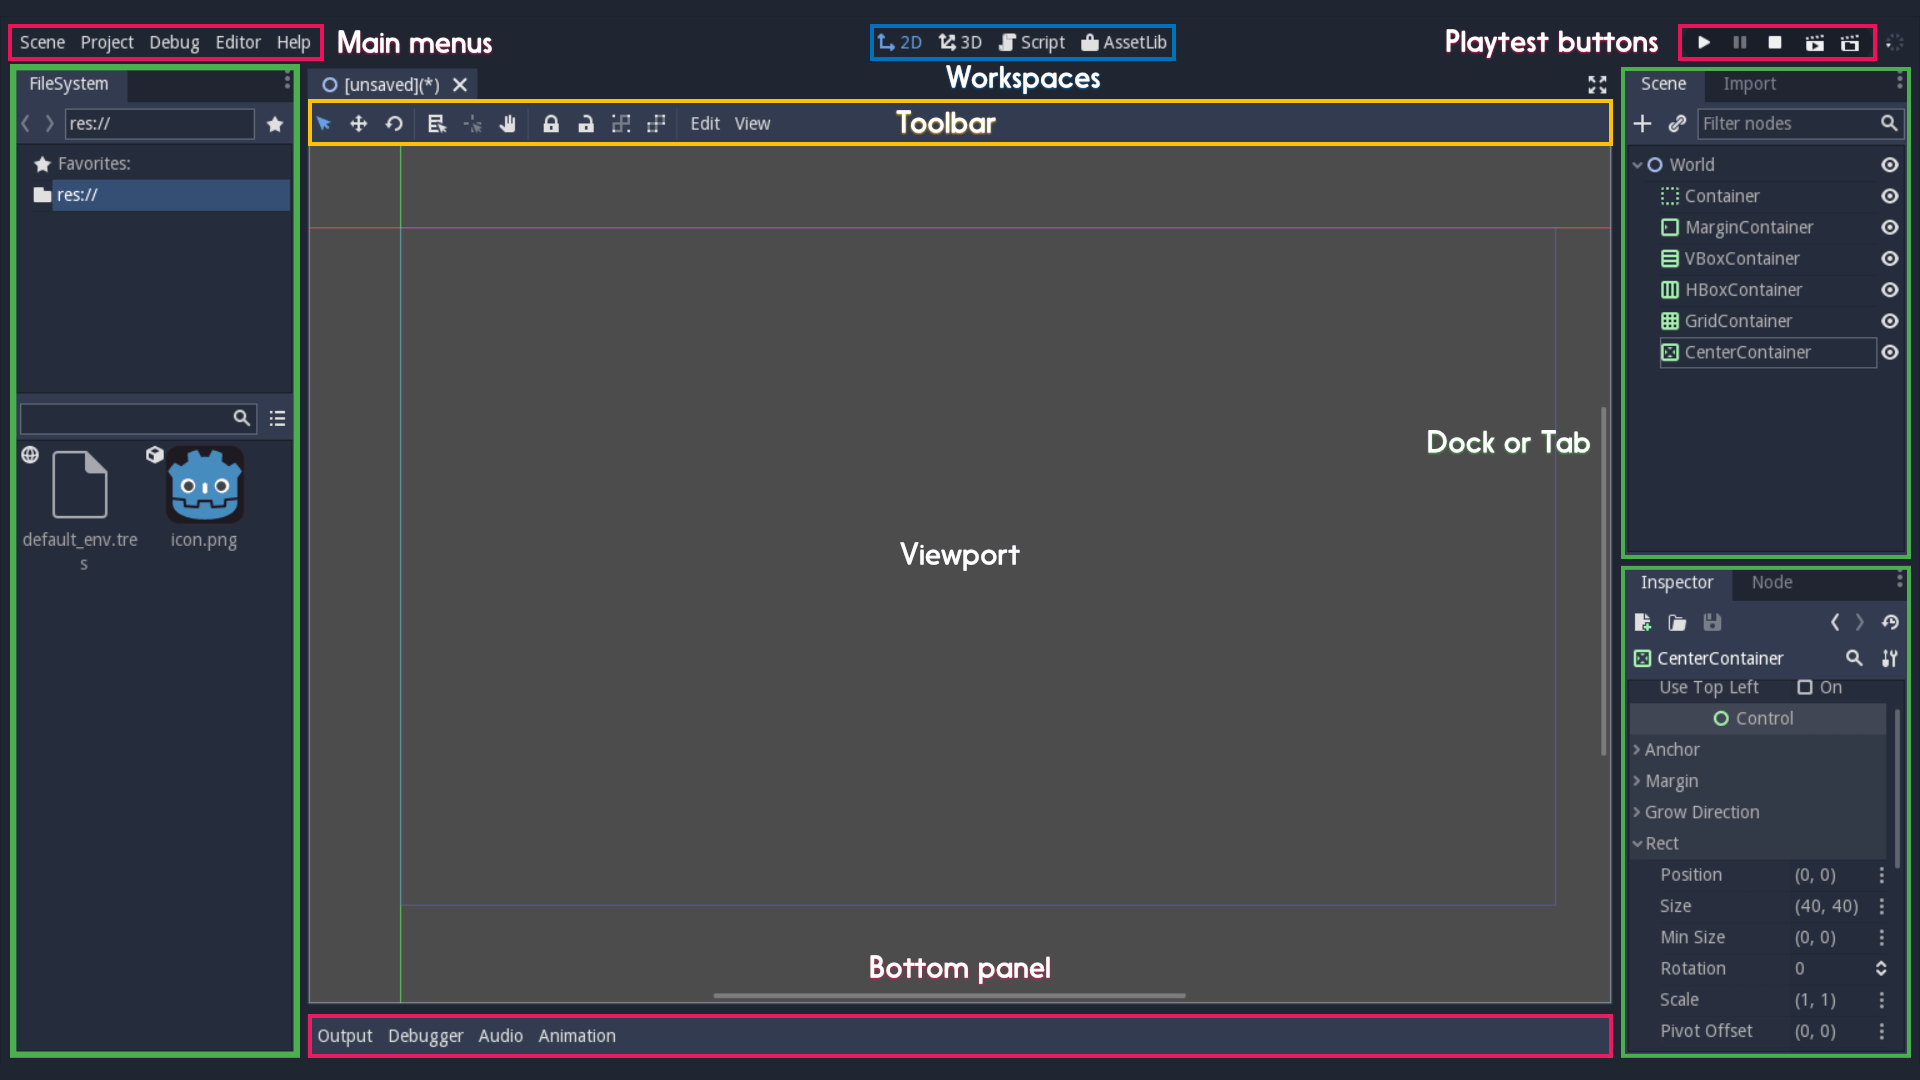
To get a comprehensive, theory-focused overview, the following article provides an excellent guided tour of each part of the editor.
Let's Learn Godot 4 by Making an RPG - Part 1 - DEV Community
The article 'Let's Learn Godot 4 by Making an RPG - Part 1' by Christine Coomans on DEV Community has a fantastic, detailed breakdown of the editor interface.
Please read the section titled 'EDITOR OVERVIEW'. It starts after the initial introduction and ends just before 'PROJECT SETUP'. Focus on understanding the purpose of each component: Workspaces, Scene Dock, FileSystem Dock, Inspector, and the Bottom Panel.
Key Components Summary
Let's consolidate the information from that reading with some key points.
A. Main Screens (Workspaces)
Located at the top-center of the editor, these four buttons switch the main view between different contexts:
- 2D: For building 2D scenes. You'll spend a lot of time here.
- 3D: For building 3D scenes.
- Script: A full-featured code editor where you'll write GDScript.
- AssetLib: An integrated interface for browsing and downloading free, open-source assets and plugins from the Godot Asset Library.
B. The Viewport
This is the large central area that changes based on the selected workspace.
- In the 2D/3D workspace, it's where you visually place and manipulate game objects (called nodes). You can pan by holding the middle mouse button and zoom with the scroll wheel.
- In the Script workspace, it becomes the text editor.
Above the viewport is a toolbar with tools for selecting, moving, rotating, and scaling nodes. These tools are contextual to the workspace you're in.
C. The Docks
Docks are the panels surrounding the viewport that contain all your project information.
- FileSystem (Bottom-Left): This is a direct view of your project folder. You'll use it to organize your files and assets like sprites, scripts, and scenes. A well-organized file system is crucial for a large project like a Metroidvania.
- Scene (Top-Left): This shows the structure of the currently open scene as a tree of nodes. It's one of the most important concepts in Godot, which we'll explore in depth in a future lesson.
- Inspector (Right): When you select a node in the Scene dock or the viewport, the Inspector populates with all of its properties (like position, color, texture, etc.). This is where you'll configure your game objects without writing code.
- Node (Right, tabbed with Inspector): This dock is for connecting signals (a way for nodes to send messages) and organizing nodes into groups. We'll cover this in detail when we get to GDScript.
D. The Bottom Panel
This panel is collapsed by default but provides powerful tools:
- Output: Shows messages you print from your code.
- Debugger: Helps you find and fix errors in your scripts.
- Audio: A mixer for controlling sound buses.
- Animation: A powerful editor for creating animations, which appears when you select an
AnimationPlayernode.
3. Customizing Your Workspace
One of the great things about Godot is its flexibility. You can rearrange the editor to suit your workflow, which is especially useful if you have multiple monitors.
The official Godot documentation provides a concise guide on how to do this.
Customizing the interface — Godot Engine (latest) documentation in ...
The official Godot documentation page 'Customizing the interface' explains how to move docks and save layouts.
Read the sections 'Moving and resizing docks' and 'Customizing editor layouts'. This will show you how to undock panels into floating windows and how to save different UI configurations for different tasks (e.g., one for coding, one for level design).
This ability to create and save layouts is powerful. You might have one layout for scripting, with the Script editor maximized, and another for tilemap editing, with the Scene and FileSystem docks more prominent.
Test your understanding!
Now, let's apply what you've learned about the editor layout.
- Click and drag the FileSystem dock by its title. Move it to the right side of the screen, so it sits as a new column next to the Inspector.
- Resize the Scene dock to make it wider, giving you more space to see complex scene trees.
- Go to the top menu:
Editor->Editor Layouts->Save. - Save this new layout with the name "Level Design".
- Now, go back to
Editor->Editor Layoutsand select the Default layout to restore the original configuration.
This exercise confirms you can manipulate the docks and manage custom layouts, a skill that enhances workflow efficiency.
Show answer
If you followed the steps, you should have seen the FileSystem dock snap into place on the right. After saving the layout, selecting "Default" should have returned all docks to their original positions. You can switch back to your "Level Design" layout anytime from the same menu.
Conclusion
In this lesson, we took a comprehensive tour of the Godot editor. You've learned about:
- The Project Manager for handling your projects.
- The main Workspaces (2D, 3D, Script, AssetLib) that define your working context.
- The central Viewport for interacting with your game world.
- The essential Docks: Scene for hierarchy, FileSystem for assets, and the Inspector for properties.
- How to customize and save your editor layout to match your workflow.
You now have a solid map of the tools at your disposal. This foundational knowledge is the first step toward building the complex, interconnected world of a Metroidvania.
In our next lesson, we will cover how to use the Godot documentation and built-in help effectively. Knowing your way around the editor is the first half of the battle; knowing how to find answers for yourself is the other, and it's a skill that will accelerate your journey to mastery.