Hello! Welcome to the first lesson in your journey to becoming a full-stack developer.
Today, we'll start by setting up the absolute foundation of modern JavaScript development. Our goal is to install Node.js and npm and explain their roles in the JavaScript ecosystem. By the end of this lesson, you'll have installed these essential tools and understood why they are critical for building the professional, high-value applications you're aiming to create.
Let's get started.
What are Node.js and npm?
You've mentioned that your self-teaching in JavaScript has been "going nowhere." A common reason for this feeling is the gap between writing simple scripts in an HTML file and building a complex, real-world application. The tools we're covering today, Node.js and npm, are the bridge over that gap.
-
Node.js is a JavaScript runtime environment. In simple terms, it allows you to run JavaScript code outside of a web browser. Historically, JavaScript only ran in browsers to make websites interactive. With Node.js, you can use JavaScript to write command-line tools and, most importantly for us, build the backend (server-side) of web applications. This is why we can pursue a "JavaScript all the way" approach for your full-stack goal.
-
npm stands for Node Package Manager. It's a tool that is automatically installed with Node.js. Its main job is to manage "packages"—reusable pieces of code written by other developers. Think of it like a massive, shared library. Instead of building every single feature from scratch, you can use npm to pull in packages that handle common tasks like working with databases, user authentication, or even specific UI components. This dramatically speeds up development and is standard practice in every professional software company.
Your experience managing a business provides a good analogy. You wouldn't build your own delivery vehicles from scratch; you'd lease or buy them from a manufacturer. Similarly, you wouldn't write your own mapping and routing software; you'd use a service like Google Maps. In software development, npm allows you to do the same: you select the best pre-built "packages" and assemble them to create your application. This is how professional developers work efficiently.
Why Are They So Important?
It's common for newcomers to wonder if these tools are just adding complexity. The questioner on the following discussion forum had the exact same thought. Read their question and the top-voted answers to see why manual management doesn't scale.
What is NPM and why do I need it? [closed] - Stack Overflow
This Stack Overflow discussion, titled 'What is NPM and why do I need it?', directly addresses why developers use a package manager instead of just downloading files manually. The top answers provide a clear, practical justification for npm's existence.
First, read the original question to understand the user's perspective. Then, read the first three answers (the ones with 115, 6, and 4 upvotes) to get a comprehensive view of npm's purpose. Focus on how npm solves problems related to dependencies, versioning, and collaboration.
As you saw, trying to manage dependencies manually becomes a huge headache as projects grow. Here’s a summary of the key benefits of using npm:
- Automated Dependency Management: npm handles installing all the packages your project needs, and also the packages that those packages need (dependencies of dependencies).
- Version Control: It allows you to specify which version of a package your project uses, preventing your application from breaking when a package is updated.
- Collaboration: A simple
npm installcommand is all a new developer needs to get your project running on their machine. - The npm Registry: npm gives you access to the world's largest software registry, with hundreds of thousands of free, reusable code packages.
Installing Node.js and npm
Now for the practical part. We'll install Node.js and npm. The best way to do this is by first installing a Node Version Manager, or nvm. This tool lets you easily install, switch between, and manage multiple versions of Node.js on your computer. This is a professional best practice, as different projects might require different Node.js versions.
The following guide from the MDN Web Docs, a highly respected resource for web developers, will walk you through the process.
Setting up a Node development environment - MDN Web Docs
This guide from MDN Web Docs, 'Setting up a Node development environment', provides detailed, step-by-step instructions for installing Node.js and npm using a version manager on Windows, macOS, and Ubuntu.
Navigate to the section titled 'Installing Node'. Follow the instructions specific to your operating system (Windows or Ubuntu/macOS). The guide recommends using a version manager (nvm-windows or nvm), which is the approach you should follow. Your goal is to install the latest Long-Term Support (LTS) version of Node.js.
Verifying Your Installation
Once you have completed the installation steps, it's crucial to verify that everything is working correctly. This is a quick step that gives you immediate feedback.
Open your terminal or command prompt and run the following commands, one at a time:
node -v
This command should print the version of Node.js you installed (e.g., v20.11.1).
npm -v
This command should print the version of npm that was installed alongside Node.js (e.g., 10.2.4).
If both commands return a version number, your installation was successful. Congratulations! You've just set up a core part of your developer toolkit.
How npm Works: package.json
Now that you have npm, let's briefly touch on how it manages dependencies. The heart of any Node.js project is a file called package.json.
You can think of package.json as the project's ID card and instruction manual. It contains metadata like the project's name and version, but most importantly, it lists all the packages the project depends on.
When you (or a teammate) run the npm install command in a project folder, npm reads the package.json file and automatically downloads and installs all the listed packages.
The following diagram illustrates this process.
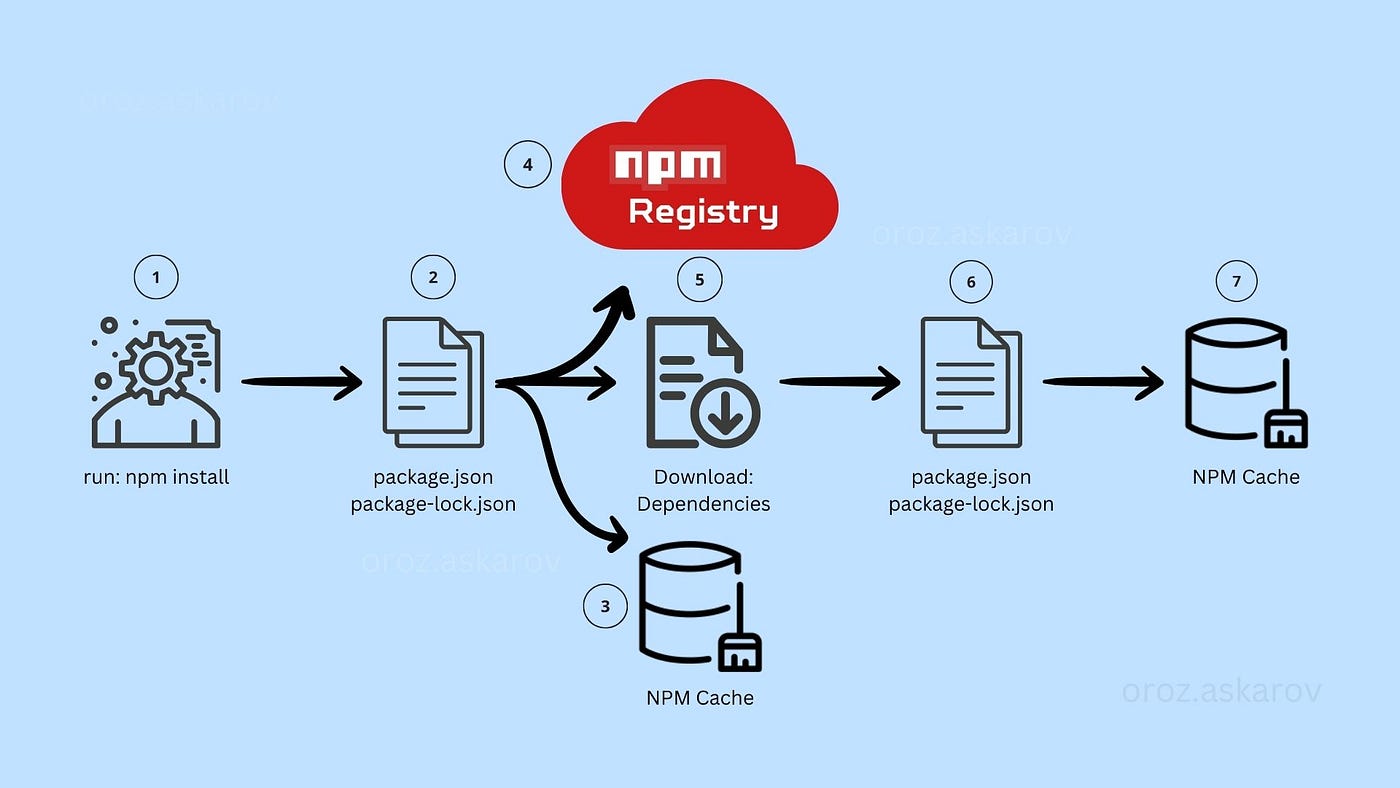
Since you have some experience with Java, you might find a useful parallel here. The package.json file serves a similar purpose to a pom.xml file in a Maven project or a build.gradle file in a Gradle project—it's the central place for defining and managing your project's external dependencies.
We will create and use package.json files extensively in our future projects.
Key Takeaways
This lesson was about setting the stage for everything that comes next. Let's recap the essentials:
- Node.js is a JavaScript runtime that lets us run JavaScript on a server, enabling full-stack development with a single language.
- npm is the Node Package Manager, used to install and manage third-party code packages, which is standard practice for efficient and professional development.
- Using a Node Version Manager (nvm) is a best practice for managing different Node.js versions.
- The
package.jsonfile is the manifest for a Node.js project, defining its properties and dependencies.
Next Steps
You've now installed the engine (Node.js) and the parts supplier (npm) for your applications. In the next lesson, we'll set up your workshop: a professional code editor. We will set up Visual Studio Code with extensions optimized for web development, ensuring you have a powerful and efficient environment for writing code.