Welcome to the final lesson in our introduction to VBA module. In our last session, we explored how to use For Each loops to automate repetitive actions on ranges of cells. Now, we'll shift our focus from having your macros do things to having them talk to the user. This lesson is all about making your macros interactive.
We will cover two essential functions: MsgBox for displaying messages and asking for confirmation, and InputBox for gathering information from the user. Mastering these will allow you to create more dynamic, user-friendly tools. For a freelancer, building applications that communicate clearly and guide the user is a hallmark of professionalism, making your solutions more robust and valuable.
By the end of this lesson, you will be able to create message boxes to inform or prompt the user for a decision, and use input boxes to receive data that your macro can then act upon.
1. Displaying Information with MsgBox
The simplest way to communicate with a user in VBA is with a message box. At its most basic, MsgBox displays a piece of text and an "OK" button. This is perfect for notifying the user that a task is complete or that an error has occurred.
However, the MsgBox function is far more versatile. You can customize its title, the buttons it displays (like Yes/No or Abort/Retry/Ignore), and the icon it shows (like a question mark or a critical warning symbol). These options are controlled by adding optional parameters to the function.
The video below provides a concise and clear demonstration of how to build message boxes, from the most basic to more complex versions with custom buttons and icons.
How to Master the VBA Message Box in 6 Minutes
This video from Excel Macro Mastery, "How to Master the VBA Message Box in 6 Minutes," is an excellent tour of the MsgBox function's capabilities.
Please watch the following segments: The basic syntax for creating a simple message box. How to add a custom title. How to change the buttons using constants like vbYesNo. How to include an icon like vbQuestion or vbCritical. Finally, see how to combine options using the + operator.
As you saw in the video, you can combine button and icon constants to create a specific type of prompt. For example, to ask the user a question with "Yes" and "No" buttons, you would write:
Sub AskQuestion()
    MsgBox "Do you want to proceed with the report generation?", vbYesNo + vbQuestion, "Confirmation"
End Sub
Here, vbYesNo + vbQuestion tells VBA to show Yes and No buttons along with a question mark icon, and "Confirmation" becomes the title of the dialog box.
2. Capturing User Choices with MsgBox
Displaying a message is useful, but the real power of MsgBox comes from its ability to return a value based on which button the user clicks. You can capture this returned value in a variable and then use an If...Then statement—which you learned about two lessons ago—to make your code react to the user's choice.
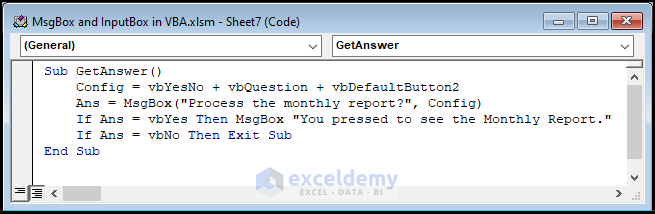
This is how you create interactive decision points in your macros. For instance, you can ask for confirmation before performing a destructive action like deleting data.
The video you just watched also explains this concept very clearly.
How to Master the VBA Message Box in 6 Minutes
Let's return to the "Master the VBA Message Box" video to see how to handle user clicks.
Watch the section from on handling return values. Pay close attention to how a variable is declared to store the result and how an If statement checks that result against constants like vbYes. Also, watch the brief segment on setting a default button. This is a subtle but important feature for improving user experience, especially to prevent accidental clicks on dangerous options.
Let's write a practical example. This macro will ask the user if they want to clear the contents of a specific range. The action will only proceed if the user clicks "Yes."
Option Explicit

Sub ConditionalClear()
    ' Declare a variable to hold the user's response
    Dim userResponse As VbMsgBoxResult

    ' Display a message box and store the result
    userResponse = MsgBox("Are you sure you want to clear all data in range A1:C10?", _
                          vbYesNo + vbCritical + vbDefaultButton2, _
                          "Warning: Data Deletion")

    ' Check which button was pressed
    If userResponse = vbYes Then
        ' If 'Yes', then proceed with the action
        ActiveSheet.Range("A1:C10").ClearContents
        MsgBox "Data has been cleared.", vbInformation, "Complete"
    Else
        ' If 'No' (or the box was closed), do nothing and inform the user
        MsgBox "Operation cancelled.", vbInformation, "Cancelled"
    End If
End Sub
Notice the use of vbCritical to show a warning icon and vbDefaultButton2 to make "No" the default choice, preventing users from accidentally pressing Enter and deleting data.
3. Getting User Input with InputBox
While MsgBox is for presenting choices, InputBox is for collecting information. It displays a prompt and a text box where the user can type a value. Your VBA code can then capture this value in a variable and use it.
Complete Guide to VBA InputBox and MsgBox
This guide provides a solid overview of the InputBox function.
Please read the sections titled Basic Usage and Defaults. This covers the syntax for prompting the user and providing a default value in the input field.
A common pattern is to get input from a user and then confirm it or use it in a message. For example:
Sub GreetUser()
    Dim userName As String

    ' Prompt the user for their name, providing a default
    userName = InputBox("Please enter your name:", "User Registration", "Guest")

    ' Use the input in a message box
    MsgBox "Welcome, " & userName & "!", vbInformation
End Sub
Handling the "Cancel" Button
A tricky aspect of the standard InputBox is that it returns an empty string ("") whether the user clicks "Cancel" or clicks "OK" without typing anything. For building robust tools, you need to tell the difference.
Complete Guide to VBA InputBox and MsgBox
Let's look at a more advanced technique from the same guide.
Read the section Handling Cancel. This introduces a clever function, StrPtr, that allows you to reliably detect when the Cancel button has been clicked. This is a pro-level technique for error handling.
Here is the code from that guide, which provides a template for distinguishing these cases:
Sub InputBoxHandleCancel()
    Dim userInput As String
    userInput = InputBox("Enter a value:")

    If StrPtr(userInput) = 0 Then
        ' The user clicked Cancel
        MsgBox "Action was cancelled by the user.", vbInformation
    ElseIf userInput = "" Then
        ' The user clicked OK but left the box empty
        MsgBox "No input was provided.", vbExclamation
    Else
        ' The user provided a valid input
        MsgBox "You entered: " & userInput, vbInformation
    End If
End Sub
4. Advanced Input with Application.InputBox
Excel provides its own, more powerful version of the input box called Application.InputBox. Its biggest advantage is a Type parameter that lets you request a specific kind of data, like a number, a date, or even an Excel range. It has built-in validation, so if the user enters the wrong type of data, Excel automatically shows an error message.
This saves you from writing extra validation code and is incredibly useful for freelancer projects where you need to ensure data integrity.
The following video provides an excellent comparison between the standard VBA.InputBox and the more powerful Application.InputBox.
VBA.Inputbox Vs Application.Inputbox in Excel VBA
This video from PK: An Excel Expert clearly demonstrates the differences and advantages of using Application.InputBox.
Please watch these key segments: First, understand the key difference: the Type parameter. Next, see an example of Type:=1 for enforcing numeric input. Notice the automatic validation message if you enter text. Finally, watch the powerful Type:=8 example for selecting a range. This allows a user to select cells directly with their mouse instead of typing addresses.
Using Application.InputBox with Type:=8 is a fantastic way to make your tools interactive. You can ask the user which range they want to process, and then use a For Each loop (from our previous lesson) on their selection.
Here's an example that combines these concepts. It asks the user to select a range and then highlights all negative numbers within that selection.
Sub HighlightNegativeInSelection()
    Dim targetRange As Range
    Dim cell As Range

    ' Use Application.InputBox to get a range from the user
    ' On Error Resume Next prevents an error if the user clicks Cancel
    On Error Resume Next
    Set targetRange = Application.InputBox("Please select the range to analyze.", _
                                           "Select Range", Type:=8)
    On Error GoTo 0 ' Resume normal error handling

    ' Check if the user clicked Cancel or closed the dialog
    If targetRange Is Nothing Then
        MsgBox "Operation cancelled.", vbInformation
    Else
        ' Loop through the user-selected range
        For Each cell In targetRange
            If IsNumeric(cell.Value) And cell.Value < 0 Then
                cell.Interior.Color = vbRed
                cell.Font.Color = vbWhite
            End If
        Next cell
        MsgBox "Negative numbers have been highlighted in the selected range.", vbInformation
    End If
End Sub
This macro is flexible and powerful. It lets the user decide what data to process each time it runs, a much better design than hard-coding a range like "A1:C10".
Conclusion
In this lesson, you've learned how to make your VBA macros communicate with the user. This is a fundamental skill for building applications that are not just automated, but also interactive and user-friendly.
Key Takeaways:
MsgBoxis used to display information and ask for simple confirmation (e.g., Yes/No, OK/Cancel). You can customize its buttons, title, and icon.- The value returned by
MsgBoxcan be captured in a variable and used withIf...Thenstatements to control your code's logic. InputBoxis used to get free-form text input from a user. You can useStrPtrto reliably check if the user clicked "Cancel".Application.InputBoxis a more powerful version with aTypeparameter that provides built-in data validation, making your tools more robust. UsingType:=8allows users to select cell ranges directly.
You have now completed the "Introduction to Macros and VBA" module. You've gone from recording your first macro to writing loops and creating interactive prompts. In our next module, "Intermediate VBA Programming," we will build on this foundation. The first lesson will take a deep dive into the VBA Object Model, teaching you how to precisely reference and manipulate any element in Excel—from workbooks and worksheets down to individual cells.