Welcome to your next lesson on Excel automation. In our previous session, we prepared your Excel environment by enabling the Developer tab and understanding the crucial macro security settings. With that essential groundwork complete, you're now ready to move from theory to practice.
Today, you will create your very first macro. This lesson is all about the Macro Recorder, a fantastic tool that translates your actions in Excel directly into VBA code. You will learn to record a sequence of steps, run that sequence with a single click, and even peek "under the hood" to view and make simple edits to the generated code. This is a foundational skill that opens the door to automating your repetitive tasks and is your first practical step towards building sophisticated client solutions.
1. The Macro Recorder: Your First Step into Automation
Think of the Macro Recorder as a tool that watches over your shoulder, meticulously writing down every click, keystroke, and command you execute in Excel. It then packages these instructions into a "subroutine" (a block of code) that you can replay at any time. This process allows you to automate tasks without writing a single line of code from scratch.
More importantly, for someone learning VBA, the recorder is an invaluable teacher. By recording an action you know how to perform manually, you can then study the code Excel generates, which is one of the best ways to learn the VBA language.
Let's begin by understanding the basic concept and process.
Excel Macros & VBA - Tutorial for Beginners
The video "Excel Macros & VBA - Tutorial for Beginners" by Kevin Stratvert provides an excellent introduction. It explains why macros are useful and walks through the entire process of recording a simple formatting task.
Please watch the first part of the video, from the beginning to the end of the recording process. Pay close attention to the "Record Macro" dialog box and the options for naming your macro and assigning a shortcut key.
2. Recording Your First Macro: A Hands-On Exercise
Now it's your turn to apply what you've just seen. We will record a simple macro that applies a standard "header" format to a cell.
1. Set up your worksheet:
In a new, blank Excel sheet, type "Monthly Sales Report" in cell A1, "Region" in cell A2, and "Sales" in cell B2.
2. Start the Recorder:
- Select cell A1. This is important, as the macro will start by acting on whatever cell is active.
- Go to the Developer tab and click Record Macro.
- The "Record Macro" dialog box will appear.
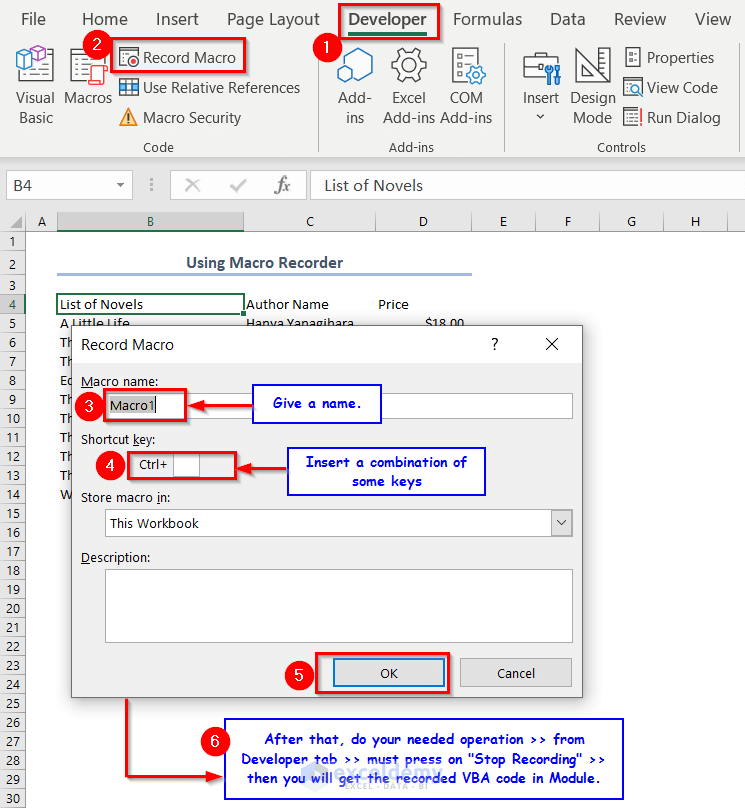
- Macro name: Type
ApplyHeaderFormat. Remember, macro names cannot contain spaces. - Shortcut key: In the box next to
Ctrl+, typeShift+H. This makes the shortcutCtrl+Shift+H. Using Shift helps avoid conflicts with common Excel shortcuts. - Store macro in: Leave this as This Workbook. We will explore the other options later.
- Description: Type "Applies a standard bold, blue fill, and white font format for report headers."
- Click OK.
3. Perform the actions to record:
From this moment on, everything you do is being recorded. Notice the "Record Macro" button has changed to "Stop Recording."
- With cell A1 still selected, go to the Home tab.
- Click Bold.
- Change the Fill Color to a dark blue.
- Change the Font Color to white.
- Click on cell A2 to move the selection away. This is also a recorded step.
4. Stop the Recorder:
- Go back to the Developer tab and click Stop Recording.
You have just created your first macro! It might not feel like much happened, but Excel has written a small program based on your actions.
3. Running Your Macro
Now for the rewarding part: putting your macro to work. There are several ways to run, or "call," a macro.
1. Using the Shortcut Key:
- Select a different cell, for example, C5, and type "Test Header".
- Press the shortcut you assigned: Ctrl+Shift+H. Instantly, the formatting you recorded is applied to the cell.
2. Using the Macros Dialog Box:
- Select another cell, for instance, C6, and type "Another Test".
- Press Alt+F8 to open the Macros dialog box (or go to Developer > Macros).
- You will see
ApplyHeaderFormatin the list. Select it and click Run. The formatting is applied again.
3. Assigning the Macro to a Button:
For creating user-friendly tools, assigning macros to buttons is a common practice.
Lesson 2 : Record Your First Macro And Run It
This article from ListenData includes a helpful animated guide showing how to insert a button and link it to a macro.
Follow the instructions in the section "Insert a button to run macro". Use these steps to create a button on your worksheet and assign your ApplyHeaderFormat macro to it.
After following the guide, you'll have a clickable button on your sheet. You can right-click the button to edit its text (e.g., to "Apply Format"). Now, whenever you click it, your macro will run.
4. Viewing and Editing Your Macro's Code
The Macro Recorder is a gateway to the Visual Basic Editor (VBE), the environment where all VBA code lives. Let's look at the code you just generated and make a small change.
1. Open the VBE:
- Press Alt+F11, or go to the Developer tab and click Visual Basic.
- The VBE window will open. On the left, in the "Project Explorer" pane, you will see your workbook listed. Underneath it, you'll find a folder called "Modules".
- Double-click on Module1. The code for your macro will appear in the main window on the right.
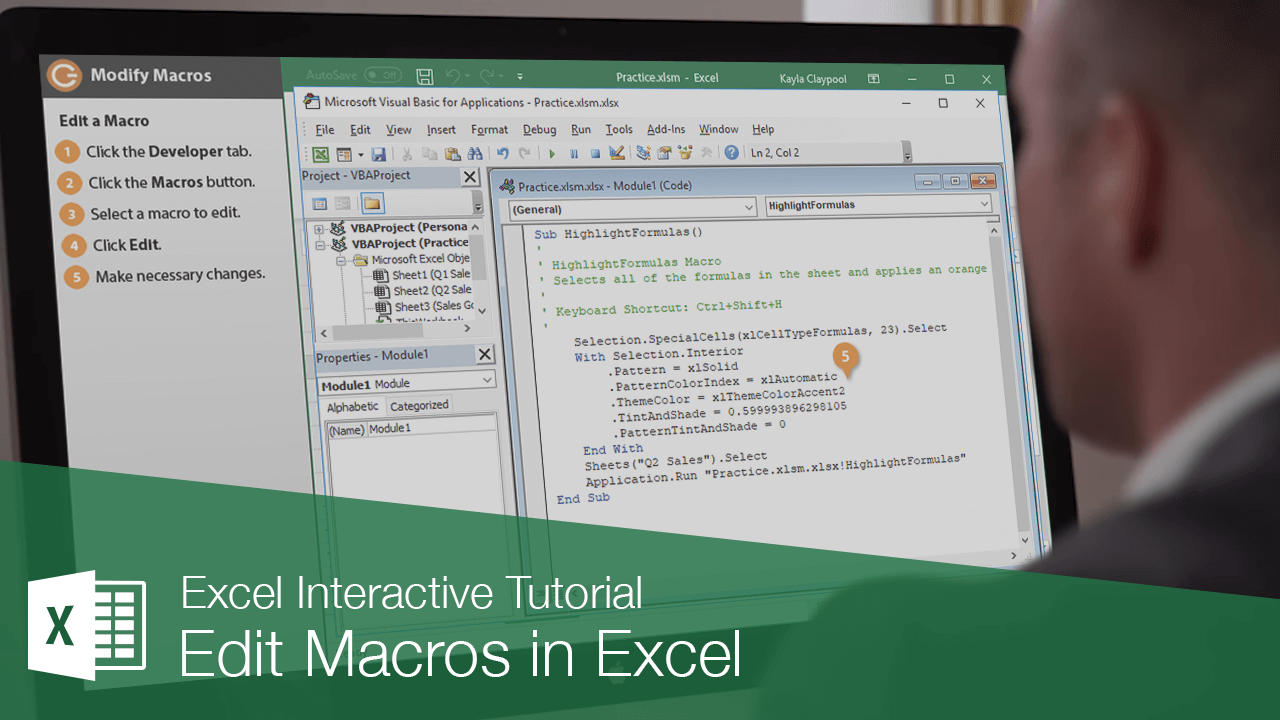
Your code should look something like this:
Sub ApplyHeaderFormat()
'
' ApplyHeaderFormat Macro
' Applies a standard bold, blue fill, and white font format for report headers.
'
' Keyboard Shortcut: Ctrl+Shift+H
'
    With Selection.Font
        .Name = "Calibri"
        .Bold = True
        .Size = 11
    End With
    With Selection.Interior
        .Pattern = xlSolid
        .PatternColorIndex = xlAutomatic
        .ThemeColor = xlThemeColorAccent1
        .TintAndShade = -0.249977111117893
    End With
    Selection.Font.Color = vbWhite
    Range("A2").Select
End Sub
Note: The exact color codes may vary slightly based on your Excel version and theme.
2. Making a Simple Edit:
This code might look complex, but you can read it like a set of instructions. For example, Selection.Font.Bold = True is the line that makes the text bold.
Let's make a simple edit. Find the line .Bold = True and change it to .Bold = False.
3. Test Your Edit:
- Go back to your Excel sheet (you can press Alt+F11 again).
- Select a new blank cell.
- Run your macro again using any of the methods you learned (shortcut, button, or Alt+F8).
This time, the macro applies the blue fill and white text, but it does not make the font bold. You have successfully edited a macro! This simple change demonstrates that you have full control over the code. Even if you start with the recorder, you can always refine the result manually.
5. A Crucial Concept: Absolute vs. Relative References
By default, the macro recorder uses absolute references. When you recorded selecting cell A2 at the end, the code specifically wrote Range("A2").Select. This means every time the macro runs, it will always end by selecting cell A2, no matter where you started.
Often, you want a macro to work relative to your starting position. For this, you can enable "Use Relative References" on the Developer tab before you start recording.
Excel Macros & VBA - Tutorial for Beginners
This concept is critical for making your macros reusable. Kevin Stratvert's video explains the difference clearly.
Please watch the segment from on relative references. He demonstrates how recording with this option enabled changes the macro's behavior to act on the currently active cell, rather than a fixed one.
Conclusion
In this lesson, you've made the leap from a passive user to an active creator in Excel. You now know how to capture a repetitive process and turn it into a reusable, single-click solution.
Key Takeaways:
- The Macro Recorder translates your actions into VBA code, automating tasks and helping you learn the language.
- You can run a recorded macro using a shortcut key, the Macros dialog (
Alt+F8), or by assigning it to a button or shape. - The Visual Basic Editor (
Alt+F11) is where your macro's code is stored, and you can edit this code directly to change the macro's behavior. - Understanding the difference between Absolute and Relative References is key to creating flexible and reusable macros.
- Always remember to save your work as an Excel Macro-Enabled Workbook (
.xlsm) to preserve your code.
You've now recorded, run, and edited a macro. In our next lesson, we will spend more time in the Visual Basic Editor. You will get a guided tour of its main windows and components, preparing you to start writing your own simple procedures from scratch.