Welcome to your first lesson. We're kicking off your journey to becoming an Excel expert by diving into the very heart of the software: formulas. This lesson lays the essential groundwork for everything you'll build, from sophisticated financial models to automated reports.
Today, you will learn how to perform calculations using basic arithmetic operators and, most importantly, how to control your formulas using cell references. We'll explore the three types of references—relative, absolute, and mixed. Mastering this concept is what separates basic data entry from powerful, dynamic spreadsheet creation. It's the key to writing a formula once and applying it to thousands of cells correctly, saving you immense amounts of time.
Let's begin by building your first formulas.
1. The Anatomy of a Formula: Operators and Order
At its core, an Excel formula is an expression that calculates a value. The single most important rule is that every formula must begin with an equal sign (=). This tells Excel that the contents of the cell should be calculated, not just displayed as text.
Once you type the equal sign, you can perform calculations using arithmetic operators.
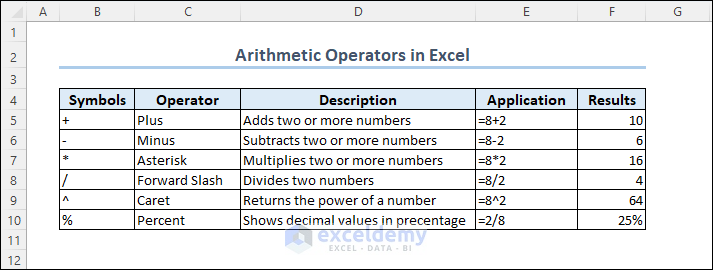
A critical concept to remember is the standard mathematical order of operations, often remembered by the acronym PEMDAS or BODMAS:
- Parentheses
() - Exponents
^ - Multiplication
*and Division/(from left to right) - Addition
+and Subtraction-(from left to right)
For example, the formula =(5 + 3) * 2 will result in 16, because the operation in the parentheses is performed first. Without the parentheses, 5 + 3 * 2 would result in 11, because multiplication is performed before addition.
To see these fundamentals in action, let's watch a short segment of a video.
Excel for Beginners: Master Formulas, Functions & Cell References
Watch this video from the Teacher's Tech channel to see how to start a formula and use the basic arithmetic operators.
Pay close attention to how every formula begins with the = sign and how Excel handles the order of operations in the final example shown from this clip.
2. Relative References: Formulas that Adapt
While performing calculations with numbers typed directly into a formula (e.g., =199 * 3) works, the true power of Excel comes from cell referencing. Instead of using fixed numbers, you refer to the cells that contain the numbers. This makes your spreadsheet dynamic: if the data in a referenced cell changes, the formula result updates automatically.
The default type of reference in Excel is relative. A relative reference, like B2 or C2, is interpreted by Excel based on its position relative to the cell containing the formula. When you copy a formula with relative references to another cell, the references adjust automatically.
This is incredibly useful. For example, if you have a list of prices in column B and quantities in column C, you can write the formula =B2*C2 in cell D2 to calculate the total for the first item. Then, you can use the Fill Handle (the small square at the bottom-right corner of the selected cell) to drag the formula down. Excel will automatically change the formula in cell D3 to =B3*C3, in D4 to =B4*C4, and so on.
The next part of the video you just watched demonstrates this perfectly.
Excel for Beginners: Master Formulas, Functions & Cell References
This segment shows why cell referencing is superior to hard-coding numbers and introduces relative references using a practical sales example.
Watch from this part to see how to create a dynamic formula and use the fill handle to copy it down. Notice how the cell references change in each new row.
3. Absolute References: Locking a Cell
Sometimes, you don't want a cell reference to change when you copy a formula. A common scenario is when you have a single value, like a tax rate or a commission percentage, that should apply to all calculations.
If you try to use a relative reference for this constant value, it will shift when you drag the formula, leading to errors. To prevent this, you use an absolute reference.
An absolute reference is created by adding dollar signs ($) before the column letter and the row number (e.g., $G$1). The dollar signs "lock" the reference, so it remains fixed on that specific cell no matter where you copy the formula.
A quick way to make a reference absolute is to press the F4 key on your keyboard after selecting the reference in the formula bar.
Let's see this in action.
Excel for Beginners: Master Formulas, Functions & Cell References
Continuing with the same video, this section explains why relative references can fail and how to use absolute references to fix the problem.
Watch from this segment. The example of applying a fixed tax rate clearly illustrates the need for an absolute reference and demonstrates the use of the $ signs and the F4 shortcut.
For a textual summary and another example of relative versus absolute references, you can review the following article.
Absolute, Relative, and Mixed Cell References in Excel
This article from TrumpExcel provides clear definitions and examples for relative and absolute references.
Read the sections titled What are Relative Cell References in Excel? and What are Absolute Cell References in Excel?. Focus on understanding how the formula changes (or doesn't change) when copied.
4. Mixed References: Partial Locking
What if you need to lock just the column but allow the row to change, or vice-versa? This is where mixed references come in. A mixed reference locks either the column or the row, but not both.
$A1: The column (A) is absolute, but the row (1) is relative. When you copy this formula, the column will always be A, but the row number will adjust.A$1: The column (A) is relative, but the row (1) is absolute. When you copy this formula, the row will always be 1, but the column letter will adjust.
Mixed references are essential for creating more complex tables, like a multiplication table or a tiered commission schedule, where you need to reference values from both a specific row and a specific column simultaneously.
You can cycle through the different reference types by pressing the F4 key repeatedly:
A1(relative) -> press F4$A$1(absolute) -> press F4A$1(mixed, row locked) -> press F4$A1(mixed, column locked) -> press F4
The following image provides a great visual summary of the three reference types.
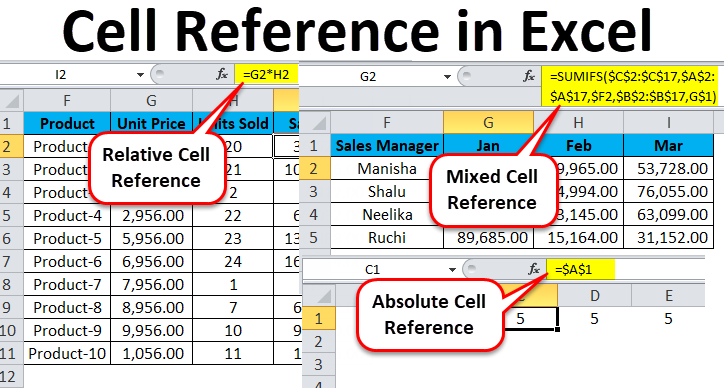
The next video gives an excellent demonstration of all three types, with a particularly clear example of when and how to use mixed references.
Excel Cell Reference: Absolute, Relative or Mixed?
In this video, Leila Gharani provides concise examples for all three reference types, culminating in a powerful use case for mixed references.
First, watch the demonstration of relative references. Next, see how absolute references are used to calculate percentages against a grand total. Finally, and most importantly, pay close attention to the explanation of mixed references. The logic of deciding whether to lock the row or the column is key here.
5. Time to Practice
As you requested a hands-on learning style, this is your chance to apply these concepts. The following resource contains practical exercises. Your goal for each is to write a single formula in the first cell and then use the fill handle to copy it to the rest of the table to get the correct results. This will require you to think carefully about which parts of your cell references need to be locked.
Practice Exercises on Absolute and Mixed Cell References
This webpage from Ohio Computer Academy provides excellent practice scenarios for absolute and mixed references.
Open a blank Excel sheet and try to recreate and solve these three exercises. Exercise 1: Focus on the section starting with the dataset. You'll need an absolute reference for the discount rate. Exercise 2: Now try the second problem, which starts with courses and fees. This will require a mixed reference to lock the discount column when you fill horizontally. Exercise 3: Finally, tackle the third problem involving currency conversion. This is another mixed reference scenario, but this time you'll need to lock the row containing the conversion rates. Don't worry if you don't get it right on the first try. The process of debugging your formula is a huge part of learning. If you get stuck on the second exercise, the page author has provided a detailed solution in the comments section.
Conclusion
In this foundational lesson, you have learned the essential mechanics of creating formulas in Excel. We've moved from simple arithmetic to the powerful and flexible system of cell referencing.
Here are the key takeaways:
- All formulas must begin with an
=sign. - Excel follows the standard order of operations (PEMDAS/BODMAS).
- Relative references (e.g.,
A1) are the default and adjust when a formula is copied. - Absolute references (e.g.,
$A$1) are fixed and do not change when a formula is copied. They are perfect for constants like tax rates. - Mixed references (e.g.,
$A1orA$1) lock either the column or the row, providing flexibility for more complex layouts. - The F4 key is your most valuable shortcut for quickly toggling between these reference types.
You have now built a solid foundation. In our next lesson, we will continue expanding your formula toolkit by exploring some of the most common and useful functions in Excel: SUM, AVERAGE, COUNT, MIN, and MAX.