Welcome back! In our last lesson, you took a significant step by learning how to interact with the Excel Object Model, giving you the ability to command worksheets and ranges directly. We focused on the principle of avoiding .Select and instead manipulating objects for cleaner, more efficient code.
This lesson builds directly on that foundation. Now that you know how to reference any cell or range, we'll introduce the engine that powers most automation: loops. You've already had a brief encounter with the For Each loop, but today we'll master the two other essential types: For...Next and Do...While. These structures allow you to perform repetitive actions on your data with precision and control, a core skill for any automation task you'll encounter as a freelancer. By the end of this lesson, you will be able to choose the appropriate loop for a given task and use it to perform repetitive actions on your data.
1. The For...Next Loop: Iterating a Known Number of Times
The For...Next loop is your go-to tool when you know exactly how many times you want to repeat a block of code. For example, you might want to process all 50 rows in a sales report. The loop uses a counter variable, which you can use to navigate through your data.
This is where the Cells(row, column) syntax you learned in the previous lesson becomes indispensable. By using the loop's counter as the row argument, you can systematically work your way down a column.
The video below provides a complete guide to the For...Next loop, explaining its syntax and power.
VBA For Loop - A Complete Guide
This video from Excel Macro Mastery, "VBA For Loop - A Complete Guide," is an excellent deep-dive into this topic.
Please watch the following segments: Why We Need a For Loop: This explains how loops save you from writing repetitive code and add flexibility. The Standard Format: Pay close attention to the For...To...Next syntax and the optional Step keyword, which allows you to count in different increments or even backwards. Nested Loops: This demonstrates how to place a loop inside another loop—a powerful technique for working with grids of data (rows and columns).
Basic Syntax and a Practical Example
The basic structure of a For...Next loop is:
Sub ForNextExample()
    ' Declare a counter variable, usually a Long for rows
    Dim i As Long

    ' Loop from 1 to 10
    For i = 1 To 10
        ' The code inside here will run 10 times.
        ' The value of 'i' will be 1, then 2, then 3, and so on.
        Sheet1.Cells(i, 1).Value = "Row " & i
    Next i
End Sub
In a real-world scenario, you rarely have a fixed number of rows. A common and robust pattern is to first find the last row of data and then use that as the endpoint for your loop.
Sub ProcessAllRows()
    Dim lastRow As Long
    Dim i As Long

    ' Use the Code Name of the sheet for reliability
    With Sheet1
        ' Find the last row with data in column A
        lastRow = .Cells(.Rows.Count, "A").End(xlUp).Row

        ' Loop from the second row (to skip headers) to the last row
        For i = 2 To lastRow
            ' Example: Convert text in column B to uppercase
            .Cells(i, "B").Value = UCase(.Cells(i, "B").Value)
        Next i
    End With
End Sub
Controlling the Loop Flow
Sometimes you need more control. You might want to skip certain iterations or exit the loop entirely once you've found what you're looking for.
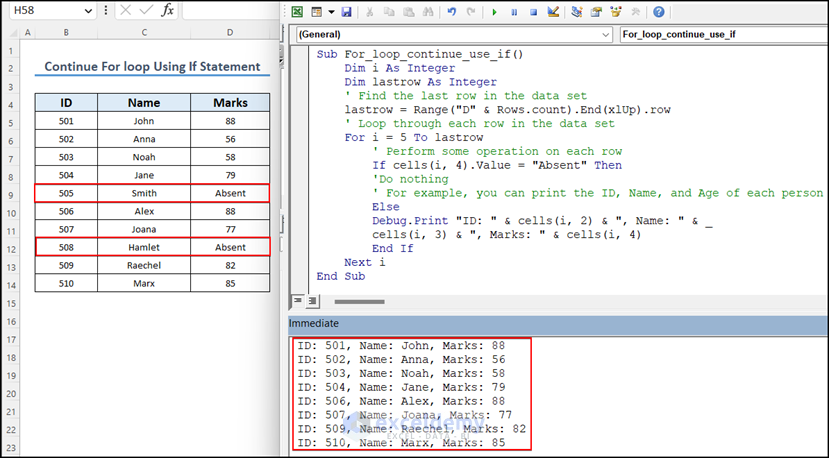
- Skipping an Iteration: VBA doesn't have a
Continue Forstatement like some other languages. Instead, you simply use anIfblock to wrap the code you want to execute. If the condition isn't met, the code is skipped, and the loop proceeds to the next iteration.
- Exiting Early: If you're searching for a specific value, it's inefficient to continue looping after you've found it. The
Exit Forstatement allows you to terminate the loop immediately.
VBA For Loop - A Complete Guide
Let's return to the "VBA For Loop" video to see how Exit For works.
Watch the short segment on the Exit For statement. Notice how it prevents the code from doing unnecessary work.
2. The Do...While Loop: Iterating Until a Condition Changes
What if you don't know how many times to loop? For instance, you need to process rows of data until you encounter the first blank cell, but that could be after 10 rows or 10,000. This is the perfect scenario for a Do...While or Do...Until loop.
Do While [condition]: The loop continues as long as the condition isTrue.Do Until [condition]: The loop continues as long as the condition isFalse(i.e., it runs until the condition becomesTrue).
These are two ways of expressing the same logic. Most developers stick with Do While for consistency.
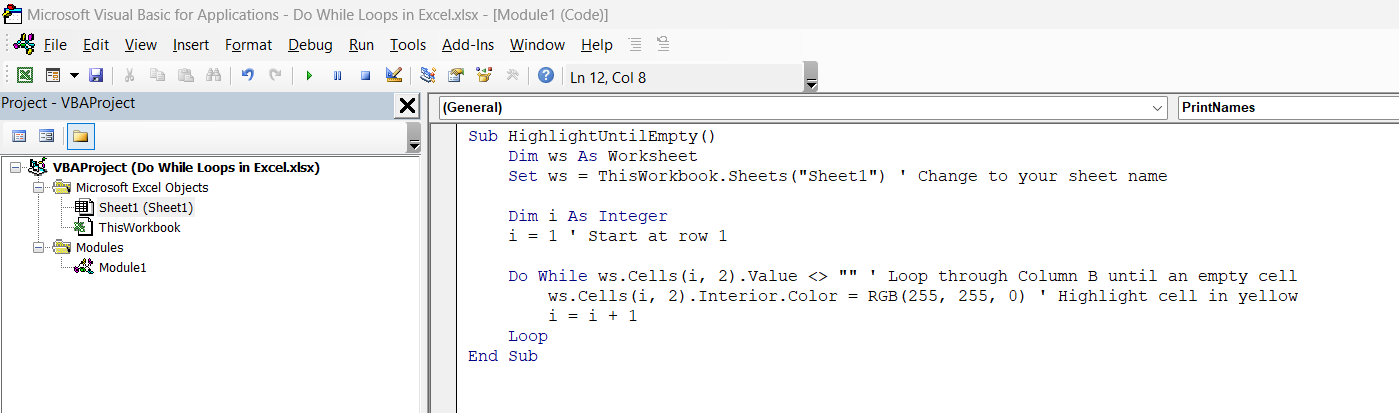
The Do loop has two syntax variations which determine when the condition is checked.
-
Check at the top:
Do While [condition] ... Loop
The condition is evaluated before the loop runs. If the condition is false on the first check, the loop will not execute at all. This is the most common and safest form. -
Check at the bottom:
Do ... Loop While [condition]
The loop code runs at least once, and the condition is evaluated at the end. This is useful when you need an action to be performed before the first check.
Let's watch a video that explains these variations clearly.
How to Master VBA loops FAST (with real coding examples)
This video, "How to Master VBA loops FAST," provides a great overview of the different loop types. We'll focus on its explanation of Do loops.
Watch the segment from on Do loops. Pay close attention to the distinction between Do While and Do Until, and the practical difference between placing the condition at the top or the bottom of the loop.
Here is a practical example of a Do While loop that finds the sum of values in column A until it hits an empty cell.
Sub SumUntilEmpty()
    Dim total As Double
    Dim i As Long

    total = 0
    i = 2 ' Start from row 2 to skip a header

    ' Loop as long as the cell in column A is not empty
    Do While Sheet1.Cells(i, "A").Value <> ""
        ' Add the cell's value to the total
        total = total + Sheet1.Cells(i, "A").Value

        ' IMPORTANT: Increment the counter manually!
        i = i + 1
    Loop

    ' Display the result
    MsgBox "The total is: " & total
End Sub
A critical difference from a For...Next loop is that you are responsible for incrementing your own counter (i = i + 1). Forgetting this will create an infinite loop that freezes Excel!
3. Choosing the Right Loop for the Job
Knowing which loop to use is key to writing effective code. Here is a simple framework to help you decide.
VBA For Loop - A Complete Guide
This article from Excel Macro Mastery provides a concise summary comparing the different loop types. While you have seen this in video format, reviewing it in text can help solidify the concepts.
Please read the section titled Summary of the VBA For Loops to reinforce the key differences.
Here's a quick summary to guide your thinking:
For Each...Next: Use when you want to act on every object in a collection (e.g., every worksheet in a workbook, every chart on a sheet) and you don't care about the order or position (index).For...Next: Use when you need to loop a specific number of times. This is the workhorse for processing structured data in ranges, where you can use the counter to move from row to row (Cells(i, 1)).Do...While(orDo...Until): Use when your loop depends on a condition rather than a fixed count. It's perfect for scenarios where the end point is unknown, like processing rows until a blank is found or reading lines from a text file.
Conclusion
You've now added two powerful tools, For...Next and Do...While, to your VBA arsenal. You can now perform complex, repetitive tasks that are central to building automations for your future clients.
Key Takeaways:
- Use a
For...Nextloop when you know the number of iterations in advance. It is ideal for stepping through rows of a known range. - Use a
Do...Whileloop when the number of iterations is unknown and depends on a condition being met (e.g., running until a cell is empty). - In a
Do...Whileloop, you must manually increment your counter variable to avoid an infinite loop. - Choosing the right loop for the task (
For Each,For Next, orDo While) is a fundamental skill in VBA programming.
In our next lesson, we will address an important reality of programming: things can go wrong. A user might delete data your code expects, or a calculation might result in an error. We will learn how to handle these runtime errors gracefully using On Error statements to make your macros more robust and professional.